Radio Shack 1201476 - AM/FM/Weather Tabletop Radio Manual
- User manual (2 pages)
Advertisement
Package Contents
- Tabletop Radio
- AC Adapter
- Remote Sensor
- User's Guide
Features
- Predicts and displays the weather forecast
- Water-resistant remote sensor transmits wirelessly up to nearly 90 feet away (accuracy based on line of sight)
- Receives all NOAA weather channels
- Stores 27 preset stations (10 AM, 10 FM, 7 weather)
- Auxiliary input for connecting other audio source
IMPORTANT SAFETY INFORMATION
- Read instructions before operating the product.
- Retain instructions for future reference.
- Heed all warnings.
- Follow all instructions.
- Do not use this apparatus near water.
- Clean only with a dry cloth.
- Do not block any of the ventilation openings. Install in accordance with the manufacturers instructions.
- Do not install near any heat sources such as radiators, heat registers, stoves, or other apparatus (including amplifiers) that produce heat.
- Do not defeat the safety purpose of the polarized or grounding - type plug. When the provided plug does not fit into your outlet, consult an electrician for replacement of the obsolete outlet.
- Protect the power cord from being walked on or pinched, particularly plugs, convenience receptacles, and the point where they exit from the radio.
- Only use attachments/accessories specified by the manufacturer.
- Unplug this radio during lightning storms or when unused for long periods of time.
- Refer all servicing to qualified service personnel. Servicing is required when the radio has been damaged in any way, such as power-supply cord or plug is damaged, liquid has been spilled or objects have fallen into the radio, the radio has been exposed to rain or moisture, does not operate normally, or has been dropped.
- The radio shall not be exposed to dripping or splashing and that no objects filled with liquids, such as vases, shall be placed on radio.
- Batteries shall not be exposed to excessive heat such as sunshine, fire or the like.
Power Your Radio
Connect the supplied AC adapter barrel plug into the AC 9V jack at the back of the unit, and plug the adapter into a standard AC outlet. The LCD backlit display lights blue.
Install Backup Batteries
Backup batteries are for power outages only. Settings and data memory will be lost if both AC is out and batteries are removed.
- Open the battery cover.
- Install three AA batteries (not included) as indicated by the polarity symbols (+ and -) marked inside.
- Replace the battery cover.

RESET
Resetting your radio clears all your saved settings.
DIMMER
Switch to LOW or HIGH to dim or brighten the radio backlit display.
AUX IN
Connect to an external audio source using a 3.5mm plug (not included).
Battery Notes
- When
![]() and the readings in the radio's RADIO/TIME display flash, replace the batteries.
and the readings in the radio's RADIO/TIME display flash, replace the batteries. - Dispose of batteries promptly and properly. Do not burn or bury them.
- Use only fresh batteries of the required size and type.
- Do not mix old and new batteries, different types of batteries (alkaline or rechargeable), or rechargeable batteries of different capacities.
- If you do not plan to use the radio for a long time, remove the batteries. Batteries can leak chemicals that can damage electronic parts.
 and the readings in the radio's RADIO/TIME display flash, replace the batteries.
 Set Up the Remote Sensor
Install Batteries
- Slide open the battery cover.
- Insert two AA batteries (not included) in the battery compartment matching the polarity symbols (+ and –) marked inside.

- Replace the battery cover.

Place the Remote Sensor
Place the sensor on a flat surface within 90 feet (27.4 m) of your radio, in an open area free from trees or other obstructions.
To mount the sensor on a wall
- Select a position that is not higher than 5 feet (1.5 m) on an outdoor wall.
- Drill a hole at the position.
- Thread a screw (not included) into the hole and let it extend slightly from the wall.
- Fit the head of the screw into the keyhole slot of the sensor.

LED
Flashes once a minute to indicate signal transmission.

 Note:
Note:
- When
![]() and the readings flash in the radio's OUTDOOR display, replace the batteries in the sensor.
and the readings flash in the radio's OUTDOOR display, replace the batteries in the sensor. - Before mounting the remote sensor, verify the radio can receive signals from the chosen location. Move the sensor closer if the radio does not receive any signals.
- Do not block vents. Do not submerge the sensor in water. Avoid exposing the sensor to direct rain, snow, or sunlight. Remove the sensor from outdoors in extreme or harsh weather. Do not place the sensor in areas of high winds.
 and the readings flash in the radio's OUTDOOR display, replace the batteries in the sensor.
Weather Forecast
The radio calculates the weather forecast for the next 12 to 24 hours, and it displays the current indoor/outdoor temperature and humidity readings.
When you power on the radio, wait for about 3 minutes to receive an outdoor signal from the remote sensor.
![]() flashes until the signal is received, then it disappears when ready.
flashes until the signal is received, then it disappears when ready.
Note: If AC power is interrupted and you have not installed backup batteries, the radio will begin searching for a signal.
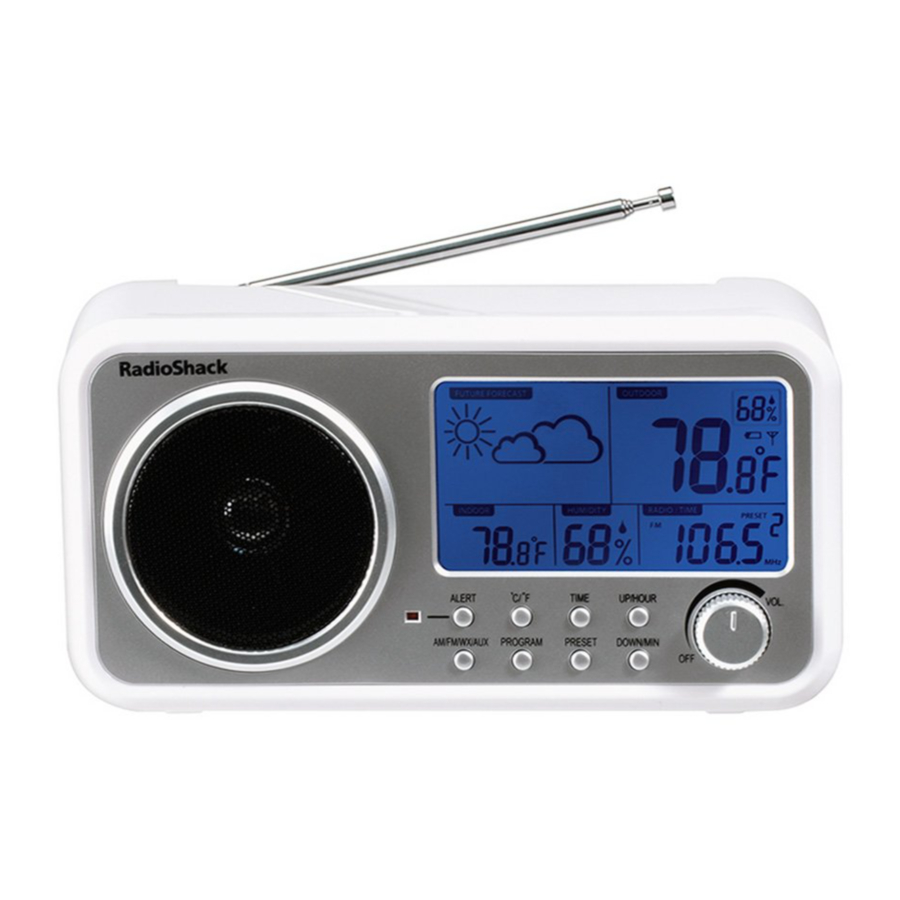
Display Overview

Buttons Overview

TIME
- Press to display the current time for 5 seconds in AM/FM/WX mode.
- Press and hold to enter time setting in standby or AUX modes.
°C/°F
Toggle between Celsius and Fahrenheit.
ALERT
Enter the alert standby mode in weather band.
AM/FM/WX/ AUX
Select band or change to auxiliary mode.
PROGRAM
Enter programming.
DOWN/MIN
- Press to tune to stations or select a weather channel. Press and hold to scan available stations.
- Adjust the minute setting.
UP/HOUR
- Press to tune to stations or select a weather channel. Press and hold to scan available stations.
- Adjust the hour setting.
PRESET
Select a preset station.
VOL
Turn to switch on/off the radio and adjust volume.
The radio displays the following weather forecast icons:
![]()
Listen to Your Radio
- Extend the antenna (for FM and weather radio).
- Rotate the OFF/VOL dial to turn on the radio and adjust the volume.
- Press AM/FM/WX/AUX repeatedly to select a radio band (AM/FM/WX).
- Press UP/HOUR or DOWN/MIN to tune a station, or press and hold UP/HOUR or DOWN/MIN to scan available stations.
- Turn VOL to OFF to switch off the radio.
Listen to an External Audio Source
- Turn on the radio.
- Use a Ç-inch (3.5 mm) audio cable (not included) to connect the earphone jack on your auxiliary audio source to AUX IN jack on the back of the radio.
- Press AM/FM/WX/AUX repeatedly until the display shows AUX to select auxiliary mode.
- Use the controls on your connected device to control playback. You can use the volume wheel on the radio to adjust the volume.
- When finished, disconnect the audio cable and turn the radio off.
Store Preset Stations
You can store 10 FM and 10 AM stations. 7 weather (WX) stations are already preset in radio.
- Press AM/FM/WX/AUX repeatedly to select the band.
- Tune to your desired station.
- Press PROGRAM to enter programming mode.
- Press UP/HOUR or DOWN/MIN to select a location (0 to 9) to store the current station and then press PROGRAM to store.
- Repeat steps 2 – 4 to store more stations, or press any other key to quit programming mode.
Listen to Preset Stations
In your selected waveband, press PRESET repeatedly to select a preset station. The display shows the corresponding preset station number.
Set the Clock
- In standby and AUX (auxiliary) mode, press and hold TIME to enter time setting.
- Press UP/HOUR to set the hour, and press DOWN/ MIN to set the minute.
- Press TIME again to enter time format setting. Then press UP/HOUR or DOWN/MIN to select 12H or 24H.
- Press TIME to confirm and exit.
Weather Alerts
To hear weather alerts, press AM/FM/WX/AUX repeatedly to select the WX band. Then press ALERT to enter the alert standby mode; the Alert Indicator lights red. When an alert is received, the Alert Indicator flashes and the radio beeps.
Press ALERT to turn on WX. Press UP/HOUR or DOWN/ MIN to select a channel to listen to the weather band broadcasts.
Reset
- Switch off the radio, remove the batteries, and unplug the adapter.
- Using a point (such as the end of paper clip or pen), press the RESET for at least 1 second. The clock time and all stations stored in the preset memory will be cleared.
- Replace batteries or reconnect your adapter and turn on the radio.
Specifications
| Power Supply | AC 9V 1000mA AC Adapter; | |
| 3 x AA Backup Batteries (not included); | ||
| 2 x AA Batteries for Sensor (not included) | ||
| Frequency Range | AM: 520 – 1710 KHz; | |
| FM: 88 –108 MHz; | ||
| WX: 162.400 – 162.550 MHz | ||
| Tuning Step | AM: 10 KHz; FM: 200 KHz; WX: 25 KHz | |
| Weather Radio Bands | ||
| Channel 1 | 162.400 MHz | |
| Channel 2 | 162.425 MHz | |
| Channel 3 | 162.450 MHz | |
| Channel 4 | 162.475 MHz | |
| Channel 5 | 162.500 MHz | |
| Channel 6 | 162.525 MHz | |
| Channel 7 | 162.550 MHz | |
| Frequency Response | 270 Hz – 1.7 KHz | |
| S/N Ratio | AM: 30dB; FM: 40dB; WX: 35dB | |
| Impedance | 8 ohm | |
| Transmission Frequency | 433 MHz | |
| RF Operating Range | 90 feet (27.4 m) | |
| Temperature Operating Range | Indoor: 32°F to 113°F (0°C to 45°C) | |
| Outdoor: -4°F to 140°F (-20°C to 60°C) | ||
| Temperature Accuracy | 32°F to 104°F (0°C to 40°C): ±1°C | |
| Humidity Range | 20% to 95% | |
| Dimensions (WHD) | 8.26 × 4.39 × 2.6 inch (210 × 112 × 66 mm) | |

Documents / ResourcesDownload manual
Here you can download full pdf version of manual, it may contain additional safety instructions, warranty information, FCC rules, etc.
Download Radio Shack 1201476 - AM/FM/Weather Tabletop Radio Manual
Advertisement


Need help?
Do you have a question about the 1201476 and is the answer not in the manual?
Questions and answers