Table of Contents
Advertisement
Quick Links
®
Installation, Operation and Maintenance Manual
Please read and save these instructions for future reference. Read carefully before attempting to assemble, install,
operate or maintain the product described. Protect yourself and others by observing all safety information. Failure
to comply with these instructions will result in voiding of the product warranty and may result in personal injury
and/or property damage.
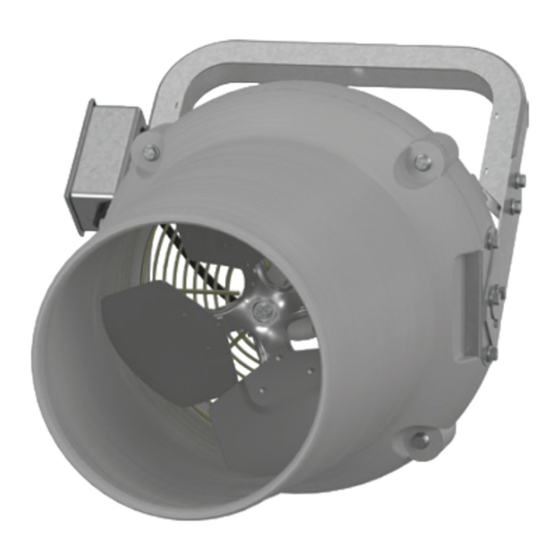
Model DDF directional destratification fans provide improved comfort
and reduced energy costs by efficiently mixing air from floor to ceiling
to improve temperature uniformity. Fans are ideal for a variety of
commercial, industrial and institutional applications, especially in
buildings with high ceilings. Features include an aerodynamically
optimized housing, high efficiency corrosion resistant propeller with
aluminum blades, electronically commutated (EC) Vari-Green
and 10 foot wiring pigtail with plug. Universal mounting bracket
includes steel hanging cable and secondary steel safety cable with
Gripple
®
installation hardware.
Important Safety Instructions
Read and save these instructions.
1. Only mount fan to building structure.
2. Read and follow all instructions, cautionary markings
and make sure power source conforms to the
requirement of the equipment.
3. Follow all local electrical and safety codes, as
well as the National Electrical Code (NEC) and the
Occupational Safety and Health Act (OSHA) in the
United States, including fire rated construction.
Ground motor in accordance with NEC Article 250
(grounding).
4. Do not use an extension cord with this fan.
5. Do not kink power cord or allow it to contact oil,
grease, hot surfaces, sharp objects or chemicals.
Replace worn or damaged cord immediately.
WARNING
Always disconnect, lock and tag power source before
servicing. Failure to disconnect power source can
result in fire, shock or serious injury. Always unplug
the power cord.
Do not insert foreign objects in between rotating fan
blades.
To reduce the risk of electric shock, do not expose to
water or rain.
Do not use general purpose fans in flammable,
explosive, chemical-laden, or wet or rainy
atmospheres. Do not attach fan to ductwork.
®
Directional Destratification Fans
motor,
®
WARNING
To reduce the risk of fire, electrical shock, or injury to
persons, observe the following:
a. Use this unit only in the manner intended by the
manufacturer. If you have questions, contact the
manufacturer.
b. Before servicing or cleaning unit, switch power off
at service panel and lock the service disconnecting
the means to prevent power from being switched
on accidentally. When the service disconnecting
means cannot be locked, securely fasten a
prominent warning device, such as a tag, to the
service panel.
c. Do not use this fan with any solid-state speed
control device.
d. Do not use replacement parts that have not been
recommended by the manufacturer.
e. Installation work and electrical wiring must be
done by a qualified person(s) in accordance with
all applicable codes and standards, including fire-
rated construction.
f. When cutting or drilling into wall or ceiling, do not
damage electrical wiring and other hidden utilities.
Directional Destratification Fans
Document 486130
Model DDF
1
Advertisement
Table of Contents

Related Manuals for Greenheck DDF


Summary of Contents for Greenheck DDF
- Page 1 Model DDF directional destratification fans provide improved comfort and reduced energy costs by efficiently mixing air from floor to ceiling to improve temperature uniformity.
- Page 2 Unpacking AVERTISSEMENT Verify that all required parts and the correct quantity of Pour écarter tout risque d’incendie, d’électrocution each item have been received. If any items are missing, ou de blessures graves, veiller à toujours débrancher, report shortages to your local representative to arrange verrouiller et étiqueter la source d’alimentation avant for obtaining missing parts.
-
Page 3: Typical Installation
Typical Installation 4. Attach the beam clamp assembly to the ceiling WARNING structure. Use the quick connect link to mount Installation and troubleshooting to be performed only the handle eyebolt on the fan to the beam clamp by qualified person(s). assembly. -
Page 4: Maintenance
Operation and Wiring button on the Gripple connector and pulling the cable in the opposite direction of the arrow marked on the Balance Dial Gripple connector. The speed control dial (P/N 385806) is factory-installed 9. Cut or secure excess safety cable to ensure it does in the 9-pin connector on the motor. -
Page 5: Parts List
Parts List Each fan bears a manufacturer’s nameplate with the model number and serial number. This information will assist the local representative and the factory in providing service and replacement parts. Before taking any corrective action, make certain unit is not capable of operation during repairs. HANDLE MOTOR INLET... -
Page 6: Maintenance Log
Maintenance Log Date ___________________Time _____________ AM/PM Date ___________________Time _____________ AM/PM Notes: ___________________________________________ Notes: ___________________________________________ _________________________________________________ _________________________________________________ _________________________________________________ _________________________________________________ _________________________________________________ _________________________________________________ _________________________________________________ _________________________________________________ Date ___________________Time _____________ AM/PM Date ___________________Time _____________ AM/PM Notes: ___________________________________________ Notes: ___________________________________________ _________________________________________________ _________________________________________________ _________________________________________________ _________________________________________________ _________________________________________________ _________________________________________________ _________________________________________________ _________________________________________________ Date ___________________Time _____________ AM/PM... - Page 7 Maintenance Log Date ___________________Time _____________ AM/PM Date ___________________Time _____________ AM/PM Notes: ___________________________________________ Notes: ___________________________________________ _________________________________________________ _________________________________________________ _________________________________________________ _________________________________________________ _________________________________________________ _________________________________________________ _________________________________________________ _________________________________________________ Date ___________________Time _____________ AM/PM Date ___________________Time _____________ AM/PM Notes: ___________________________________________ Notes: ___________________________________________ _________________________________________________ _________________________________________________ _________________________________________________ _________________________________________________ _________________________________________________ _________________________________________________ _________________________________________________ _________________________________________________ Date ___________________Time _____________ AM/PM...
-
Page 8: Our Commitment
As a result of our commitment to continuous improvement, Greenheck reserves the right to change specifications without notice. Product warranties can be found online at Greenheck.com, either on the specific product page or in the literature section of the website at Greenheck.com/Resources/Library/Literature.
Need help?
Do you have a question about the DDF and is the answer not in the manual?
Questions and answers