Advertisement
Table of Contents
Contents
LiftMaster TCLS1E, TCLS2E - Sensors Manual
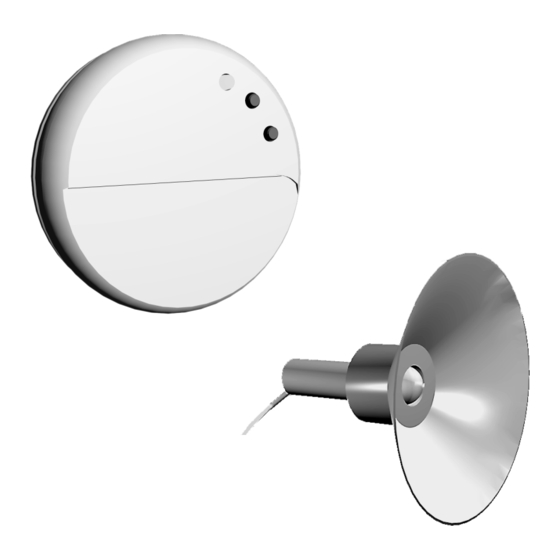
Optical and glass breakage sensor TCLS1E
- LED
- Key 1
- Key 2
- The sensor must always be horizontally installed.
- If the sensor (glass breakage function) doesn't react or if it reacts too sensitively, please realign it by turning it. Turning it anti-clockwise gives greater sensitivity. Turning it clockwise gives less sensitivity.
- If the sensor is triggered by vibration it triggers again after 60 seconds.
- Technical features
- Brightness-dependent control of one or more roller shutters in connection with the TCRX3E and TCRX2E receiver modules and the TCTRX2E programmable time switch.
- Triggering of short-term shading.
- Automatic closing of the roller shutters when darkness falls -Built-in glass breakage sensor. Closes the roller shutters automatically if anything hits the glass
- 64 Bit rolling safety code
- Battery changing on the TCLS1E
(Approx. every three years, according to use). Turn the TCLS1E and carefully remove the front panel from the housing. Now you can see the batteries and they can be changed.
You require two batteries of type: 3V / CR 2016 (2x) The housing can be closed again simply by pressing the cover and base elements together.
Please read before installation
Safety Instructions
- These safety alert symbols mean Caution - a personalsafety or property damage instruction. Please read those warnings carefully.
- Failure to comply with the following instructions may result in serious personal injury or property damage.
![]()
IT IS IMPORTANT FOR THE SAFETY OF PERSONS TO FOLLOW THESE INSTRUCTIONS. SAVE THESE INSTRUCTIONS.- Installation, examination and operation of the 230V connection should be performed by an electrician.
- Installation and wiring must be in compliance with your local building and electrical codes.
- Do not allow children to play with fixed controls. Keepremote controls away from children.
- Programming of the device (see Linking...) should bedone before the final installation of the transmitter. During this the devices should be no further than 5 metres from one another.
- Range: About.100m in the open air, approx. 30m inbuildings
- Please carry out all the necessary settings beforefitting the sensor.

Technical data
Operating voltage.....6V, type CR 2016
Frequency....433.92 MHz
Type of enclosure....IP 40
Operating temperature range....0°C to 40°C
Range approx....30m
Conformity mark....CE
- We reserve the right to make technical changes in the interests of progress.
Linking to TCRX2E and TCTRX2E
- First the TCLS1E must be programmed to the TCRX3Eor TCRX2E receiver module or the TCTRX2E timer switch:
- TCRX3E: Briefly press the black knob on the top of the TCRX3E. You will hear a pulsating signal. Press the top key on the TCLS1E. The signal will stop. (Programming is complete)
- TCRX2E: Press the two knobs on the TCRX2E. You will hear a pulsating signal. Press the top key on the TCLS1E.
The signal will stop. (Programming is complete). - TCTRX2E: Select menu mode on the TCTRX2E. Select Setup. Select Radio and then Learn. On the display appears the word Transmit. Press one of the two knobs on the TCLS1E. The word Sensor now appears. (Programming is complete).
Shading function
- Stick the TCLS1E on the glass pane at the position the shutter should travel to for desired lighting.
- Press the two knobs on the TCLS1E simultaneously. The LED will light up in red. Release the knobs. The LED will flash in green and yellow for about 8 seconds. While it is flashing press knob 1. The LED will briefly light up in green. Programming is then complete. In order to test the shading function, push the lower button of the sensor. The test will then be performed (this is possibly only once). The shutter will travel downwards until it reaches the level of the sensor. It will then stop, reverse until the light sensor is no longer obstructed and then stop again.
- The roller shutter will now close approx.15 minutes after the set brightness level has been reached and open again approx. 15 minutes after deletion of the set brightness level.
- . Deactivation of the shading function.
Press the two knobs on the TCLS1E simultaneously until the LED briefly lights up in red. Release the knobs. The LED will flash in green and yellow. Press the top knob on the sensor until the LED lights up in red. The shading function has now been deactivated but the settings are retained. - Reactivation of the shading function. Press the two knobs on the sensor simultaneously until the LED briefly lights up in red. Release the knobs. The LED will flash in green and yellow. Press the top knob until the LED lights up in green. The shading function has now been reactivated.
Complete closing in the evening
- Wait until the time of day when the roller shutters should close. Press both knobs on the sensor simultaneously. The LED briefly lights up in red, release knobs. The LED then flashes in yellow and green.
- While it is flashing press key 2 on the sensor. The LED lights up in yellow. The roller shutters will completely close now 15 minutes after reaching the set brightness level.
- Deactivation of complete closing.
Press the two knobs on the TCLS1E simultaneously until the LED briefly lights up in red. Release the knobs. The LED will flash in green and yellow. Press the lower knob on the sensor until the LED lights up in red. Complete closing has now been deactivated but the settings are retained. - Reactivation of complete closing
Press the two knobs on the sensor simultaneously until the LED lights up in red. Release the knobs. The LED will flash in green and yellow. Press lower knob until the LED turns yellow. The shading function has now been reactivated.
Glass breakage sensor
- The TCLS1E will react against blows against the window pane and will trigger complete closure of the roller shutters.
- Activation of the glass breakage sensor function: Press the two knobs on the sensor simultaneously until the LED briefly lights up in red. Hold down both knobs until the LED lights up in red for a second time after about 4 seconds. The glass breakage sensor function is now activated. If the sensor reacts too sensitively against slight vibrations turn the device about its axis to reduce the sensitivity. 6.4 Deactivation of the glass breakage sensor function.
Press the two knobs on the sensor simultaneously until the LED briefly lights up in red. Hold down both knobs for about 4 seconds until the LED lights up in green. The glass breakage sensor function is now deactivated.
If it doesn't function
- Always place the sensor horizontally. (Align the line onthe sensor parallel to the horizontal plane)
- Turn the sensor by one to two degrees if it reacts toosensitively (glass breakage function).
- During programming the distance between the sensorand timer should be no more than 5 metres.
- Replace the two batteries in the sensor.
- Ensure that you are firmly holding down the two knobsas required as well as simultaneously.
- Has the timer/receiver been correctly connected and isthere a power supply?
- Don't forget to always confirm your menu selection on the TCTRX2E with the UP key. 7.6. Hotline +49 (0) 68 38 907 172
Optical cable sensor TCLS2E
- Connection to time switch, TCT2E
- Suction bell
- Optical sensor
- Technical features
- Brightness level-dependent control of a roller shutter inconnection with the TCT2E programmable timer switch.
- Triggering of short-term shading processes.
- Automatic closing of the roller shutter when darkness falls.
Please read before installation
Safety Instructions
- These safety alert symbols mean Caution - a personalsafety or property damage instruction. Please read those warnings carefully.
- Failure to comply with the following instructions may result in serious personal injury or property damage.
![]()
IT IS IMPORTANT FOR THE SAFETY OF PERSONS TO FOLLOW THESE INSTRUCTIONS. SAVE THESE INSTRUCTIONS.- Installation, examination and operation of the 230V connection should be performed by an electrician.
- Installation and wiring must be in compliance with your local building and electrical codes.
- Do not allow children to play with fixed controls. Keep remote controls away from children.
Connection of the TCLS2E to the TCT2E
- The TCLS2E is connected to the TCT2E with a cable. Pull the module out of its frame and plug the coupling into the socket on the bottom edge under the TCT2E display.
- Now replace the timer in the frame.
Shading function
- Close the roller shutter manually until the desired shading effect has been achieved. Mark this position and reopen the shutter.
- Press the suction bell onto the inside of the window pane.
- On the TCT2E unit go to menu mode. Select Setup, then select Sensor.
- The present level of brightness is shown in the display as a black bar. The level of light after which the roller shutters should close (set value), is shown as a small dot in the upper right corner of the bar. Move this dot with the DOWN key to the right end of the black bar and then press the UP key twice. Then select Back.
- Now select Mode, then Sensor and then Only+ Sun symbol. The roller shutter closes and opens again on reaching the set brightness levels with a delay of 15 minutes.
Complete closing in the evening
- Wait until the time of day when the roller shutter should close.
- Press the suction head onto the inside of the window pane (in case the shading function has not already been adjusted).
- On the TCT2E unit go to menu mode. Select Setup, then select Sensor and press the UP key. The sun symbol at the top right of the display now changes into a moon symbol.
- The present level of brightness is again showed as a black bar. The level of light after which the roller shutters should close (set value), is shown as a small dot in the lower left corner of the bar. Move this dot with the DOWN key to the right end of the black bar and then press the UP key twice.
Then select Back. - Now select Mode, then Sensor and then Only+ Moon symbol. The roller shutter now closes completely upon reaching the set brightness level.
- If a fixed closing time has been programmed into the TCT2E and if the set value is reached earlier the roller shutter will also close earlier. If the set value is not reached until after the programmed closing time the shutter will still close at the programmed time.

Documents / ResourcesDownload manual
Here you can download full pdf version of manual, it may contain additional safety instructions, warranty information, FCC rules, etc.
Advertisement


Need help?
Do you have a question about the PROFESSIONAL TCLS1E and is the answer not in the manual?
Questions and answers