Chapters
Table of Contents

Related Manuals for AEG KFA29SIO


Summary of Contents for AEG KFA29SIO
- Page 1 DE Benutzerinformation | Kochfeld FR Notice d'utilisation | Table de cuisson Istruzioni per l’uso | Piano cottura EN User Manual | Hob KFA29SIO aeg.com\register...
-
Page 2: Table Of Contents
Willkommen bei AEG! Danke, dass Sie sich für unser Gerät entschieden haben. Holen Sie sich Anwendungshinweise, Prospekte, Fehlerbehebungs-, Service- und Reparatur-Informationen unter aeg.com/support Änderungen vorbehalten. INHALTSVERZEICHNIS 1. SICHERHEITSHINWEISE................2 2. SICHERHEITSANWEISUNGEN..............5 3. MONTAGE...................... 7 4. GERÄTEBESCHREIBUNG................10 5. TÄGLICHER GEBRAUCH................11 6. - Page 3 ordnungsgemäßer Bedienung bestehen. Kinder unter 8 Jahren und Personen mit schweren Behinderungen oder Mehrfachbehinderung sollten vom Gerät ferngehalten werden, wenn sie nicht ständig beaufsichtigt werden. • Kinder sollten beaufsichtigt werden, um sicherzustellen, dass sie nicht mit dem Gerät. • Halten Sie sämtliches Verpackungsmaterial von Kindern fern und entsorgen Sie es ordnungsgemäß.
- Page 4 • WARNUNG: Das Gerät darf nicht durch ein externes Schaltgerät, wie eine Zeitschaltuhr, mit Strom versorgt oder an einen Schaltkreis angeschlossen werden, der von einem Programm regelmäßig ein- und ausgeschaltet wird. • ACHTUNG: Der Garvorgang muss überwacht werden Ein kurzer Garvorgang muss kontinuierlich überwacht werden. •...
-
Page 5: Sicherheitsanweisungen
2. SICHERHEITSANWEISUNGEN 2.1 Montage • Entfernen Sie Trennplatten, die im Küchenmöbel unter dem Gerät installiert sind. WARNUNG! Nur eine qualifizierte Fachkraft darf die 2.2 Elektrischer Anschluss Montage des Geräts vornehmen. WARNUNG! WARNUNG! Brand- und Stromschlaggefahr. Andernfalls besteht Verletzungsgefahr und das Gerät könnte beschädigt •... - Page 6 nicht ohne Werkzeug entfernt werden Stromversorgung. So vermeiden Sie einen können. elektrischen Schlag. • Stecken Sie den Netzstecker erst nach • Benutzer mit einem Herzschrittmacher Abschluss der Montage in die Steckdose. müssen einen Mindestabstand von 30 cm Stellen Sie sicher, dass der Netzstecker zu den Induktionskochzonen einhalten, nach der Montage noch zugänglich ist.
-
Page 7: Montage
verursachen. Hebe diese Gegenstände • Bezüglich der Lampe(n) in diesem Gerät immer an, wenn du sie auf der Kochfläche und separat verkaufter Ersatzlampen: bewegen musst. Diese Lampen müssen extremen physikalischen Bedingungen in 2.4 Reinigung und Pflege Haushaltsgeräten standhalten, wie z.B. Temperatur, Vibration, Feuchtigkeit, oder •... - Page 8 3.4 Anbringen der Dichtung Nach der Montage des Kochfelds dichten Sie den verbleibenden Spalt zwischen der Glaskeramikplatte und der Arbeitsplatte mit Silikon ab. Stellen Sie sicher, dass das Silikon nicht unter die Glaskeramik gelangt. 3.5 Aufbau Wenn Sie das Kochfeld unter einer Dunstabzugshaube installieren, beachten Sie bitte die Montageanleitung der Dunstabzugshaube für den Mindestabstand...
- Page 9 3.6 Montage mehrerer Kochfelder INTEGRIERTE MONTAGE 60 30 490 mm min. 500 mm min. 50 270 mm 3.7 Anschlusskabel • Das Kochfeld wird mit einem Anschlusskabel. min. min. • Ersetzen Sie ein defektes Netzkabel durch den Kabeltyp: H05V2V2-F die einer Temperatur von 90 °C oder mehr standhält.
-
Page 10: Gerätebeschreibung
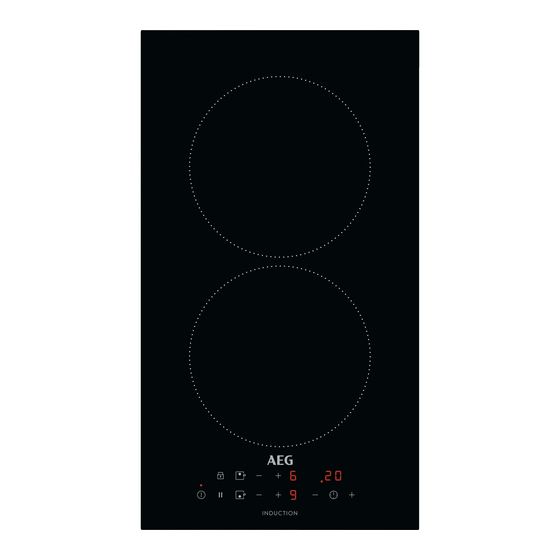
4. GERÄTEBESCHREIBUNG 4.1 Anordnung der Kochflächen Induktionskochzone Bedienfeld 180 mm 180 mm 4.2 Bedienfeldlayout Bedienen Sie das Gerät über die Sensorfelder. Die Anzeigen, Kontrolllampen und akustischen Signale informieren Sie über die aktiven Funktionen. Sensorfeld Funktion Kommentar Ein / Aus Ein- und Ausschalten des Kochfeldes. Verriegelung / Kindersiche‐... -
Page 11: Täglicher Gebrauch
Sensorfeld Funktion Kommentar Einstellen der Kochstufe. PowerBoost Einschalten der Funktion. 4.3 Anzeige der Kochstufen Display Beschreibung Die Kochzone ist ausgeschaltet. Die Kochzone ist eingeschaltet. Pause ist eingeschaltet. PowerBoost ist eingeschaltet. Eine Störung ist aufgetreten. + Zahl OptiHeat Control (3-stufige Restwärmeanzeige): Weitergaren/Warmhalten/Restwärme. Verriegelung/ Kindersicherung ist eingeschaltet. - Page 12 5.5 PowerBoost Kochstufe Das Kochfeld wird Diese Funktion stellt den ausgeschaltet nach Induktionskochzonen zusätzliche Leistung zur Verfügung. Für die Induktionskochzone 6 Std , 1 - 2 kann diese Funktion nur für einen begrenzten Zeitraum eingeschaltet werden. Danach 3 - 4 5 Std schaltet die Induktionskochzone automatisch 4 Std...
- Page 13 5.8 Verriegelung Sie können das Bedienfeld sperren, wenn Nach Ablauf der Zeit ertönt ein Kochzonen eingeschaltet sind. So wird akustisches Signal und 00 blinkt. Die verhindert, dass die Kochstufe versehentlich Kochzone wird ausgeschaltet. geändert wird. Ausschalten des Signaltons: Berühren Sie Stellen Sie zuerst die Kochstufe ein.
-
Page 14: Tipps Und Hinweise
Funktion die verfügbare Leistung zwischen und ausgeschaltet. Berühren Sie allen Kochzonen auf (die mit derselben Sekunden lang. Es wird oder angezeigt. Phase verbunden sind). Das Kochfeld steuert die Kochstufen, um die Sicherungen der Berühren Sie der vorderen linken Zone Hausinstallation zu schützen. zum Auswählen von: •... - Page 15 • Verwenden Sie aus Sicherheitsgründen unterschiedlichen Materialien und für optimale Kochergebnisse nicht (Sandwichkonstruktion). mehr Kochgeschirr als in der • Summen: Sie haben die Kochzone auf „Spezifikation der Kochzonen“ angegeben. eine hohe Stufe geschaltet. Vermeiden Sie es, Kochgeschirr während • Klicken: Elektrisches Umschalten . des Kochvorgangs in die Nähe des •...
-
Page 16: Reinigung Und Pflege
Kochstufe Verwendung für: Dauer Tipps (Min.) 6 - 7 Sanftes Braten: Schnitzel, Cordon bleu nach Be‐ Bei Bedarf umdrehen. vom Kalb, Kotelett, Frikadellen, Brat‐ darf würste, Leber, Mehlschwitze, Eier, Pfannkuchen, Krapfen. 7 - 8 Scharfes Braten, Rösti, Lendenstücke, 5 - 15 Bei Bedarf umdrehen. - Page 17 8.1 Was zu tun ist, wenn ... Störung Mögliche Ursache Problembehebung Das Kochfeld kann nicht einge‐ Das Kochfeld ist nicht oder nicht ord‐ Prüfen Sie, ob das Kochfeld ordnungs‐ schaltet oder bedient werden. nungsgemäß an die Spannungsver‐ gemäß an die Spannungsversorgung sorgung angeschlossen.
-
Page 18: Technische Daten
Code für die Glaskeramik (befindet sich in der der Garantiebroschüre. Ecke der Glasoberfläche) und eine 9. TECHNISCHE DATEN 9.1 Typenschild Modell KFA29SIO Produkt-Nummer (PNC) 949 492 562 00 Typ 61 A2A 00 AA 220 - 240 V, 50 - 60 Hz Induktion 3.65 kW Hergestellt in: Rumänien... -
Page 19: Energieeffizienz
Kochgeschirr, dessen Durchmesser ändert sich mit dem Material und den größer als der in der Tabelle angegebene Abmessungen des Kochgeschirrs. Wert ist. 10. ENERGIEEFFIZIENZ 10.1 Produktinformationen Modellbezeichnung KFA29SIO Kochfeldtyp Einbau-Kochfeld Anzahl der Kochzonen Heiztechnik Induktion Durchmesser der kreisförmigen Kochzonen (Ø) Vorne mittig 18.0 cm... -
Page 20: Umwelttipps
Ersatzteilverkauf Industriestrasse 10, 5506 die Kosten für Material, Arbeits- und Mägenwil, Tel. 0848 848 111 Reisezeit. Die Garantieleistung entfällt bei Nichtbeachtung der Gebrauchsanweisung Fachberatung/Verkauf Badenerstrasse 587, und Betriebsvorschriften, unsachgerechter 8048 Zürich, Tel. 044 405 81 11 Installation, sowie bei Beschädigung durch Garantie Für jedes Produkt gewähren wir ab äussere Einflüsse, höhere Gewalt, Eingriffe Verkauf bzw. -
Page 21: Informations De Sécurité
Bienvenue chez AEG ! Nous vous remercions d’avoir choisi l’un de nos appareils. Obtenir des conseils d’utilisation, des brochures, un dépanneur, des informations sur le service et les réparations : www.aeg.com/support Sous réserve de modifications. TABLE DES MATIÈRES 1. INFORMATIONS DE SÉCURITÉ..............21 2. - Page 22 comprennent les risques encourus. Les enfants de moins de 8 ans et les personnes ayant un handicap très important et complexe doivent être tenus à l'écart de l’appareil, à moins d'être surveillés en permanence. • Veillez à ce que les enfants ne jouent pas avec l’appareil. •...
- Page 23 couvrez les flammes, par exemple avec une couverture ignifuge ou un couvercle. • AVERTISSEMENT : L'appareil ne doit pas être branché à l'alimentation en utilisant un appareil de connexion externe comme un minuteur, ou branché à un circuit qui est régulièrement activé/désactivé...
-
Page 24: Consignes De Sécurité
2. CONSIGNES DE SÉCURITÉ 2.1 Installation 2.2 Branchement électrique AVERTISSEMENT! AVERTISSEMENT! L’appareil doit être installé uniquement Risque d'incendie ou d'électrocution. par un professionnel qualifié. • Tous les raccordements électriques doivent être effectués par un électricien AVERTISSEMENT! qualifié Risque de blessure ou de dommages •... - Page 25 • Ne tirez pas sur le câble secteur pour • N’utilisez que les accessoires débrancher l'appareil. Tirez toujours sur la recommandés pour cet appareil par le fiche de la prise secteur. fabricant. • N'utilisez que des systèmes d'isolation AVERTISSEMENT! appropriés : des coupe-circuits, des fusibles (les fusibles à...
-
Page 26: Installation
• Nettoyez l’appareil avec un chiffon doux et sont conçues pour signaler des humide. Utilisez uniquement des produits informations sur le statut opérationnel de de lavage neutres. N’utilisez pas de l’appareil. Elles ne sont pas destinées à produits abrasifs, de tampons à récurer, être utilisées dans d'autres applications et de solvants ou d’objets métalliques, sauf ne conviennent pas à... - Page 27 Installation superposée 1. Nettoyez le plan de travail autour de la zone de découpe. 2. Fixez le joint d’étanchéité 2x6 mm fourni sur le bord inférieur de la table de cuisson, le long du bord extérieur de la surface vitrocéramique. Ne l’étirez pas. min.
- Page 28 3.6 Installation de plusieurs tables INSTALLATION INTÉGRÉE de cuisson 60 30 490 mm min. 500 mm min. 50 270 mm 3.7 Câble de connexion • La table de cuisson est fournie avec un min. min. câble d’alimentation. • Pour remplacer le câble d'alimentation endommagé, utilisez le type de câble suivant : H05V2V2-F qui supporte une température minimale de 90 °C.
-
Page 29: Description De L'appareil
4. DESCRIPTION DE L'APPAREIL 4.1 Agencement des zones de cuisson Zone de cuisson à induction Bandeau de commande 180 mm 180 mm 4.2 Configuration du bandeau de commande Les touches sensitives permettent de faire fonctionner l'appareil. Les affichages, les voyants et les signaux sonores indiquent les fonctions activées. -
Page 30: Utilisation Quotidienne
Touche Fonction Commentaire sensitive Pour augmenter ou diminuer la durée. Pour sélectionner un niveau de cuisson. PowerBoost Pour activer la fonction. 4.3 Affichage du niveau de cuisson Afficheur Description La zone de cuisson est désactivée. La zone de cuisson est activée. Pause est activé. - Page 31 se désactive automatiquement au bout de L’indicateur peut également s’allumer : 2 minutes. • pour les zones de cuisson voisines, même • vous ne désactivez pas la zone de si vous ne les utilisez pas, cuisson ou ne modifiez pas le niveau de •...
- Page 32 cuisson. Le voyant de la zone de cuisson 1. Pour activer la fonction : appuyez sur la commence à clignoter. L'affichage indique la touche durée restante. s’affiche. Le niveau de cuisson est réduit à Pour désactiver la fonction : appuyez sur 2.
-
Page 33: Conseils
4 secondes. Réglez le niveau de cuisson l’alimentation électrique, cette fonction dans les 10 secondes qui suivent. Vous répartit la puissance disponible entre toutes pouvez utiliser la table de cuisson. Lorsque les zones de cuisson (raccordées à la même phase). La table de cuisson contrôle les vous éteignez la table de cuisson avec , la niveaux de cuisson pour protéger les fusibles... - Page 34 6.2 Bruits pendant le • corrects : fonte, acier, acier émaillé, acier fonctionnement inoxydable, fond multicouche (homologué par le fabricant). Si vous entendez : • incorrects : aluminium, cuivre, laiton, verre, céramique, porcelaine. • craquement : le récipient est composé de Les récipients de cuisson conviennent différents matériaux (conception pour l’induction si :...
-
Page 35: Entretien Et Nettoyage
Réglages de la Utilisez pour : Durée Conseils température (min) 3 - 4 Cuisez les légumes, le poisson et la 20 - 45 Ajouter quelques cuillères à soupe viande à la vapeur. d’eau. Vérifiez la quantité d’eau pen‐ dant le processus. 4 - 5 Pommes de terre à... -
Page 36: Dépannage
8. DÉPANNAGE AVERTISSEMENT! Reportez-vous aux chapitres concernant la sécurité. 8.1 Que faire si... Problème Cause possible Solution Vous ne pouvez pas activer la ta‐ La table de cuisson n’est pas bran‐ Vérifiez que la table de cuisson est ble de cuisson ni la faire fonction‐ chée à... -
Page 37: Caractéristiques Techniques
à 3 lettres pour la vitrocéramique (situé dans le coin de la surface en verre) et 9. CARACTÉRISTIQUES TECHNIQUES 9.1 Plaque signalétique Modèle KFA29SIO PNC 949 492 562 00 Type 61 A2A 00 AA 220 - 240 V, 50 à 60 Hz Induction 3.65 kW... -
Page 38: Rendement Énergétique
Elle change en fonction du matériau et des les diamètres indiqués dans le tableau. dimensions du récipient. 10. RENDEMENT ÉNERGÉTIQUE 10.1 Informations produits Identification du modèle KFA29SIO Type de table de cuisson Plan de cuisson intégré Nombre de zones de cuisson Technologie de chauffage Induction Diamètre des zones de cuisson circulaires (Ø) -
Page 39: Garantie
GARANTIE Service-clientèle Points de Service Industriestrasse 10 Le Trési 6 Via Violino 11 5506 Mägenwil 1028 Préverenges 6928 Manno Morgenstrasse 131 3018 Bern Langgasse 10 9008 St. Gallen Am Mattenhof 4a/b 6010 Kriens Schlossstrasse 1 4133 Pratteln Comercialstrasse 19 7000 Chur Points de vente de rechange frais de mains d’œuvres et de déplacement, Industriestrasse 10, 5506 Mägenwil,Tel. - Page 40 Pour la Suisse: Où aller avec les appareils usagés ? Partout où des appareils neufs sont vendus, mais aussi dans un centre de collecte ou une entreprise de récupération officiels SENS. La liste des centres de collecte officiels SENS est disponible sous www.erecycling.ch Concerne la France uniquement : FRANÇAIS...
-
Page 41: Informazioni Di Sicurezza
Benvenuto in AEG! Grazie per aver scelto di acquistare questo prodotto. Ricevere consigli, scaricare i nostri opuscoli, eliminare eventuali anomalie, ottenere informazioni sull'assistenza e la riparazione: www.aeg.com/support Con riserva di modifiche. INDICE 1. INFORMAZIONI DI SICUREZZA..............41 2. ISTRUZIONI DI SICUREZZA................ 44 3. - Page 42 dall’elettrodomestico, a meno che non vi sia una supervisione continua. • Sorvegliare i bambini per assicurarsi che non giochino con l’apparecchiatura. • Tenere gli imballaggi lontano dai bambini e smaltirli in modo adeguato. • AVVERTENZA: L’elettrodomestico e le parti accessibili si riscaldano molto durante l'uso.
- Page 43 o collegata a un circuito regolarmente acceso e spento da un'azienda. • ATTENZIONE! Si deve sorvegliare il processo di cottura I processi di cottura brevi devono essere sorvegliati continuamente. • AVVERTENZA: Pericolo di incendio: Non conservare alcun oggetto sulle superfici di cottura. •...
-
Page 44: Istruzioni Di Sicurezza
2. ISTRUZIONI DI SICUREZZA 2.1 Installazione 2.2 Collegamento elettrico AVVERTENZA! AVVERTENZA! L’installazione dell’apparecchiatura deve Rischio di incendio e scossa elettrica. essere eseguita da personale qualificato. • Tutti i collegamenti elettrici devono essere effettuati da un elettricista qualificato . AVVERTENZA! • Il dispositivo deve essere messo a terra. Rischio di lesioni o danni •... - Page 45 • Servirsi unicamente di dispositivi di pentole, se non diversamente specificato isolamento adeguati: interruttori dal produttore di questa apparecchiatura. automatici, fusibili (quelli a tappo devono • Usare esclusivamente accessori essere rimossi dal portafusibile), consigliati dal produttore per questa sganciatori per correnti di guasto a terra e apparecchiatura.
-
Page 46: Installazione
• Non nebulizzare acqua né utilizzare temperatura, vibrazioni, umidità, o sono vapore per pulire l’apparecchiatura. destinate a segnalare informazioni sullo • Pulire l’apparecchiatura con un panno stato operativo dell'apparecchio. Non sono inumidito e morbido. Utilizzare solo destinate ad essere utilizzate in altre detergenti neutri. - Page 47 Installazione in alto 1. Pulire il piano di lavoro attorno all'area di incasso. 2. Fissare il 2x6 mm nastro adesivo in dotazione alla parte inferiore del piano cottura, lungo il bordo esterno del vetroceramica. Non tenderlo. Assicurarsi min. min. che le estremità del nastro adesivo si 500mm 50mm trovino al centro di un lato del piano...
- Page 48 3.6 Installazione di più di un piano INSTALLAZIONE INTEGRATA cottura 60 30 490 mm min. 500 mm min. 50 270 mm 3.7 Cavo di collegamento • Il piano cottura è fornito con un cavo di min. min. collegamento. • Per sostituire il cavo di alimentazione danneggiato, usare il seguente tipo di cavo: H05V2V2-F resistente a una temperatura di 90 °C o superiore.
-
Page 49: Descrizione Del Prodotto
4. DESCRIZIONE DEL PRODOTTO 4.1 Disposizione del piano di cottura Zona di cottura a induzione Pannello dei comandi 180 mm 180 mm 4.2 Layout del pannello di controllo Utilizzare i tasti sensore per mettere in funzione l'apparecchiatura. I display, gli indicatori ed i segnali acustici mostrano quali funzioni sono attive. -
Page 50: Utilizzo Quotidiano
Tasto sen‐ Funzione Commento sore Per aumentare o ridurre il tempo. Per impostare un livello di potenza. PowerBoost Per attivare la funzione. 4.3 Display del livello di potenza Display Descrizione La zona di cottura è disattivata. La zona di cottura è in funzione. Sospendi è... - Page 51 La spia scompare quando la zona di cottura Dopo un tempo prestabilito, si accende si è raffreddata. e il piano di cottura si spegne. Rapporto tra livello di potenza e il tempo 5.5 PowerBoost trascorso il quale si spegne il piano di cottura: Questa funzione aumenta la potenza fornita alle zone di cottura a induzione.
- Page 52 Questa funzione impedisce di modificare inavvertitamente il livello di potenza. Al termine del conto alla rovescia, verrà Impostare innanzitutto il livello di potenza. emesso un segnale acustico e 00 lampeggerà. La zona di cottura si Per attivare la funzione: sfiorare disattiva.
-
Page 53: Consigli E Suggerimenti Utili
anteriore sinistra per effettuare la selezione calore per proteggere i fusibili dell'impianto seguente: domestico. • - i segnali acustici sono spenti • Se il piano cottura raggiunge il limite della potenza massima disponibile (fare • - i segnali acustici sono attivi riferimento alla targhetta dell’intervallo), la Per confermare la selezione, attendere finché... - Page 54 • Per motivi di sicurezza e risultati di cottura • ronzio: si stanno utilizzando livelli di ottimali, non utilizzare pentole di potenza elevati. dimensioni maggiori rispetto a quelle • scatto: si verifica un'accensione elettrica. indicate nelle "Specifiche delle zone di •...
-
Page 55: Manutenzione E Pulizia
Impostazione Utilizzare per: Tempo Suggerimenti di calore (min) 7 - 8 Frittura, sformato di patate, lombate, 5 - 15 Capovolgere quando necessario. bistecche. Portare a ebollizione l'acqua, cuocere la pasta, rosolare la carne (gulasch, stufati), friggere patatine. Portare a ebollizione grandi quantità d'acqua. PowerBoost è attivato. 7. - Page 56 Problema Causa possibile Soluzione È saltato il fusibile. Verificare che il fusibile sia la causa del malfunzionamento. Nel caso in cui il fusibile continui a saltare, rivolgersi ad un elettricista qualificato. Non è stato impostato il livello di ca‐ Accendere nuovamente il piano cottu‐ lore entro 10 secondi.
-
Page 57: Dati Tecnici
(si trova nell'angolo della 9. DATI TECNICI 9.1 Targhetta identificativa Modello KFA29SIO PNC 949 492 562 00 Tipo 61 A2A 00 AA 220 - 240 V, 50 - 60 Hz Induzione 3.65 kW Prodotto in: Romania Numero di serie .... -
Page 58: Efficienza Energetica
10. EFFICIENZA ENERGETICA 10.1 Informazioni sul prodotto Identificazione modello KFA29SIO Tipo di piano cottura Piano cottura a incasso Numero di zone di cottura Tecnologia di riscaldamento Induzione Diametro delle zone di cottura circolari (Ø) Anteriore centrale 18.0 cm Parte posteriore centrale 18.0 cm... -
Page 59: Considerazioni Sull'ambiente
Garanzia Per ogni prodotto concediamo una copertura sono esclusi il logoramento ed i garanzia di 2 anni a partire dalla data di danni causati da agenti esterni, intervento di consegna o dalla sua messa in funzione. (fa terzi, utilizzo di ricambi non originali o dalla stato la data della fattura, del certificato di inosservanza delle prescrizioni d’istallazione garanzia o dello scontrino d’acquisto) Nella... -
Page 60: Safety Information
Welcome to AEG! Thank you for choosing our appliance. Get usage advice, brochures, trouble shooter, service and repair information: www.aeg.com/support Subject to change without notice. CONTENTS 1. SAFETY INFORMATION................60 2. SAFETY INSTRUCTIONS................62 3. INSTALLATION.....................64 4. PRODUCT DESCRIPTION................67 5. - Page 61 • Children should be supervised to ensure that they do not play with the appliance. • Keep all packaging away from children and dispose of it appropriately. • WARNING: The appliance and its accessible parts become hot during use. Keep children and pets away from the appliance when in use and when cooling down.
-
Page 62: Safety Instructions
• Metallic objects such as knives, forks, spoons and lids should not be placed on the hob surface since they can get hot. • Do not use the appliance before installing it in the built-in structure. • Do not use a steam cleaner to clean the appliance. •... - Page 63 – Do not store any small pieces or • If the mains socket is loose, do not sheets of paper that could be pulled in, connect the mains plug. as they can damage the cooling fans • Do not pull the mains cable to disconnect or impair the cooling system.
-
Page 64: Installation
• Switch off the appliance and let it cool WARNING! down before cleaning. • Do not use water spray and steam to Risk of fire and explosion. clean the appliance. • Fats and oil when heated can release • Clean the appliance with a moist soft flammable vapours. - Page 65 3.3 Electrical connection 4. Attach the stripes to the rabbets. Do not stretch the stripes. Do not bond the ends Install the hob with a socket supply line. If of the stripes one over the other. there is no socket supply line, the fixed home After you assemble the hob, seal the electrical system must include an isolating remaining gap between the glass ceramic...
- Page 66 3.6 Installation of more than one INTEGRATED INSTALLATION 60 30 490 mm min. 500 mm min. 50 270 mm 3.7 Connection cable • The hob is supplied with a connection min. min. cable. • To replace the damaged mains cable, use the cable type: H05V2V2-F which withstands a temperature of 90 °C or higher.
-
Page 67: Product Description
4. PRODUCT DESCRIPTION 4.1 Cooking surface layout Induction cooking zone Control panel 180 mm 180 mm 4.2 Control panel layout Use the sensor fields to operate the appliance. The displays, indicators and sounds tell which functions operate. Sensor Function Comment field On / Off To activate and deactivate the hob. -
Page 68: Daily Use
Sensor Function Comment field To increase or decrease the time. To set a heat setting. PowerBoost To activate the function. 4.3 Heat setting displays Display Description The cooking zone is deactivated. The cooking zone operates. Pause operates. PowerBoost operates. There is a malfunction. + digit OptiHeat Control (3 step Residual heat indicator): continue cooking / keep warm / resid‐... - Page 69 The relation between the heat setting and The indicator disappears when the cooking the time after which the hob deactivates: zone has cooled down. 5.5 PowerBoost Heat setting The hob deactivates after This function makes more power available to the induction cooking zones. The function can 6 hours , 1 - 2 be activated for the induction cooking zone...
- Page 70 5.9 Child Safety Device • Minute Minder You can use this function when the hob is This function prevents an accidental activated and the cooking zones do not operation of the hob. operate. The heat setting display shows To activate the function: activate the hob To activate the function: touch and then with...
-
Page 71: Hints And Tips
• If the hob reaches the limit of maximum selected heat setting and the reduced heat available power (refer to the rating plate), setting. the power of the cooking zones will be • Wait until the display stops flashing or automatically reduced. -
Page 72: Care And Cleaning
is not proportional to the increase of the consumption of power. It means that a cooking zone with the medium heat setting The data in the table is for guidance only. uses less than a half of its power. Heat setting Use to: Time Hints... -
Page 73: Troubleshooting
abrasive detergent. After cleaning, wipe • Remove shiny metallic discoloration: the hob dry with a soft cloth. use a solution of water with vinegar and clean the glass surface with a cloth. 8. TROUBLESHOOTING WARNING! Refer to Safety chapters. 8.1 What to do if... Problem Possible cause Remedy... -
Page 74: Technical Data
(it is in the corner of the glass guarantee booklet. surface) and an error message that comes 9. TECHNICAL DATA 9.1 Rating plate Model KFA29SIO PNC 949 492 562 00 Typ 61 A2A 00 AA 220 - 240 V, 50 - 60 Hz Induction 3.65 kW Made in: Romania Ser.Nr. -
Page 75: Energy Efficiency
For optimal cooking results use cookware no larger than the diameter in the table. 10. ENERGY EFFICIENCY 10.1 Product Information Model identification KFA29SIO Type of hob Built-In Hob Number of cooking zones Heating technology Induction Diameter of circular cooking zones (Ø) Middle front 18.0 cm... -
Page 76: Environmental Concerns
Spare parts service Industriestrasse 10, proof). The guarantee covers the costs of 5506 Mägenwil, Tel. 0848 848 111 materials, labour and travel. The guarantee will lapse if the operating instructions and Specialist advice/Sale Badenerstrasse 587, conditions of use are not adhered to, if the 8048 Zürich, Tel. - Page 80 867378157-B-372023...
Need help?
Do you have a question about the KFA29SIO and is the answer not in the manual?
Questions and answers