Table of Contents
Advertisement
Advertisement
Table of Contents

Subscribe to Our Youtube Channel
Related Manuals for Ametek Reichert Tono-Vera


Summary of Contents for Ametek Reichert Tono-Vera
- Page 1 Tono-Vera ® Tonometer Q U I C K S T A R T G U I D E...
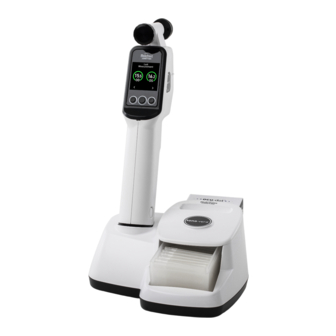
- Page 2 Getting to Know Tono-Vera Tonometer ® Flexi-Soft ™ Flexi-Soft Forehead Rest Forehead Rest Adjustment Wheel Tono-Vera® Probe Chamber Collar Display Tono-Vera® Probe Chamber Menu Button Multifunction Buttons Canthus Mark Canthus Manual Mark Measure Button Battery Pack Battery Pack Release Release USB-C Charging Port (Rechargeable Model Only)
- Page 3 Setting Up Tono-Vera Tonometer Rechargeable Battery Model Power On/Off Slide the Tono-Vera ® Li-Ion Rechargeable Battery Press any button to turn Tono-Vera on. Pack into the device until it clicks into place. To turn off, press and hold the center Multifunction Button for three seconds.
-
Page 4: Loading The Probe
Loading the Probe Main Screen Remove Ocu-Dot Probe Tube Cap. ActiView Positioning ™ System Area Insert Ocu-Dot Battery Indicator Probe Tube into Probe Chamber. Alignment Target Probe Angle Indicator Number of Measurements Rotate the unit so Measure Mode the Ocu-Dot Probe slides into the Probe OD (Right Eye) Chamber. -
Page 5: Device Orientation
Positioning Tono-Vera Tonometer will automatically measure when properly aligned. It is suggested to practice measuring with the included Tono-Vera Training Aid. It is recommended to hold the unit so the Ocu-Dot Probe and Canthus Marks are perpendicular to the eye. The unit can measure when the probe angle is ±15º from level. The probe tip should be approximately 4-8 mm from the eye. -
Page 6: Probe Angle
Aligning Correct distance, centration, and probe angle must be achieved simultaneously. The on-screen ActiView™ Positioning System guides the user to proper alignment. When the proper distance, centration, and probe angle are achieved, measurements will be taken automatically. Distance & Centration (Approximately 4-8 mm) A ring will appear when an eye is detected. -
Page 7: Understanding Results
Measuring Understanding Results High-Confidence Result Final IOP Result appears in a green ring. Low-Confidence Result Final IOP Result appears in a yellow ring. Retake Measurement No IOP Result will appear Number of Measurements in an orange ring. Final IOP Result - OD Action Screens Selected Eye - OS When taking measurements, the following... -
Page 8: Menu Screen
Measurement trademarks of Reichert, Inc. ActiView and Flexi-Soft are trademarks Selected of Reichert, Inc. (White) Not Selected AMETEK is a registered trademark (Grayed Out) of AMETEK, Inc. All other trademarks are properties of their respective owners. Select 2023-01-12 16305-105 Rev. C...
Need help?
Do you have a question about the Reichert Tono-Vera and is the answer not in the manual?
Questions and answers
Is the Tono Vera suitable for home use. The patient is a health care professional?