Table of Contents
Advertisement
Quick Links
Advertisement
Table of Contents

Related Manuals for MDHearing AIR 3


Summary of Contents for MDHearing AIR 3
- Page 1 User Manual AIR 3 Hearing Aids • Series A...
-
Page 2: Fda Warnings
FDA Warnings WARNING: If you are younger than 18, do not use this. You should go to a doctor, preferably an ear-nose-throat doctor (an ENT), because your condition needs specialized care. Over-the-counter hearing aids are only for users who are age 18 or older. This OTC hearing aid is for users who are 18 and older. - Page 3 WARNING: When to see a doctor If you have any of the problems listed below, please see a doctor, preferably an ear-nose-throat doctor (an ENT). • Your ear has a birth defect or an unusual • You get really dizzy or have a feeling of shape.
- Page 4 WARNING: This hearing aid should not cause pain when inserting it. Remove this device from your ear if it causes pain or discomfort when you insert or place it. To try again, make sure to follow the instructions. If you feel pain or discomfort again, contact the manufacturer. If your pain or discomfort doesn’t go away, contact your hearing healthcare professional.
- Page 5 Caution: This is not hearing protection. You should remove this device if you experience overly loud sounds, whether short or long-lasting. If you’re in a loud place, you should use the right kind of hearing protection instead of wearing this device. In general, if you would use ear plugs in a loud place, you should remove this device and use ear plugs.
- Page 6 If you try this device and continue to struggle with or remain concerned about your hearing, you should consult with a hearing healthcare professional. MDHearing has a team of U.S.-based licensed audiologists and hearing specialists ready to assist by phone, email, text, and video sessions.
- Page 7 Note: Tell FDA about injuries, malfunctions, or other adverse events. To report a problem involving your hearing aid, you should submit information to FDA as soon as possible after the problem. FDA calls them “adverse events,” and they might include: skin irritation in your ear, injury from the device (like cuts or scratches, or burns from an overheated battery), pieces of the device getting stuck in your ear, suddenly worsening hearing loss from using the device, etc.
-
Page 8: Table Of Contents
Troubleshooting ....35 AIR 3 Diagram.....13 Warranty &... -
Page 9: Support
Our U.S.-based team of licensed audiologists and hearing specialists are the heart and soul of MDHearing. They’re here to guide and assist you with any questions you may have. To help our professionals improve your experience and provide the most accurate advice, take our free online hearing test at www.MDHearingAid.com/hearing-test. -
Page 10: Introduction
Congratulations With the AIR 3, you are back in control of the sounds around you—thanks to digital, rechargeable technology paired with user-adjustable settings. Please read this User Manual in its entirety before using your new hearing aids. Practice and patience are important as your brain relearns how to hear. - Page 11 Superior in quality of sound, ease of use, and best value. Thank you for restoring my confidence. — Loren B.
-
Page 12: Package Contents
Package Contents b) Charging Case a) Hearing Aid(s) Thin Tubing ComfortTIP ™... - Page 13 c) Charging Accessories Cord Power Adapter d) Cleaning Tool Wire Magnet Brush *Contents will vary depending on quantity ordered.
-
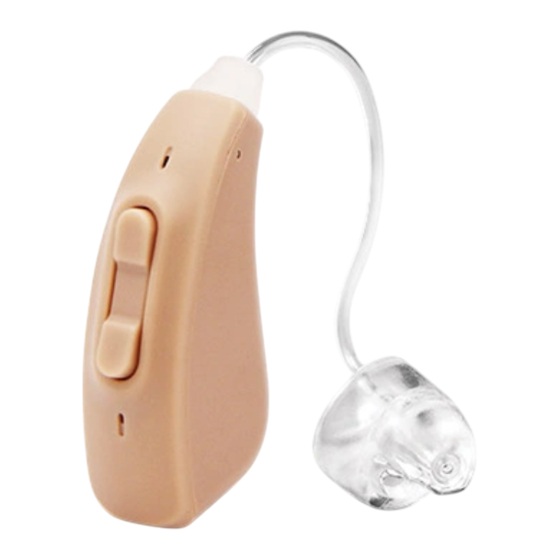
Page 14: Air 3 Diagram
AIR 3 Diagram Hearing Aid Dimensions: 1.125” x 0.25” x 0.5”... - Page 15 1) Microphones 2) Control Switch (on/off, volume, and program control) 3) Stabilizer Bar 4) Charging Contacts 5) Twist & Lock Tubing Base 6) Thin Tubing (series AA, size 2B) 7) Hearing Aid Body 8) ComfortTIP ™ (open, size small)
-
Page 16: Quick Start Guide
Quick Start Guide If you have a pair of hearing aids, first identify the left and right aid. Hearing aids are fit, and may be tuned, differently for each ear. Therefore, they should not be swapped. Step 1: Charge the hearing aids. Step 2: Place the hearing aids on your ears. - Page 17 Identifying Your Left and Right Hearing Aids To identify the left and right aids, hold them upright in each hand with the control switch facing you. The tubing/tips point toward each other when in the correct hand. You may also look for the label near the end of the tubing. The blue label indicates left ear.
- Page 18 Step 1: Charge a) Plug the charging case and USB cord into a standard outlet. LED2 will turn orange to indicate charging, and green to indicate fully charged. b) Place the hearing aid(s) in the charger, tucking the stabilizer bar into the well. The left hearing aid should be placed in the left side of the charger, and the right hearing aid in the right side.
- Page 19 Charging Case LEDs The charging case has three LED lights indicating the LED1 LED2 LED3 charging status of the hearing aids and charger. LED1 LED2 LED3 Left aid Charger Right aid Charging Solid orange Solid orange Solid orange Fully charged Solid green Low battery —...
-
Page 20: Charging Information
Charging Information/Battery Life The charging case can fully charge the hearing aids up to 3 times without being plugged in. It takes about 5 hours to fully charge the hearing aids. It takes about 4 hours to fully charge the case. On average, a full charge of the hearing aids lasts 12–16 hours. - Page 21 Low Battery Warning When the hearing aid battery is low, a beep repeats every 5 minutes until it fully depletes. On/Off Control The hearing aid will automatically turn off when placed in the charger, and turn on when removed from the charger. You may also manually turn the hearing aid on/off with the control switch: •...
-
Page 22: Placing On Ear
Step 2: Place On Ear ý þ Prevent the ComfortTIP from coming off ™ in ear—always verify the tip is pushed all the way on tubing before inserting. a) Hold the thin tubing at the stabilizer bar junction. Insert the ComfortTIP with gentle pressure into your ear canal. - Page 23 c) Tuck the stabilizer bar into the outer bowl of your ear. It may be trimmed to suit the size of your ear. d) You may need to gently pull your ear outwards and push the ComfortTIP into the ear canal, following the natural curve of your ear canal.
-
Page 24: Settings
• Top of switch: Raises volume and program. Lowers • Bottom of switch: Lowers volume and program. volume & program If you would like help fitting your AIR 3, please contact us for a free consultation with one of our licensed hearing professionals at 800-918-3914 or support@MDHearingAid.com. - Page 25 Volume Control To change volume, press and quickly release the switch. You can raise or lower the volume. • A double beep indicates each volume change. • A single, high-pitched beep indicates when maximum volume is reached. • A single, low-pitched beep indicates minimum volume.
- Page 26 Program Selection To change programs, press and hold the switch for 2 seconds. Beeps indicate a program change. Experiment with the different programs at various volumes to find what combinations work best for you. Please note: When a volume and program setting is used continuously for 10 minutes, the hearing aid will remember these settings and restore them when it is turned off and back on.
- Page 27 Program Beeps Best For Watching TV and time with family at home. Both 1. Quiet 1 beep low and high pitched hearing loss. Time with friends, church, small group meetings, 2. Social 2 beeps or hearing loss in the higher pitches. Large crowds, cafes, traffic, nature sounds, high 3.
-
Page 28: Care & Cleaning
Care and Cleaning Daily Cleaning: Use the cleaning tool brush to remove dust, earwax, or other debris from the ComfortTIP ™ button, and microphone. The hearing aid body can be cleaned with a dry soft cloth. Do not use water, alcohol, or other liquid agent to clean the hearing aid as it may damage it. - Page 29 Regular Cleaning: Use the cleaning tool wire to remove debris from tubing. a) Remove tubing (see page 30). b) Thread the wire through the tubing base and out of the tip. c) Wipe the end of wire clean and repeat as necessary. d) Reattach the tubing to the hearing aid body.
-
Page 30: Replacing Parts
Replacing Parts In addition to daily cleaning, you should also replace tips and tubing every 3 months. Tips and tubing are left and right ear Left specific. The AIR 3 comes assembled with Left Right the following: Right Thin Tubing (series AA, size 2B): blue label indicates left ear. - Page 31 Replacing Tubing a) Remove tubing: Hold the tubing at the base, rotate it 90° counter-clockwise, and pull it off. You may experience resistance the first time you remove the tubing. b) Attach tubing: Hold the tubing base and line up the notches like a lock and key (one notch is larger than the other.
- Page 32 Replacing Tips a) Remove tip: Hold tubing with one hand and pull ComfortTIP ™ off with other hand. b) Attach tip: Align new ComfortTIP so the vented end is lined up with the stabilizer bar. Push tip over the ridges on the end of tubing. c) IMPORTANT: The tubing end should be þ...
-
Page 33: Ordering Parts & Protection
Over time, these items wear out and may become stiff, affecting both fit and sound quality. Regular replacement will keep your hearing aids sounding and feeling like new. If you’d like to protect your hearing aids beyond the 1-year warranty, MDHearing offers the MDShield ™... -
Page 34: Tips For Optimal Performance
Tips for Optimal Performance • Avoid physical shock, such as dropping it on the floor. • Store in a cool dry place, such as a hearing aid dehumidifier. • For maximum battery life, charge the hearing aid until it is fully charged with each charge. -
Page 35: Using The Telephone
Using the Telephone Use program 1 when using the phone. If whistling (feedback) occurs, make slight adjustments to the volume or try various positions with the phone’s speaker and the hearing aids microphone until you find what works best for you. Speaker Microphone... -
Page 36: Troubleshooting
Troubleshooting Issue: Intermittent or Feedback/ Weak or distorted sound whistling no sound Turn AIR 3 on Adjust volume Charge AIR 3 Use a dehumidifier Clean ear canal Clean tubing/tip Change tubing/tip... - Page 37 Sound is distorted or intermittent. • Trapped moisture may be distorting the • Remove tubing from the hearing aid body sound. Use a hearing aid dehumidifier and turn the volume up to maximum. If it overnight. whistles, the hearing aid is working and wax or debris may be blocking the sound.
- Page 38 Device makes a whistling sound. • Whistling (feedback) occurs when • If whistling occurs when raising the amplified sound returns to the volume, you might need more gain and microphone and is re-amplified. should try the closed ComfortTIP ™ . Call us at 800-918-3914.
- Page 39 Device has weak or no sound. • Trapped moisture may be distorting the • Remove tubing from the hearing aid body sound. Use a hearing aid dehumidifier and turn the volume up to maximum. If it overnight. whistles, the hearing aid is working and wax or debris may be blocking the sound.
-
Page 40: Warranty & Replacements
Warranty and Replacements The MDHearing AIR 3 is covered against defects in materials and workmanship for one (1) year from the date you receive your order. If our examination determines that the unit failed to work due to parts, materials, or workmanship, we will repair or replace it for free. - Page 41 • Write the RMA code on the OUTSIDE of envelope (RMA will be a combination of words, letters, and numbers) RMA: DON’T send: MDHearing 650 W Lake St #120 • Hearing aid accessories (tips, Chicago, IL 60661 domes, tubes, etc.)
-
Page 42: Return Policy
Return Policy Your satisfaction is guaranteed. If you are not satisfied with your MDHearing AIR 3, you have 45 days to return it for a full refund. We are unable to honor return requests after 45 days from the date of delivery as reported by shipment tracking. -
Page 43: Transport & Storage
Transport and Storage Conditions During transport or storage for a long period of time, the temperature should not exceed the limit values of 14° to 158° Fahrenheit (-10° to 70° Celsius). During transport or storage for a long period of time, the relative humidity should not exceed the limit values of 10% to 60%. -
Page 44: Warning To Dispensers
Warning to Hearing Aid Dispensers A hearing aid dispenser should advise a prospective hearing aid user to consult promptly with a licensed physician (preferably an ear specialist) before dispensing a hearing aid if the hearing aid dispenser determines through inquiry, actual observation, or review of any other available information concerning the prospective user, that the prospective user has any of the following conditions: •... - Page 45 Stop using the MDHearing AIR 3 and consult a physician if: • Hearing in one or both ears worsens. • Ear becomes occluded with excessive ear wax. • Hearing does not improve. • You develop an infection of your ear or ear canal.
-
Page 46: General Warnings
General Warnings This product may help you hear better • Feel the hearing aid is not providing enough amplification even at the highest volume if you: setting. • Strain to follow conversations when others don’t, especially in noisy places. To prevent hearing damage: •... - Page 47 • The battery is built-in and cannot be replaced. Hazard Warnings Use of other batteries may present a risk of fire, • In the unlikely case that any parts remain in the explosion, or chemical burn. ear canal after the removal of the hearing aid, contact a physician immediately.
- Page 48 • Hearing aids may fail suddenly without prior X-ray, MRI, CT, PET Scanning, Electro- warning (e.g. in case of a defect or an empty therapy battery), particularly in situations where you’re • Hearing aids must NOT be exposed to strong required to hear acoustic warning signals, e.g.
-
Page 49: Technical Specifications
Technical Specifications MAX OSPL90 114 dB SPL HF Average OSPL90 105 dB SPL HFA Full-on Gain 35 dB Frequency Range 200–6,000 Hz Total Harmonic Distortion @500 Hz Total Harmonic Distortion @800 Hz Total Harmonic Distortion @1600 Hz Equivalent Input Noise 25 dB Latency Value <15msec... - Page 50 Your Serial Number Please retain your hearing aid serial numbers for your records. Your AIR 3 serial number can be found on the spine of the hearing aid. Serial Number(s): Serial No.
-
Page 51: Notice Of Cancellation
A SIGNED AND DATED COPY OF THIS CANCELLATION NOTICE OR ANY OTHER WRITTEN NOTICE, OR SEND A TELEGRAM, TO MDHEARING, 650 W LAKE ST #120, CHICAGO, IL 60661 NO LATER THAN MIDNIGHT OF THE 45TH DAY AFTER THE DATE OF DELIVERY AS REPORTED BY SHIPMENT TRACKING. “I HEREBY CANCEL THIS TRANSACTION,”... - Page 52 MDHearingAid.com 800-918-3914 v08.23...
Need help?
Do you have a question about the AIR 3 and is the answer not in the manual?
Questions and answers