Table of Contents
Advertisement
Quick Links
Repair
™
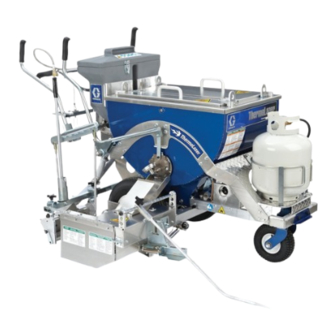
ThermoLazer
- For professional application of thermoplastic traffic marking compound materials
(reflective beads applied simultaneously with screeding) -
- For outdoor use only (not to be operated in rain or damp conditions) -
Model No. 258699 North America - Includes 257500 and 4 in. (10 cm) SmartDie
Model No. 257500 International (SmartDie
Fuel: LP Gas (Propane Vapor)
Burner capacities (max total): 138,000 BTU/hr. (40.44 kW) [38,000 BTU/hr. (7.03 kW) without torch]
Material capacity (max): 300 lb (136 kg)
IMPORTANT SAFETY INSTRUCTIONS
Read all warnings and instructions in this
manual. Save these instructions.
Related Manuals
Operation
313787
Parts
313880
For use with the following SmartDie
Part
Description
256736 4 in. (10 cm) Screed Box
257469 5 in. (12 cm) Screed Box
256737 6 in. (15 cm) Screed Box
257470 7 in. (18 cm) Screed Box
256738 8 in. (20 cm) Screed Box
257471 9 in. (22.5 cm) Screed Box
257472 10 in. (26 cm) Screed Box
256739 12 in. (30 cm) Screed Box
256799 Double Line 4-4-4 in. (10-10-10 cm) Screed Box
24B729 Double Line 4-3-4 in. (10-8-10 cm) Screed Box
Pavement Marking System
™
Screed Box not included)
™
Screed Box:
Get other manuals https://www.bkmanuals.com
313879B
™
Screed Box
257500
ti14144a
Advertisement
Table of Contents

Related Manuals for Graco ThermoLazer 258699


Summary of Contents for Graco ThermoLazer 258699
- Page 1 Repair ™ 313879B ThermoLazer Pavement Marking System - For professional application of thermoplastic traffic marking compound materials (reflective beads applied simultaneously with screeding) - - For outdoor use only (not to be operated in rain or damp conditions) - ™ Model No.
-
Page 2: Table Of Contents
Adjust Gas Pressure to Kettle Burners ..11 Graco Information ......24 Adjust Kettle Pilot Burner Flame . -
Page 3: Warnings
• Do not alter or modify equipment. • Use equipment only for its intended purpose. Call your Graco distributor for information. • Do not fill material beyond maximum capacity. • Route gas lines, hoses, wires and cables away from traffic areas, sharp edges, moving parts, and hot surfaces. - Page 4 Warnings Warnings TOXIC FLUID OR FUMES HAZARD Toxic fluids or fumes can cause serious injury or death if splashed in the eyes or on skin, inhaled, or swal- lowed. • Read MSDS to know the specific hazards of the materials you are using. PERSONAL PROTECTIVE EQUIPMENT You must wear appropriate protective equipment when operating, servicing, or when in the operating area of the equipment to help protect you from serious injury, including eye injury, inhalation of toxic...
-
Page 5: Kettle Gas Safety Valve, Kettle Temperature Control, And Kettle Thermopile Diagnosis
Kettle Gas Safety Valve, Kettle Temperature Control, and Kettle Thermopile Diagnosis Kettle Gas Safety Valve, Terminal Connections Kettle Temperature Control, and Kettle Thermopile Diagnosis The gas safety valve, temperature control and thermo- pile can be checked by using a millivolt meter. Before checking, make certain all electrical connections are clean and tight. -
Page 6: Kettle Temperature Control Calibration
Kettle Temperature Control Calibration Kettle Temperature Control Calibration 6. If the temperature control setting is lower than the remote calibrated temperature setting on tempera- ture probe, turn adjusting screw clockwise. Every 1/4 in. turn will change temperature 35° F (19.4° C). To Check Kettle Temperature Control Calibration: ™... -
Page 7: Kettle Thermometer Calibration
Kettle Thermometer Calibration Kettle Thermometer Calibration 6. If kettle thermometer is lower than the remote cali- brated temperature probe, turn adjusting screw counterclockwise. Adjusting Screw To Check Kettle Thermometer Calibration: RESET ™ 1. Move ThermoLazer to an area with no wind. 2. -
Page 8: Thermopile Replacement
Thermopile Replacement Thermopile Replacement Removal 1. Shut off gas valve on LP-tank and disconnect hose. 6. Pull thermopile wire out of gas safety valve enclo- sure (28). ti4128a ti14854a 2. Remove gas safety valve enclosure back cover. 7. Cut wire tie. ti14851a 3. - Page 9 Thermopile Replacement Installation 1. Replace thermopile (7). 7. Connect thermopile wires to gas safety valve (13). See Parts manual 313880 for additional details. ti14862a 2. Replace gas pilot mounting plate (18). ti14866a 8. Replace cover (252) on gas safety valve enclosure (28).
-
Page 10: Adjust Gas Pressure To Kettle Burners
Adjust Gas Pressure to Kettle Burners Adjust Gas Pressure to Kettle Burners 1. Shut off kettle gas safety valve (CC). 2. Turn kettle temperature control knob (AA) to 0 (“OFF”). 3. Remove kettle gas safety valve 1/8-27 NPT pipe plug. 4. -
Page 11: Adjust Kettle Pilot Burner Flame
Adjust Kettle Pilot Burner Flame Adjust Kettle Pilot Burner Flame 1. Ignite kettle gas pilot burner. 2. Record pilot burner flame height and color. Flame should be 2 to 3 in. (5 to 7 cm) high and blue-orange in color. 3. -
Page 12: Cleaning Kettle Main Burner Gas Lines
Cleaning Kettle Main Burner Gas Lines Cleaning Kettle Main Burner Gas Lines 1. Disconnect gas tubing line (49) from gas tube fitting 3. Reconnect gas tubing line (49) to gas tube fitting tee tee (165). (165). 2. Force air into gas tubing line (49). Insert rubber hose over gas tubing tee and force air into tubing at 30 psi (2.1 bar). -
Page 13: Replacing Screed Box Spring
Replacing Screed Box Spring Replacing Screed Box Spring 1. Position replacement spring as shown below and 3. Set screed box on its side. slide into spring guard. ti14551a ti14553a 2. Push spring up through guard and loop end around 4. Loop open end of spring and guard over first pin on guard pin until spring sits in groove. -
Page 14: Securing Bead Dispenser Wheel
Securing Bead Dispenser Wheel Securing Bead Dispenser Wheel To properly dispense beads, drive wheel (27) must be in direct contact with tire (89). If drive wheel (27) becomes loose and/or starts to slip, use allen wrench to tighten set screw (211). NOTE: To ensure proper contact between drive wheel (27) and tire (89), make sure air pressure is always at 60 psi (4.14 bar). -
Page 15: Screed Box/Bead Dispenser Box Actuator
Screed Box/Bead Dispenser Box Actuator Screed Box/Bead Dispenser Box Actuator If the screed box/bead dispenser box actuator does not remain in the “down and locked” position, adjust the 3/4-16 lock nut by turning clockwise 1/4 to 1/2 turn or until the actuator does not freely rotate. ti14604a Adjusting Screed Box Pivot Arm ™... -
Page 16: Troubleshooting
Troubleshooting Troubleshooting Problem Cause Solution Kettle pilot burner does Low or empty LP-gas tank Replace with full tank. not ignite or does not Gas supply hose not connected to tank Connect gas supply hose. remain ignited LP-gas tank shut-off valve closed Open LP-gas tank shut-off valve. - Page 17 Troubleshooting Problem Cause Solution Kettle main burners do Kettle gas safety valve knob not at correct Turn knob to ON position (see Operation not ignite or are not position manual). burning correctly Kettle temperature control dial set at a lower Turn kettle temperature control dial to tem- temperature than material temperature perature 25°...
- Page 18 Troubleshooting Problem Cause Solution ™ Empty LP-gas tank Replace with full tank. SmartDie screed box IR burner does not LP-gas tank shut-off valve closed Open LP-gas tank shut-off valve. ignite, does not remain Gas supply hose not connected to tank Connect gas supply hose.
- Page 19 Troubleshooting Problem Cause Solution ™ Foreign material in screed box discharge CAREFULLY dislodge and remove foreign SmartDie screed box opening material. leaking Dirty screed box CAREFULLY clean box. All moving parts need to be free of debris. Spring broken Replace spring (see page 13). Incorrect deployment rod linkage length Adjust length (see page 14).
- Page 20 Troubleshooting Applying Material Problem Cause Solution Ragged line edges when extruding Dirty screed box CAREFULLY clean box. Discharge opening and die plate runners need to be free of debris. Cold material temperatures Heat material as required. Marking speed too fast ™...
- Page 21 Troubleshooting Problem Cause Solution Ragged edges and gaps in line • Material temperature is too low • Raise material temperature ™ • Wait for change in ambient condi- • Thermolazer speed is too fast tions to remove moisture ™ • Reduce Thermolazer speed ti14511a Swollen rounded line...
-
Page 22: Technical Data
Technical Data Technical Data Fuel: Liquefied petroleum gas (LP-gas) (propane vapor) Gas supply pressure (maximum): 250 psi (17.24 bar) Kettle burner inlet pressure: 11 in. w.c. (2.7 kPa) IR burner inlet pressure: 12 psi (.83 bar) Torch inlet pressure: 18 psi (1.24 bar) Kettle main burner heating capacity (maximum): Two (2) burners;... -
Page 23: Graco Standard Warranty
With the exception of any special, extended, or limited warranty published by Graco, Graco will, for a period of twelve months from the date of sale, repair or replace any part of the equipment determined by Graco to be defective. - Page 24 All written and visual data contained in this document reflects the latest product information available at the time of publication. Graco reserves the right to make changes at any time without notice. This manual contains English. MM 313879 Graco Headquarters: Minneapolis International Offices: Belgium, China, Japan, Korea GRACO INC.
Need help?
Do you have a question about the ThermoLazer 258699 and is the answer not in the manual?
Questions and answers