Table of Contents
Advertisement
Quick Links
English
Read through the Installation Instructions before you proceed
with the installation.
In particular, you will need to read under the "Safety
Precautions" on page 3.
Installation Instructions
Infrared Receiver for L
Model No.
Contents
Part Names ................................................... 2
Supplied accessories .................................. 2
Safety Precautions ...................................... 3
Specifications .............................................. 5
Installation Precautions .............................. 6
Wiring ........................................................... 7
Mounting ...................................................... 8
Resin Panel ...................................................... 8
Metal Panel ...................................................... 9
Setting ........................................................ 10
Address Setting .............................................. 10
Test Operation ........................................... 11
detected contents ........................................... 12
CZ-RWRL3
Advertisement
Table of Contents

Related Manuals for Panasonic CZ-RWRL3


Summary of Contents for Panasonic CZ-RWRL3
-
Page 1: Table Of Contents
Installation Instructions Infrared Receiver for L CZ-RWRL3 Model No. English Read through the Installation Instructions before you proceed with the installation. In particular, you will need to read under the “Safety Precautions” on page 3. Contents Part Names ........... 2 Supplied accessories ........ -
Page 2: Part Names
Part Names „ Receiver (1) Indication lamp Indicates operation status. (2) Light receiving section Receives signals. „ Operation panel (3) Emergency operation button Starts/Stops emergency operation. Supplied accessories < >: Number of pieces Installation Instructions Installation Instructions Screw M4 × 10 Clamper <1>... -
Page 3: Safety Precautions
Read before installation This receiver must be installed by the sales dealer or installer. These instructions are all you need for most installation sites and maintenance conditions. If you require help for a special problem, contact our sales/service outlet or your certified dealer for additional instructions. - Page 4 Safety Precautions CAUTION z Do not use the receiver at the following locations. • Location where flammable gases, etc. may leak • Location where corrosive gases, etc. may leak • Location with lots of water or oil droplets (including machine oil) •...
-
Page 5: Specifications
Specifications CZ-RWRL3 Model No. Receiver: (H) 37 mm × (W) 70 mm × (D) 22 mm Dimensions Operation panel: (H) 55 mm × (W) 120 mm × (D) 16 mm Receiver: 15 g Weight Operation panel: 75 g 0 °C to 40 °C / 20% to 80% (No condensation) Temperature / *Indoor use only. -
Page 6: Installation Precautions
Installation Precautions z The receiver uses a very weak infrared light for its signal, which can result in the signal not being received because of the following influences, so take care in where the indoor unit is installed. • Inverter or rapid-start type fluorescent lights (Models without glow lamps) •... -
Page 7: Wiring
Wiring 1 Connect the receiver and the operation panel with the receiver wiring. 2 Connect the wires from the receiver to the terminals for RC wiring on the indoor unit. Wiring Diagram Infrared Receiver for L Receiver Indoor unit Operation panel Receiver wiring RC wiring... -
Page 8: Mounting
Mounting See “Setting” before mounting. Resin Panel Installing the Operation Panel 1 Remove the 2 screws. Then remove the cover A from the back of the panel. (Fig. A) 2 Fasten the operation panel to the location shown in the figure below with the 2 supplied screws. (Fig. -
Page 9: Metal Panel
Mounting Metal Panel Installing the Operation Panel 1 Remove the 2 screws and remove the cover A from the back of the panel. (Fig. A) 2 Fasten the operation panel to the location shown in the figure below with the 2 supplied screws. (Fig. -
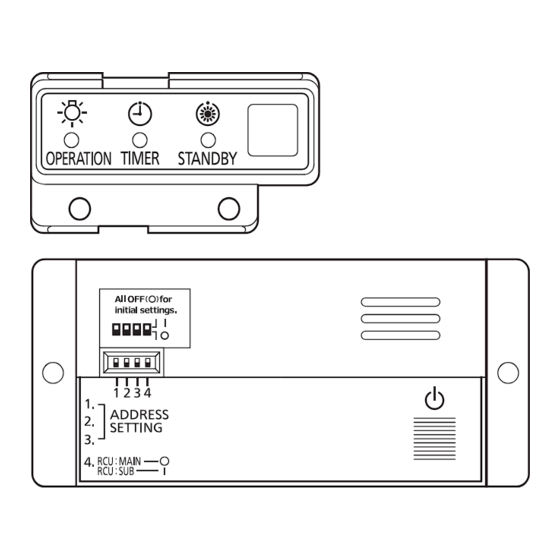
Page 10: Setting
Setting Before installing the operation panel, check the settings of the operation panel switches. Factory default: OFF (1 – 4) Main/Sub switch (4)* OFF: Main ON: Sub Address switch (1 – 3) * When using the infrared remote controller and the wired remote controller in combination, set the wired remote controller to [Main]. -
Page 11: Test Operation
Test Operation Preparation: Turn on the circuit breaker of units and then turn the power on. After the power is turned on, infrared remote controller operation is ignored for approx. 1 minute because setting is being made. This is not malfunction. (Contents received while setting are disabled.) 1 Press and hold the emergency operation button for 10 seconds. -
Page 12: Self-Diagnostics Table And Detected Contents
Test Operation Self-diagnostics table and detected contents The “Alarm Display” shown in the table below expresses the alarm contents displayed when the wired remote controller is connected. For how to handle the alarms, see installation instructions of indoor units, “Service Manual”, “Test Run Service Manual” or “Technical Data”. Detected contents Indication lamp on the receiver Alarm Display... - Page 13 Panasonic Corporation http://www.panasonic.com © Panasonic Corporation 2018 - 2021 F0921-0...
Need help?
Do you have a question about the CZ-RWRL3 and is the answer not in the manual?
Questions and answers