Table of Contents
Advertisement
Technical Support and E-Warranty Certificate www.vevor.com/support
METEOROLOGICAL STATION
MODEL:YT60231
We continue to be committed to provide you tools with competitive price.
"Save Half", "Half Price" or any other similar expressions used by us only represents an
estimate of savings you might benefit from buying certain tools with us compared to the major
top brands and doses not necessarily mean to cover all categories of tools offered by us. You
are kindly reminded to verify carefully when you are placing an order with us if you are
actually saving half in comparison with the top major brands.
Advertisement
Table of Contents

Related Manuals for VEVOR YT60231


Summary of Contents for VEVOR YT60231
- Page 1 Technical Support and E-Warranty Certificate www.vevor.com/support METEOROLOGICAL STATION MODEL:YT60231 We continue to be committed to provide you tools with competitive price. "Save Half", "Half Price" or any other similar expressions used by us only represents an estimate of savings you might benefit from buying certain tools with us compared to the major top brands and doses not necessarily mean to cover all categories of tools offered by us.
- Page 2 CustomerService@vevor.com This is the original instruction, please read all manual instructions carefully before operating. VEVOR reserves a clear interpretation of our user manual. The appearance of the product shall be subject to the product you received. Please forgive us that we won't inform you again if there are any technology or software updates on our product.
-
Page 3: Product Features
PRODUCT FEATURES ● Colorful and big digit display with super bright backlight. ● 9 functional buttons: SET, TEMP/ALARM, RAIN, WIND/+, BARO/-/RCC, ALERT, MAX/MIN, CHANNEL, LIGHT/ SNOOZE ● Self setting accurate atomic time function. ● Alarm with snooze function. ● Daylight Saving Time (DST) function. ●... -
Page 4: Package Contents
PACKAGE CONTENTS 1 Weather station 7 Mounting pole with 4 screws 2 Adapter 8 Mounting brackets with 6 screws 3 Wireless 7-in-1 outdoor sensor 9 Rubber pads X 2 4 Funnel 10 Screwdriver 5 Wind direction vane with 1 screw 11 User guide 6 Wind speed cups with 1 screw NOTE: 4 extra screws for wind direction vane and wind speed cups. -
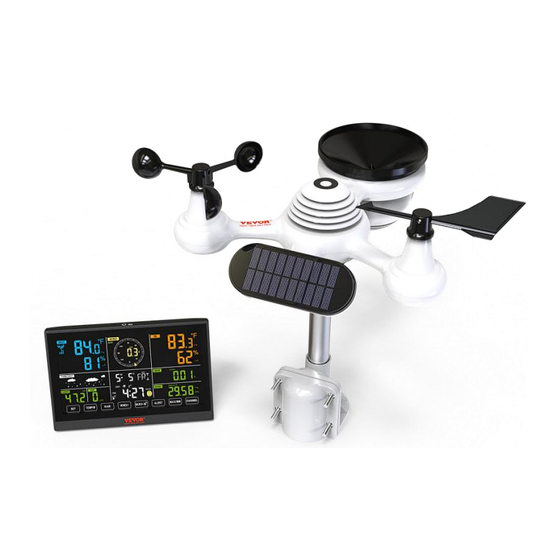
Page 5: Product Overview
PRODUCT OVERVIEW WIRELESS 7-IN-1 OUTDOOR SENSOR Solar panel Wind direction vane UV/light sensor Bubble level gradienter Rain collector Wind speed cups Mounting pole Mounting brackets Hygro-thermo sensor LED: Flashes when the unit transmits a reading RESET button Battery door - 4 -... -
Page 6: Weather Station
WEATHER STATION - 5 -... - Page 7 Outdoor temperature/humidity reading, weather index Wind direction & speed Indoor temperature/humidity reading Weather forecast Time & date, moon phase, Weekday Light intensity UV index Rain Barometer SET button TEMP/ (ALARM) button RAIN button WIND/+ button BARO/-/ (RCC) button ALERT button MAX/MIN button CHANNEL button LIGHT/ SNOOZE button...
- Page 8 INSTALLING WIND SPEED CUPS AND WIND DIRECTION VANE ● Align the screw holes in the wind speed cups with the flat, vertical side of the metal rod. ● Insert the wind speed cups in the metal rod and screw on tight to lock it in place.
- Page 9 - 8 -...
-
Page 10: Installing The Batteries
SETTING UP RAIN COLLECTOR ● Align the notches on the funnel with the lock grooves inside the rain collector. ● Insert the funnel in the rain collector and screw on tight to lock it in place. INSTALLING THE BATTERIES ● Slide the switch to unlock the battery compartment at the bottom of the solar panel. - Page 11 MOUNTING THE WIRELESS 7-IN-1 OUTDOOR SENSOR ● Pick a location for the 7-in-1 outdoor sensor that is open with no obstructions. ● Tighten the mounting brackets to a surface/wall using four tapping screws (included), or tighten the mounting pole to your existing mounting pole with four 5 Bolts and M5 Nuts assembly.
- Page 12 POINTING THE WIRELESS 7-IN-1 OUTDOOR SENSOR TO SOUTH (OPTIONAL) The outdoor wireless weather sensor is calibrated to be pointed north for maximum accuracy. However, for your convenience, if you are a user located in the Southern Hemisphere, you can use the sensor with the rain collector pointing south.
-
Page 13: Setting Up The Weather Station
SETTING UP THE WEATHER STATION POWERING UP THE WEATHER STATION ● Plug the power adapter into the power jack located in the back of the weather station. Insert 3 new AAA alkaline batteries (not included) for backup. ● Once the weather station is turned on, it will automatically enter pairing mode. - Page 14 humidity (outdoor) section of the display. ● Once the pairing process completes, the antenna icon will appear solid (not flashing), and the readings for outdoor temperature and humidity, wind speed, wind direction, UV, light intensity, and rainfall will appear in their designated sections of the LCD display RE-PAIRING SENSOR ●...
- Page 15 ● Put the weather station away from interference, such as electronic devices. (TV, computer, microwave, radio, etc.) MANUAL ATOMIC CLOCK RECEPTION ● You can receive the atomic clock signal manually. In Normal display, 【BARO/-/ 】button over 2 seconds to receive the press and hold atomic clock signal manually.
- Page 16 Setting Order 1. RCC On/Off 2. Time Zone 3. Weekday Language 4. BEEP On/Off 5. M-D/D-M Format 6. Year 7. Month 8. Date 9. 12/24 Hour Format 10. Hour 11. Minute 12. Temperature Unit 13. Pressure Unit 14. Relative Pressure 15.
- Page 17 【SET】to select month. adjust the calendar year. Press 【WIND/+】 or 【BARO/-/ 】 to 7.) When month flashes, press 【SET】to select date. adjust the calendar month. Press 【WIND/+】 or 【BARO/-/ 】 to 8.) When Day flashes, press 【SET】to select 12/24-hour format. adjust the calendar day.
- Page 18 【SET】to select windspeed to change unit between in and mm. Press unit. 【WIND/+】 or 17.) When Wind speed unit flashes, press 【BARO/-/ 】 to change unit between in and mm. Press 【SET】 to select hemisphere. 【WIND/+】 or 【BARO/-/ 】 18.) When NTH flashes, press to change hemisphere between NTH (northern) and STH (southern).
- Page 19 - 18 -...
-
Page 20: Moon Phase
Moon Phase The display console calculates the moon phase according to your time, date, and time zone. The table below explains the corresponding phases and their icons for both the Northern and Southern hemispheres. Northern Hemisphere Icons Moon Phase Southern Hemisphere Icons New Moon Waxing Crescent Moon First Quarter Moon... - Page 21 【SET】 button to save all settings and exit to normal display ● Press mode. NOTE: If there is no valid operation within 20 seconds, it will automatically return to the normal display mode from the setting mode. While adjusting settings, you can press 【...
- Page 22 TEMPERATURE Temperature/Humidity Trend Tendency arrows allow you to quickly determine of temperature and humidity are rising and falling in a one-hour update period. Temperature Trend Temperature has Temperature has not Temperature has risen > 1°C/2°F in the past changed more than fallen <...
-
Page 23: Pressure Trend
【BARO/-/ 】 button switch between absolute In normal mode, press and relative pressure. The absolute atmospheric pressure of your location. Absolute The relative atmospheric pressure is based on the sea level. Relative Pressure Trend Tendency arrows allow you to quickly determine if pressure is rising or falling in a one-hour update period. - Page 24 The Rainfall shows information regarding the rainfall and rain rate. Select the Rainfall Display Mode 【RAIN】 button to switch between Rain In normal display mode, press Rate, Rain Event, Rain Hourly ,Rain Daily, Rain Weekly, Rain Monthly and Rain Total. Increments of Rain Definition Rain Rate : current rainfall rate in the past hour.
- Page 25 WEATHER Weather Index 【TEMP/ 】 When reading the Weather Index display, you can press button to cycle through different weather indexes in the following order: Feels Like > Heat Index > Wind Chill Feels Like The Feels Like temperature index determines what temperature it actually feels like outside, taking into account factors like wind speed, pressure, temperature and humidity.
- Page 26 NOTE: The accuracy of a general pressure-based forecast is about 65-70%. Forecasts are not guaranteed. It may not necessarily reflect the current situation. Ice Alert When outdoor temperature is lower than 1℃/33.8℉, the snowflake icon will appear on the LCD display. MAX/MIN 【MAX/MIN】button switching ●...
- Page 27 To View the Accumulated MAX/MIN ● Display Feel like, Wind Chill, Heat Index, Dew Point Max/Min Values 【TEMP/ 】button to 1.) When the max values are displayed, press interchange viewing the Outdoor temperature Feel like Wind Chill → → → Heat Index Dew Point Outdoor temperature.
- Page 28 To Clear the MAX/MIN Data Record 【MAX/MIN】button over 2 ● To clear the max value, press and hold seconds while max values are displayed. 【MAX/MIN】button over 2 ● To clear the min value, press and hold seconds while min values are displayed. HI/LO ALERT SETTING To View the Alert Setting 【ALERT】...
- Page 29 【 To exit the alert setting mode at any time, press LIGHT/SNOOZE】button.The Hi/Lo alert setting order is shown below: Alert Setting Order Setting Range Display Section Default Indoor Temperature Hi Alert 50℃ (122℉) -9.9℃ – 50℃ (- 14.1℉ – 122℉) Indoor -9.9℃...
-
Page 30: Display Backlight
To Silence the Hi/Lo Alert Alarm 【 Press the LIGHT/SNOOZE】button on top of the display console to silence the alarm, or it will automatically turn off after one minute. NOTE: Once the alert is triggered, the alarm will sound for one minute and the associated alert icon and weather readings will flash. -
Page 31: Factory Restart
FACTORY RESTART If there is malfunction, the Factory Restart is a great way to return your station to "out of the box" condition. 1.) Remove all power (batteries and AC adapter) from outdoor sensors and weather station. 2.) Follow the operation “SETTING UP THE WEATHER STATION” to start the pair the sensor. -
Page 32: Specification
SPECIFICATION WEATHER STATION General Specifications Dimensions 191.6 x 127 x 28.8mm (7.5 x 5 x 1.1inch) Power source AC-AC 5V, 0.15A adapter (included) Battery 3 x AAA battery (not included) Support sensors 1 x 7-in-1 sensor (included) Time Function Specifications Time display HH : MM Hour format... - Page 33 Indoor/Outdoor Humidity Display & Function Specifications Humidity unit Display range 1 – 99% In/Out accuracy 40 – 80% RH ± 5% RH @25℃(77℉) Others : ± 8% RH @25℃(77℉) Display mode Current Memory mode Daily Max/ Min Alert High/Low humidity alert Wind Speed and Direction Display &...
- Page 34 Weather Index Display & Function Specifi cations Weather Index mode Feels like, wind chill, heat index and dew point Display mode Current Memory mode Daily Max/min WIRELESS 7-IN-1 OUTDOOR SENSOR Dimension 408 x 350 x 367mm (16 x 13.8 x 14.4inch) Main power 3 x AA 1.5V Battery Backup power...
- Page 36 Technical Support and E-Warranty Certificate www.vevor.com/support - 35 -...
Need help?
Do you have a question about the YT60231 and is the answer not in the manual?
Questions and answers
Hi. How do I determine the station ID for WeatherUnderground and WeatherCloud?
The VEVOR YT60231 weather station cannot be registered with WeatherUnderground because it is not listed among the available brands for registration. Therefore, you cannot determine or use a station ID for WeatherUnderground. No information is provided about compatibility with WeatherCloud.
This answer is automatically generated
Hi, the outside temp has been flashing for a couple of days so I changed the batteries in the outside unit but now it will not pair with inside, on a YT60231
To troubleshoot pairing issues between the outside unit and inside unit of a VEVOR YT60231 after changing the batteries, follow these steps:
1. Remove all power sources from both the outdoor sensor and the indoor weather station. This includes batteries and the AC adapter.
2. Perform a Factory Restart to return the system to its original state.
3. Follow the steps under “SETTING UP THE WEATHER STATION” to pair the sensor again.
Make sure to replace all batteries at the same time and apply a corrosion preventive compound on the battery terminals.
This answer is automatically generated
Temperature reading started blinking also displaying same temp.
When the temperature reading blinks and displays the same temperature on a VEVOR YT60231, it indicates that the alarm has been triggered. The blinking will continue, and the alarm will resume after 5 minutes.
This answer is automatically generated
How do I set the time/date
To set the time and date on the VEVOR YT60231 meteorological station, follow these steps:
1. Press the SET button to enter the settings mode.
2. When the timezone setting flashes, use the WIND/+ or BARO/-/ buttons to adjust it, then press SET to confirm.
3. When the weekday language setting flashes, use the WIND/+ or BARO/-/ buttons to select from 8 available languages, then press SET to confirm.
4. When the beep sound setting flashes, use WIND/+ or BARO/-/ to turn the button beep sound on or off, then press SET to confirm.
5. When the date format setting (M-D or D-M) flashes, use WIND/+ or BARO/-/ to choose the preferred format, then press SET to confirm.
6. When the year flashes, use WIND/+ or BARO/-/ to adjust it, then press SET to confirm.
7. When the month flashes, use WIND/+ or BARO/-/ to adjust it, then press SET to confirm.
8. When the day flashes, use WIND/+ or BARO/-/ to adjust it, then press SET to confirm.
9. When the 12H/24H format setting flashes, use WIND/+ or BARO/-/ to switch between 12-hour and 24-hour formats, then press SET to confirm.
This completes the time and date setup.
This answer is automatically generated
Immettere lingua Italiano su stazione
To set the VEVOR YT60231 meteorological station to Italian language, follow these steps:
1. Press the SET button to enter the settings mode.
2. When the weekday display starts flashing, press WIND/+ or BARO/-/ to scroll through the available languages.
3. Select ITA for Italian.
4. Press SET to confirm the selection and proceed to the next setting.
The station will now display weekdays in Italian.
This answer is automatically generated
Setting the time; didn't update for DST
To set the time on the VEVOR YT60231 meteorological station for Daylight Saving Time (DST), follow these steps:
1. Enter the clock setting mode by pressing the SET button.
2. Navigate through the settings using the WIND/+ or BARO/-/ buttons until you reach the DST option.
3. Enable or disable DST by pressing WIND/+ or BARO/-/.
4. Confirm your selection by pressing SET to move to the next setting.
This will adjust the time according to Daylight Saving Time settings.
This answer is automatically generated
Que pasos tengo q seguir? para poner la wui-Fi de la estacion meteorológica en modo vinculación **** mi móvil
@Ricardo hola. Acabo de comprar la estación y me gustaría saber si las pilas tienen que ser recargables o alcalinas. No entiendo por qué la placa solar. Tampoco me venía ninguna pila
Undrar om det finns manual på Svenska språket ?
Wondering if there is a manual in Swedish?
Cannot pair the inside monitor with the weather station outside, the solar panel has a white film over it, I assume the batteries have gone flat. I have now cleaned the film of and **** awaiting the batteries to recharge. Is there any way of preventing a build up of the white film. Kind regards Jeff Green
To prevent a white film buildup on the solar panel of the VEVOR YT60231 weather station, clean the solar panel every 3 months using a damp cloth.
This answer is automatically generated
HOW DO YOU CHANGE FARENHEIT IN CELCIUS FOR THE WEATHER DEGREE? vevor meteo station model YT60231
To change between Fahrenheit and Celsius on the VEVOR weather station model YT60231, press the TEMP/ALARM button. This button allows you to switch the temperature display between °F and °C.
This answer is automatically generated