Advertisement
Available languages
Available languages
Quick Links
• READ ALL INSTRUCTIONS BEFORE ASSEMBLY AND USE OF GATE.
KEEP INSTRUCTIONS FOR FUTURE USE.
• LIRE TOUTES LES INSTRUCTIONS AVANT D'ASSEMBLER ET D'UTILISER LA BARRIÈRE.
CONSERVER CES INSTRUCTIONS POUR UNE UTILISATION ULTÉRIEURE.
• LEA TODAS LAS INSTRUCCIONES ANTES DE MONTAR Y USAR LA REJA.
GUÁRDELAS PARA UTILIZARLAS COMO REFERENCIA.
www.carlsonpetproducts.com
Carlson Pet Products, Inc.
3200 Corporate Center Drive, Suite 105 / Burnsville, MN 55306, USA / , É.-U. / , EE. UU.
952.435.1084
Made in China/Fabriqué en Chine/Hecha en China
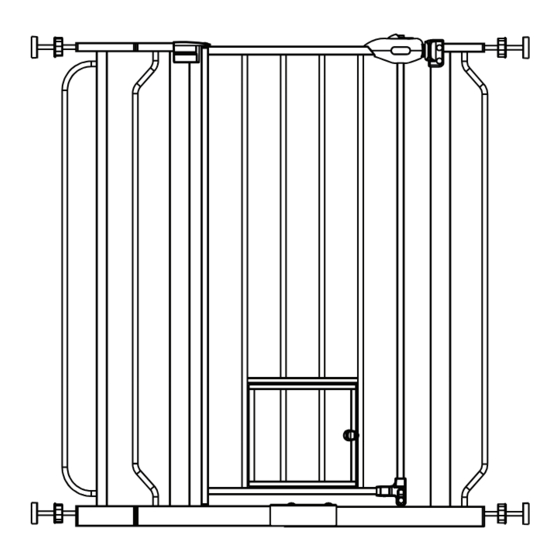
Extra Wide Walk-Through Gate with Small Pet Door
Barrière Avec Passage Extra Large avec Petite Chatière
Valla de Acceso Extra Ancha con Puerta para Mascotas
Pequeñas
Models / Modèles / Modelos: 0930 PW, 0941 PW/PB/PP
Advertisement

Subscribe to Our Youtube Channel
Related Manuals for Carlson 0941 PW


Summary of Contents for Carlson 0941 PW
- Page 1 Barrière Avec Passage Extra Large avec Petite Chatière Valla de Acceso Extra Ancha con Puerta para Mascotas Pequeñas Models / Modèles / Modelos: 0930 PW, 0941 PW/PB/PP • READ ALL INSTRUCTIONS BEFORE ASSEMBLY AND USE OF GATE. KEEP INSTRUCTIONS FOR FUTURE USE.
- Page 2 If, during the first 90 days after consumer purchase of the item, under reasonable and non-commercial use and conditions of maintenance, it fails while owned by the original purchaser because of the quality of materials or workmanship of finish and assembly, Carlson Pet Products, Inc. will replace or repair it at Carlson’s option.
- Page 3 Assembling and Installing Your Gate STEP 2 STEP 3 STEP 1 Take the left (A) and right (C) gate frame halves and Lower the gate door (B) into the assembled gate frame Align the hole in the upper corner of the gate door with align the holes in the lower horizontal tube.
- Page 4 Operating the Door Latch STEP 7 STEP 1 STEP 2 LOCKING SLIDE RECEIVING COMPONENT CIRCULAR OUTER HOUSING BUTTON BASE LOCK When you are satisfied with the general placement of your Push the circular button on the secure slide latch At the bottom of the gate door, rotate the base gate, fully tighten the threaded spindle rods attached to the while simultaneously pulling back.
-
Page 5: Avant L'assemblage
Si, au cours des 90 jours suivant l’achat de cet article, dans des circonstances raisonnables et dans des conditions d’utilisation et d’entretien non commerciales, l’article, qui appartient encore à l’acheteur original, s’avère défectueux en ce qui a trait à la qualité des matériaux ou aux travaux de finition et d’assemblage, Carlson Pet Products, Inc. le... - Page 6 Assemblage et installation de la barrière ÉTAPE 1 ÉTAPE 3 ÉTAPE 2 Alignez le trou du coin supérieur de la porte de la Prenez les parties de gauche (A) et de droite (C) du Abaissez la porte de la barrière (B) dans le cadre de barrière avec le trou du support de montage de porte.
- Page 7 Mode d'emploi du loquet à ouverture facile ÉTAPE 7 ÉTAPE 1 ÉTAPE 2 VERROU COULISSANT ÉLÉMENT DE RÉCEPTION BOUTON CIRCULAIR LOGEMENT EXTÉRIEUR VERROU DE BASE Comprimez le bouton circulaires sur le verrou Lorsque vous êtes satisfait du placement général de votre En bas du portillon, tournez le verrou de base à...
- Page 8 Si durante los primeros 90 días después de la fecha de compra, bajo uso y condiciones de mantenimiento razonables y no comerciales, y mientras permanece en manos del comprador original, el artículo presenta fallas de calidad en los materiales o la mano de obra de acabado y montaje, Carlson Pet Products, Inc. lo reemplazará o reparará a discreción de Carlson’s.
- Page 9 Montaje e instalación de la reja PASO 2 PASO 1 PASO 3 Tome las mitades izquierda (A) y derecha (C) del Alinee el orificio en la esquina superior de la puerta Baje la puerta de la reja (B) en el marco de la reja marco de la reja y alinee los orificios en el tubo de la reja con el orificio en el soporte de montaje de montado e introduzca el pasador inferior de la...
- Page 10 Cómo operar el pestillo de la puerta PASO 7 PASO 1 PASO 2 CIERRE DESLIZANTE COMPONENTES DE DE BLOQUEO RECEPCIÓN BOTÓN CARCASA CIRCULAR EXTERNA BLOQUEO DE LA BASE Una vez que esté satisfecho con la colocación en general de Apriete el botón circulares del seguro de cierre En la parte inferior de la puerta, gire el bloqueo su reja, apriete por completo las varillas roscadas que están deslizante, tirando al mismo tiempo de una o ambas...
- Page 11 Adding a Gate Extension STEP 1 Remove the top and bottom threaded spindle rods. Assemble the gate and extension as illustrated. Reposition the gate and fit in accordance with the gate fitting. It is preferable to install any extensions on the hinge side of the gate. NOTE: Need more width? Additional extensions sold separately www.carlsonpetproducts.com...
- Page 12 WARNING NOTE: The gap between the gate and wall should not exceed more than 2.5 inches. • INSTALL ACCORDING TO MANUFACTURES INSTRUCTIONS. • NOT RECOMMENDED FOR USE WITH CHILDREN. • TO PREVENT SERIOUS INJURY OR DEATH, SECURELY INSTALL GATE AND USE ACCORDING TO MANUFACTURER'S INSTRUCTIONS.
- Page 13 MISE EN GARDE REMARQUE : L'espace entre la barrière et le mur ne doit pas être supérieur à 6,4 cm (2,5 po). • INSTALLEZ LA BARRIÈRE SELON LES INSTRUCTIONS DU FABRICANT. • ELLE N’EST PAS CONÇUE POUR ÊTRE UTILISÉE AVEC DES ENFANTS. •...
- Page 14 ADVERTENCIA NOTA: La brecha entre la compuerta y la pared no debe exceder más de 6.4 cm (2.5 pulgadas). • EJECUTE LA INSTALACIÓN DE ACUERDO CON LAS INSTRUCCIONES DEL FABRICANTE. • NO ESTÁ DISEÑADA PARA USARSE CON NIÑOS. • PARA EVITAR LESIONES GRAVES O LETALES, INSTALE FIRMEMENTE LA REJA Y ÚSELA DE ACUERDO CON LAS INSTRUCCIONES DEL FABRICANTE.
Need help?
Do you have a question about the 0941 PW and is the answer not in the manual?
Questions and answers