
Related Manuals for Cloudray LiteMarker Pro QS Series


Summary of Contents for Cloudray LiteMarker Pro QS Series
- Page 1 Cloudray Laser System LiteMarker Pro Laser System QS Series User Guide Version 3.0(2023.05) www.cloudraylaser.com...
- Page 2 What’s more, you can earn $50-$300 Cashback by sharing your buyer show and Usage Report (download on the product page). Join our Facebook group to learn more laser general knowledge and discuss with more people in the laser industry. Join in Cloudray Forum to find laser machine solutions. Facebook Group: https://www.facebook.com/groups/cloudray...
- Page 3 Cloudray Laser System Cloudray cannot be held responsible for any direct or indirect damages, which result from using or working with the products electric circuits or software described herein. The apparatus must be used only by trained and skilled personnel. Before use the manual should be read and followed carefully.
-
Page 4: Table Of Contents
Cloudray Laser System CONTENTS 1. General Information ....................1 Meaning of symbols and notes ................1 Designated Use ....................... 2 Disposal Remarks ....................3 Manufacturer's Label ....................3 EC–Declaration of Conformity ................. 4 Complementary Documentation ................5 2. Safety Information ....................6 Disclaimer ....................... - Page 5 Cloudray Laser System 6.2.1. Driver Installation ..................19 6.2.2. Drive Uninstallation..................21 EZCAD main interface view ..................24 6.3.1. Marking parameter ..................24 6.3.2. Laser Marking Control Bar ................25 Focusing .........................25 Rotary attachment (option) ..................26 6.5.1. Mounting the work piece in the rotary attachment .........27 6.5.2.
-
Page 6: General Information
Cloudray Laser System 1. General Information This manual is the designated user guide for the installation, setup, safe operation, and maintenance of your fiber laser marking machine. It is divided into six chapters covering general information, safety instructions, installation steps, operation instructions, maintenance instructions, and contact information. -
Page 7: Designated Use
Cloudray Laser System Caution! Dangerous electrical voltage - indicates a risk of electric shock and warns of imminent danger to the life and health of individuals or of significant damage to equipment. Caution! Laser beam - means that the laser machine may operate in laser class 4 when commissioning the laser head. -
Page 8: Disposal Remarks
Cloudray Laser System its designated use, the other instructions on the device and in its manuals, and all applicable local and national laws and regulations. Disposal Remarks Do not dispose the machine with domestic waste! Electronic devices have to be disposed according to the regional directives on electronic and electric waste disposal. -
Page 9: Ec-Declaration Of Conformity
Cloudray Laser System EC–Declaration of Conformity www.cloudraylaser.com... -
Page 10: Complementary Documentation
Cloudray Laser System Complementary Documentation Complementary documentation can be found on the supplied U disc. Software: EZCad2.14.11(Different Lens Software) EZCad2_EN_Manual USB Driver Cor File *RS232 File: For50QB(PulseQLasterTest) RS232 Cable Driver & Manual *Notice: RS232 files only for QS series 50W marking machine. -
Page 11: Safety Information
Cloudray Laser System 2. Safety Information Disclaimer Your engraver may differ somewhat from those shown in this manual due to options, updates, etc. Please contact us if your marking machine came with an outdated manual or if you have any other questions. -
Page 12: Laser Safety Instructions
Cloudray Laser System Laser Safety Instructions This machine uses an invisible CLASS 4 LASER, the strongest and most dangerous class of laser available for public use. Used without care, it can cause serious property damage and personal injury including but not limited to the following: •... -
Page 13: Electrical Safety Instructions
Cloudray Laser System Electrical Safety Instructions • ONLY use this device with a compatible and stable power supply with less than 5% fluctuation in its voltage. DO NOT connect other devices to the same fuse, as the laser system will require its full amperage. - Page 14 Cloudray Laser System byproducts either harmful to people nearby or in violation of any local or national laws or regulations. In particular, do not use this device to process polyvinyl chloride (PVC), TEFLON, or other halogen containing materials under any circumstances.
- Page 15 Cloudray Laser System • Iodine, due to its toxic fumes • Paper and Paperboard, due to their high flammability when exposed to the concentrated laser • Phenolic Resins, including various forms of Epoxy, due to their toxic fumes • Wood, including MDF, Plywood, Balsa, Birch, Cherry, Oak, Poplar, etc., due to its high flammability www.cloudraylaser.com...
-
Page 16: Technical Specifications
Cloudray Laser System 3. Technical Specifications Laser Laser (maintenance free) Q-pulsed Fiber Laser Laser power (Depending on model) Wavelength 1060 - 1085 nm Frequency (kHz) 30 - 60 50 - 100 130 - 160 ns 120 - 150 ns Pulse width... -
Page 17: System Overview
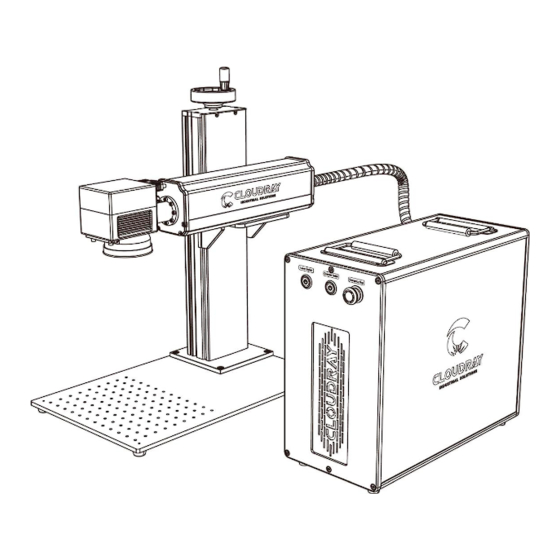
Cloudray Laser System 4. System Overview Main Parts Cabinet——Contains controllers, lasers, power supply units, etc. Galvo Head——Focuses the laser beam to a fine point, directing it to proper locations on the target material during engraving. Workbench——This platform holds the target material, with optional positioning bars to ensure precise alignment. -
Page 18: Control Elements On The Front
Cloudray Laser System Control Elements on the Front Laser Switch——Activates the fiber laser power. Press this last during startup and first during shutdown. Controller Switch——Activates the controller and galvo power. Press this second during startup and shutdown. Emergency Switch——Activates the machine main power. Rotate this first during startup and press during shutdown. -
Page 19: Laser Module (Inside)
Cloudray Laser System Laser Module (Inside) A. Relay——Used for switching circuit control conversion. B. Controller——Cooperates with the software to control the laser and galvo to work. C. Stepper Driver——Control rotary work and realize rotary marking function. D. 5V Power Supply——Provide 5V power for the controller. -
Page 20: Installation
Cloudray Laser System 5. Installation Installation Overview A complete working system consists of the fiber laser source, the laser arm with the galvo lens, the laser key, a computer (not included) with engraving software (included), and all applicable connection cables. A support column and workbench come included to assist your work. -
Page 21: Electrical Grounding
Cloudray Laser System Electrical Grounding This device employs a class 4 laser. As discussed in the Safety Information above, it is extremely high voltage and potentially dangerous, so users must securely ground it to avoid the buildup of static electricity. Using a standard 3-prong outlet will provide sufficient grounding. - Page 22 Cloudray Laser System Step 3. Connect the USB-PC cable, Rotary cable, Foot Switch cable and Power cable. Note: Rotary Attachment port is an optional port. Step 4. Plug in the U disk (software, driver, electronic manual), and connect the USB cable to the PC.
-
Page 23: Control Computer Installation
Cloudray Laser System Step 5. Remove the dust cover, start the device and turn on the red light under the galvo head. Step 6. Turn the focus wheel to adjust the two red dots to coincide to achieve focus. Control Computer Installation The control computer should not be placed more than 15 feet (4.5 m) away from the fiber... -
Page 24: Operation
Cloudray Laser System 6. Operation Operation Overview Operate this laser marking machine only in accordance with all the instructions provided in this manual. Failure to follow the proper guidelines detailed here can result in property damage and personal injury. This section will address only some of the options and features provided by the operation software. - Page 25 Cloudray Laser System • Click “Other devices”>> USBLMCV2 >> Update driver (right click). • Click “Browse my computer for driver software”. • Select the correct drive folder’s location. Please select the subdirectory of the last level. And do not select zipped up or compressed folders.
-
Page 26: Drive Uninstallation
Cloudray Laser System • Congratulations. You have finished installing the drivers for this device. 6.2.2. Drive Uninstallation Because of the diversity of windows and hardware versions, drivers are often installed incorrectly (as shown below). At this time, we need to uninstall the driver originally installed before installing another driver. - Page 27 Cloudray Laser System • Go to “Windows Settings”. Search “Device Manager” and open it. • Click Other devices>> USBLMCV2 >> Uninstall device (right click). Notice:Before install LightBurn need to uninstall this driver of EzCad. • Enable ”Delete the drive software for this device” in the pop-up window.
- Page 28 Cloudray Laser System Copy EZCad2 folder to PC’s hard disc. • • Double click the EZCad2.exe to open EZCAD2. Important: If user run the software without connect the fiber laser, a caution will appear, and the software will work at demo state. In demo state, we can evaluate the software, but we cannot save files and cannot control laser device.
-
Page 29: Ezcad Main Interface View
Cloudray Laser System EZCAD main interface view Cloudray LiteMarker marking machine is controlled by the included EZCad2 software, which must be installed on a compatible computer to direct the laser. See its separate instruction for full details on its components and use. Some features which are particularly important to note include the following parameters and controls: 6.3.1. -
Page 30: Laser Marking Control Bar
Cloudray Laser System 6.3.2. Laser Marking Control Bar • Red/Light (F1)—This item is used to mark the frame of the object without laser output so that users are convenient to orient the workpiece. This function is available in those laser machines which have guide light. -
Page 31: Rotary Attachment (Option)
Cloudray Laser System Lens Scan Field(mm) Focal distance (A) F100 70x70 F160 110x110 F290 200x200 F420 300x300 Use the manual Z-Axis handle or the up and down buttons on the Keypad to move the head in the correct position. Rotary attachment (option) Damage to electronics. -
Page 32: Mounting The Work Piece In The Rotary Attachment
Cloudray Laser System 6.5.1. Mounting the work piece in the rotary attachment 1. Put the rotary axis attachment onto the working table. 2. Connect the rotary axis attachment via the control cable with the 4-Pin plug connector of the motion system. - Page 33 Cloudray Laser System 2. Adjust the text direction as required. 3. Press “Put to origin” button to place the text in the center of the processing area. www.cloudraylaser.com...
- Page 34 Cloudray Laser System 4. Press “Hatch” button to fill in the text. 5. Menu bar—Laser—Rotate Text Mark—Set parameters www.cloudraylaser.com...
- Page 35 Cloudray Laser System A. Enable extended axis, reverse mode, enable Y axis (enable X or Y axis according to the direction in which the rotation axis is placed). B. The value of the number of pulses per revolution is the subdivision value on the drive, and the number of pulses usually used is 12800 or 25600.
-
Page 36: Vector File Rotate Marking
Cloudray Laser System 6.5.3. Vector file rotate marking 1. Import vector files, modify text size and parameters, and fill files Menu bar—Laser—Split Mark2—Set Parameters www.cloudraylaser.com... - Page 37 Cloudray Laser System A. Enable extended axis, reverse mode, enable Y axis (enable X or Y axis according to the direction in which the rotation axis is placed). B. The value of the number of pulses per revolution is the subdivision value on the drive, and the number of pulses usually used is 12800 or 25600.
- Page 38 Cloudray Laser System Press Mark(F2), the fiber laser will mark your image. www.cloudraylaser.com...
-
Page 39: St Marking Job
Cloudray Laser System 7. 1st Marking Job Operate this laser marking machine only in accordance with all the instructions provided in this manual. Failure to follow the proper guidelines detailed here can result in property damage and personal injury. To be safe, never ever run the laser system unattended. - Page 40 Cloudray Laser System Step 4. Load or create a design in EZCad2. This software supports these file types: Common types of images are supported. (bmp, jpg, gif, tga, png, tif…) Common vector images are supported. (ai, dxf, dst, plt…) Step 5. Press Hatch button at command tool bar, choose Hatch1(or you can choose the other according to your need).
- Page 41 Cloudray Laser System Step 7. Activate the laser guidance system by pressing Red or hitting F1 in EZCad2. The design should be displayed in red light on the workbench, showing where the laser will fire. Step 8. Place an expendable piece of the material to be engraved in the location shown by the laser guidance.
- Page 42 Cloudray Laser System Press the emergency switch. Step 13. Cover the galvo lens and fully clean the workbench. For best results, disconnect your fiber marking machine from its power supply between uses. Unplug it or turn off its intermediary surge protector.
-
Page 43: Instructions For Specific Materials
Cloudray Laser System 8. Instructions for Specific Materials When engraving a new material, it can be helpful to engrave a test matrix of small boxes produced with various speed, power, and frequency settings to home in on the exact effect that you are looking for. -
Page 44: Stone
Cloudray Laser System Stone When engraving various kinds of stone, generally use moderate power and speed at low frequency. As with ceramics and metals, be mindful of the dust created (especially for repetitive industrial applications) and take similar measures to ensure the safety of users and others in the work area. -
Page 45: Maintenance
Cloudray Laser System 9. Maintenance Maintenance Overview Unless otherwise specified, ONLY perform adjustment and maintenance of this device when the power is turned off and the power supply has been disconnected. ONLY allow trained and skilled professionals to modify or disassemble this device. -
Page 46: Cleaning The Lenses
Cloudray Laser System Cleaning the Lenses This system is fitted with high quality optical components, which under normal operating conditions are maintenance free for their lifetime. However, it may be necessary to clean output lenses, e.g. the scanner flat field lens (f-theta lens) if it becomes covered in dust or fumes. -
Page 47: Troubleshooting Guidance
Cloudray Laser System Troubleshooting Guidance Potential Problems Possible Solutions Correct the focus by adjusting the height of the laser arm. Correct the software parameters if they are invalid or mistaken. Have a technician fix or establish the connection between the laser and the mainboard.
Need help?
Do you have a question about the LiteMarker Pro QS Series and is the answer not in the manual?
Questions and answers