Advertisement
Quick Links
Quick Start Guide:
STEP 1
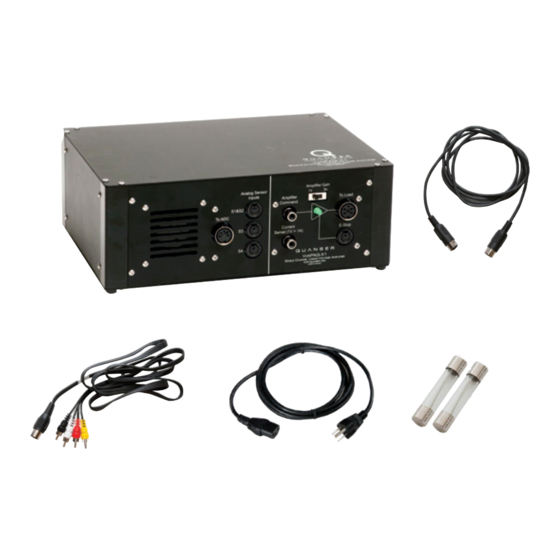
Check Components and Details
Make sure your VoltPAQ-X1 Amplifi er includes the following components:
1
4
STEP 2
Additional Components Required
To complete the VoltPAQ-X1 set up, you will need the following:
RCP Toolkit
ni.com/labviewtools/rcp
STEP 3
Set Up the Hardware
A
• If you are using the VoltPAQ-X1 to drive a Quanser
experiment, please refer to the particular experiment's
Quick Start Guide for connection instructions.
• If you intend to use the VoltPAQ-X1 to drive a third
party experiment, please refer to the VoltPAQ-X1 User
Manual for connector pinouts and specifi cations.
C
Set the GAIN switch on the VoltPAQ-X1 to 1X.
This is the default setting used for most devices.
VoltPAQ-X1 Linear Power Amplifier
2
5
6
Quanser Rapid Control Prototyping Toolkit for NI LabVIEW™. Visit www.ni.com/labviewtools/rcp
Note:
must be purchased separately.
Amplifier Gain
Analog Sensor
1X
3X
Inputs
Amplifier
Amplifier
To Load
To Load
Command
Command
S1&S2
To ADC
S3
Current
E-Stop
Sense (1V=1A)
S4
Amplifi er
3
uSer MaNuaL
uSer MaNuaL
voltpaQ-X1 amplifier
voltpaQ-X1 amplifier
Set Up and Configuration
Set Up and Configuration
7
Quanser educational solutions
Quanser educational solutions
are powered by:
are powered by:
Captivate. Motivate. Graduate.
Captivate. Motivate. Graduate.
Solutions for teaching and research. Made in Canada.
Solutions for teaching and research. Made in Canada.
B
Plug the supplied power cord into the back of the amplifi er.
D
1. VoltPAQ-X1 Linear Power Amplifi er
2. 4-pin DIN to 6-pin DIN motor cable
3. RCA to RCA cable
4. 5-pin-DIN to 4xRCA cable
5. Main power cord
6. Two sets of Slow blow fuses -3A, 250 V, 3AG
7. Quanser Workstation Resources*
(includes User Manual and Quick Start Guide)
*Download from the RCP Toolkit Resources
at www.ni.com labviewtools/rcp.
Amplifier
Sensors
Fuse: 3AG, 250V
!
3.0A
3.0A
Slow-Blow
100 - 120 V~ or
200 - 240 V~
2.8A
50-60Hz, Class 1
Amplifi er
Make sure you turn ON the VoltPAQ-X1
before running the experiment.
Amplifier
Sensors
Fuse: 3AG, 250V
!
Slow-Blow
3.0A
3.0A
100 - 120 V~ or
100 - 120 V~ or
200 - 240 V~
200 - 240 V~
2.8A
2.8A
50-60Hz, Class 1
Amplifi er
Advertisement

Related Manuals for Quanser VoltPAQ-X1


Summary of Contents for Quanser VoltPAQ-X1
- Page 1 Fuse: 3AG, 250V Quick Start Guide for connection instructions. 3.0A 3.0A Slow-Blow • If you intend to use the VoltPAQ-X1 to drive a third 100 - 120 V~ or party experiment, please refer to the VoltPAQ-X1 User 200 - 240 V~ 2.8A Manual for connector pinouts and specifi cations.
- Page 2 Verify that the fuses are not burnt. If a fuse is burnt, see the VoltPAQ-X1 User Manual for fuse rating and replacement information. Verify that the fuses are not burnt. If a fuse is burnt, see the VoltPAQ-X1 User Manual for fuse rating and replacement information.