Table of Contents
Advertisement
Quick Links
Contents
................................................................................................. 2
............................................................................................ 3
........................................................................................... 16
AC Triac Dimmer (WiFi + 2.4G + Push)
Model No.: TR -C1WR
........................................................................... 4
................................................................. 4
........................................................................... 5
................................................................................... 5
............................................................ 6-9
................................................................................... 6
...................................................................... 7
...................................................................... 8
.................................................................. 8
......................................................................... 9
Subordinate New Brand
....................................... 10-13
...................................................... 14
......................................... 15
Advertisement
Table of Contents

Related Manuals for Miboxer TRI-C1WR

Summary of Contents for Miboxer TRI-C1WR
-
Page 1: Table Of Contents
Subordinate New Brand AC Triac Dimmer (WiFi + 2.4G + Push) Model No.: TR -C1WR Contents ....................2 Feature .................... 3 Parameter ................4 Connection Diagram ..............4 Breaker mode instruction ................5 Installation Diagram ................... 5 PUSH Dimming ............6-9 Remote control instruction ................... -
Page 2: Feature
1. Feature Don’t need signal cable and change original wire layout, it’s very simple to install it with low cost. Mini appearance can fit for EU/USA standard junction box. Wide application for single color triac LED lights, filament lamps, Halogen lamps. ●... -
Page 3: Parameter
2. Parameter Model No.: TR -C1WR Input Voltage: 100-240V ~ 50/60Hz Output Voltage: 100-240V ~ Output Current: Max 1.36A Output Power: 150W @110V; 300W @220V Dim Method: WiFi + 2.4G + Push Working Temperature: -10 ~ 40°C 2.4G RF Control Distance: 30m 25mm 49mm Indicator light... -
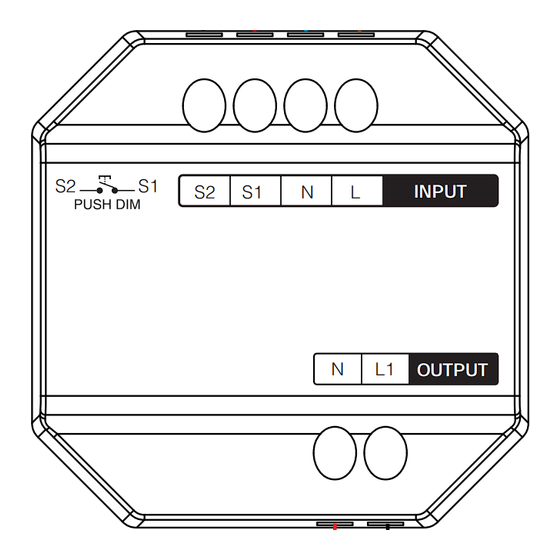
Page 4: Connection Diagram
3. Connection Diagram Input: AC100 ~ 240V PUSH switch INPUT Triac dimming led light OUTPUT Filament lamps and Halogen lamps Attention Please check and ensure that all cable had done correct connection before turn on it, otherwise the dimmer is easy to be damaged. “Breaker mode”... -
Page 5: Installation Diagram
4. Installation Diagram Support following standing junction box PUSH switch The depth of junction box is over 50mm 5. PUSH Dimming Short press PUSH switch: Turn ON/OFF light Long press PUSH switch: Stepless dimming brightness. Long press and release your finger, then repeat long pressing to increase or decrease brightness Please long press switch 20 seconds until all lights have same brightness with 100% level if multi dimmers had connect with same self-return switch. -
Page 6: Remote Control Instruction
6. Remote control instruction 6.1. Link remote For K1 remote 1). Learning code Way 1: short press “SET” one time, indicator is bursting Way 2: power off dimmer 10 seconds and power on again Indicator light Way 3: short press Push switch to keep light ON 2). -
Page 7: Unlink With Remote
6.2. Unlink with remote For K1 remote 1). Learning code 2). Press “SET” 5 times within 3 seconds, unlinking is done once the light flashes 10 times quickly For other remote 1). Learning code 2). Press “ ” any “ ”... -
Page 8: Compatible Remote
6.3. Compatible remote (purchase separately) B1 / B1-B / T1 K1 / K1-B FUT087 / FUT087-B S1-B / S1-W / S1-G 6.4. Set up min brightness with remote This function should be paired with remote firstly before setting. For K1 remote 1). -
Page 9: Auto Transmitting
For other remote 1). Long press the " " button on the remote or " " button on the zone, until the light flashes one time, indicator is going into flashing status 2). Short press the " " button on the remote or " " button on the zone to set up 10 different brightness (3%, 5%, 7%, 9%, 12%, 17%, 22%, 28%, 34%, 40%) Short press any button except “OFF”... -
Page 10: Smartphone App Control Instruction
7. Smartphone APP control instruction Network Configuration (Don’t support 5G router) 7.1. Download and install [Tuya Smart] app Search for [Tuya Smart] in Apple or Google store or scan following QR code to download and install the app. Please open the app click "Register" button to create account while using it in the first time, Log in directly if you already had account. - Page 11 4). Open homepage of app and click " + " button at the upper right corner of page. 5). Click " Lighting " on the left side of page and then click " Light Source (BLE+Wi-Fi) " 6). Follow app prompts to complete configuration. ⸺11⸺...
- Page 12 7.3. App set up lowest brightness The light is off once dim brightness into 1%, please increase lowest brightness Setting way: 1). Click “Settings” in APP 2). Move slip to finish setting ⸺12⸺...
- Page 13 7.4. Breaker Mode (ON/OFF) Attention: It only support to turn on/off light, user can not dim device once this mode is activated Setting way: 1). Click “ Settings ” in APP 2). Click button on the right side of “ Breaker Mode ” ⸺13⸺...
-
Page 14: Alexa Voice Control Instruction
8. Alexa voice control instruction Please add device into [Tuya Smart] app (check details in page 10), then start following steps 1). Open Alexa App 2). Click “More” on the bottom of right corner 3). Click “Skills & Games” 4). Click “ ”... -
Page 15: Google Home Voice Control Instruction
9. Google Home voice control instruction Please add device into [Tuya Smart] app (check details in page 10), then start following steps 1). Open Google Home App 2). Click “+” on the top of left corner 3). Click “Set up device” 4). -
Page 16: Attention
10. Attention 1. Please turn off power supply before installation. 2. Please ensure input voltage to be same as requirements from device. 3. Don’t disassemble device if you are not expert, otherwise it will damage it. 4. Please do not use the light in the place with widely range metal area or strong electromagnetic wave nearby, otherwise, the remote distance will be seriously affected.
Need help?
Do you have a question about the TRI-C1WR and is the answer not in the manual?
Questions and answers