Advertisement
Quick Links
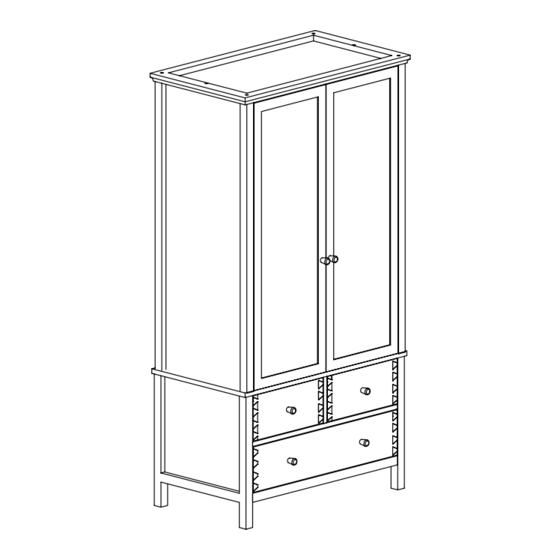
New Windsor Wardrobe
Assembly Instructions -
Please keep for future reference
615 / 0370
Dimensions
Width - 99cm
Depth - 57cm
Height - 190cm
Important -
Please read these instructions fully before starting assembly
If you need help or have damaged or missing parts, call the Customer Helpline: 08456 400800
Issue 2 - 21/04/11
Advertisement

Related Manuals for Schreiber New Windsor 615 / 0370


Summary of Contents for Schreiber New Windsor 615 / 0370
- Page 1 New Windsor Wardrobe Assembly Instructions - Please keep for future reference 615 / 0370 Dimensions Width - 99cm Depth - 57cm Height - 190cm Important - Please read these instructions fully before starting assembly If you need help or have damaged or missing parts, call the Customer Helpline: 08456 400800 Issue 2 - 21/04/11...
-
Page 2: Care And Maintenance
Safety and Care Advice Important - Please read these instructions fully before starting assembly • Assemble the item as close • Check you have all the • We do not recommend the components and tools listed on to its final position (in the same use of power pages 2 and 3. -
Page 3: Components - Parts
Components - Parts If you have damaged or missing components, call the Customer Helpline: 08456 400800 Please check you have all the parts listed below Top panel (57 x 99cm) Side panel (left) Side panel (right) Bottom panel (52.3 x 87cm) (55 x 126.5cm) (55 x 126.5cm) Lower support rail... -
Page 4: Tools Required
Components - Fittings Please check you have all the fittings listed below Note: The quantities below are the correct amount to complete the assembly. In some cases more fittings may be supplied than are required. Metal dowel x 10 Locking nut x10 50mm Bolt x 6 30mm Bolt x 2 Door hinge x 6... - Page 5 Assembly Instructions Step 1 Preparing panels Lay left side panel right side panel flat on the floor with the main fixing holes facing up Screw metal dowels into panels as shown. Note:Insert metal dowels as far as shown. Do not over tighten.
- Page 6 Assembly Instructions Step 2 Attaching support rails and bottom panel a: Locate front support rail and rear support rail onto left side panel as shown. Insert locking nuts into the support rails as shown. Use a screwdriver to turn locking nuts clockwise to secure.
- Page 7 Assembly Instructions Step 3 Attaching right side panel Carefully align right side panel and locate into position. Insert locking nuts shown and turn clockwise to secure.
- Page 8 Assembly Instructions Step 4 Attaching top panel Carefully turn the unit over onto it's front. Locate top panel into position. a: Secure in position using fixings into side panels b: Finally secure the top panel using fixings into top panel...
- Page 9 Assembly Instructions Step 5 Attaching back panel Attach back panels the back of the wardrobe using screws Important: Unit MUST be 'square' when back panels are attached.
- Page 10 Assembly Instructions Step 6 Preparing doors Separate the two halves of hinges Assemble one half of hinges to left door using fixings Repeat for right door...
- Page 11 Assembly Instructions Step 7 Hanging doors a: Assemble hinge plates to the inside of right side panel using screws Stand the wardrobe body upright. Warning: The unit is heavy. Lift with care. b: With help, align right door and slide the hinges into the hinge plates as shown.
- Page 12 Assembly Instructions Step 8 Attaching handles a: Use a screwdriver to un screw drawer handles from the inside of the drawers in base unit Note: For shipping,the drawer handles are pre- assembled inside the drawers. b: Re-assemble drawer handles to the outside of the drawers using screws...
- Page 13 Assembly Instructions Step 9 Attaching base unit With help, carefully lift the top unit onto the base section. Warning:The unit is heavy. Lift with care. Align the unit at the back and sides and secure using brackets and fixings Back...
- Page 14 Assembly Instructions Step 10 Hinge adjustment a: To move doors up or down, loosen screws as shown and move doors to suit Once doors are aligned, insert 2 more screws into the hinge plates and fully tighten all screws. b: To move doors in or out, loosen screw shown and move doors to suit.
- Page 15 Assembly Instructions Step 11 Fixing to the wall It is recommended that the unit is fixed to the wall to ensure stability. Assemble wall straps WALL to the back of the unit using the screws supplied. With help, move the unit to the desired location.
Need help?
Do you have a question about the New Windsor 615 / 0370 and is the answer not in the manual?
Questions and answers