Table of Contents
Advertisement
Quick Links
Advertisement
Table of Contents

Related Manuals for logos biosystems LUNA FX7


Summary of Contents for logos biosystems LUNA FX7
- Page 1 User Manual LBSM-SM-ML-LU7-001 www.logosbio.com Rev. 6...
- Page 2 Do not disassemble the device on any occasion as this will invalidate your warranty. TRADEMARKS The trademarks used in this document are the property of Aligned Genetics, Inc. ©2021 Aligned Genetics, Inc. All rights reserved. Logos Biosystems is the brand name of Life Science business of Aligned Genetics, Inc.
- Page 3 CERTIFICATION MARKS The WEEE (Waste Electrical and Electronic Equipment) symbol indicates that users of this instrument have responsibility of returning and disposing of WEEE in an environmentally friendly manner. Follow the waste ordinances of your region for proper disposal provisions. The CE mark indicates that this instrument conforms to all applicable European Community provisions for which this marking is required.
-
Page 4: Table Of Contents
Table of Contents SAFETY PRECAUTIONS ·········································································································· 7 Instrument Safety ·················································································································· 7 General Safety ···················································································································· 7 Operating Conditions ············································································································ 7 Instrument Disposal ············································································································· 7 Instrument Disassembly ········································································································ 7 Personal Safety ····················································································································· 7 Safety Guidelines ················································································································ 7 Waste Disposal ··················································································································· 8 PRECAUTIONS DE SECURITE ··································································································· 9 Sécurité... - Page 5 Sample Preparation ·············································································································· 16 Sample Staining ················································································································ 16 Sample Loading ················································································································ 16 Counting with the LUNA-FX7™ ······························································································· 16 Slide Insertion & Removal ··································································································· 16 Viewing Images ················································································································· 17 Cell Counting ···················································································································· 18 Results ······························································································································· 19 Results ···························································································································· 19 Histograms ······················································································································· 20 Dilution Calculator ·············································································································...
- Page 6 GF/RF threshold level ········································································································· 29 Dilution Factor ·················································································································· 29 Fluorescence Cell Counting Parameters – Cell lines & Primary cells, Advanced mode ····················· 30 GF/RF Exposure Level ······································································································· 30 Min./Max. search Size ········································································································ 30 Declumping sensitivity ········································································································ 30 Min. FL intensity ················································································································ 31 Min.
- Page 7 Connected to User PC ········································································································ 48 10. MAINTENANCE AND TROUBLESHOOTING ······························································· 51 Maintenance ························································································································ 51 Powering on/off ················································································································· 51 Cleaning ·························································································································· 51 Troubleshooting ··················································································································· 51 Inaccurate Cell Count ········································································································· 51 Slide Insertion ··················································································································· 52 Data Transfer and Saving ···································································································· 52 Software Update Errors ······································································································...
-
Page 8: Safety Precautions
Use only the power cord and AC adapter provided by Logos Biosystems. If the proper power cord and AC adapter are not used, electrical safety of the product cannot be guaranteed. -
Page 9: Waste Disposal
Keep all user manuals in a safe and accessible place for future reference. Read and understand all safety data sheets before storing, handling, or working with any reagents. Wear appropriate personal protective equipment (PPE) when handling reagents and cell samples to avoid exposure. When using toxic agents, radioactive materials, or pathogenic microorganisms belonging to WHO Risk Groups 2-4, follow national laws and regulations for biosafety level requirements. -
Page 10: Precautions De Securite
Ne touchez pas les composants avec les mains mouillées. Utilisez uniquement les composants fournis ou autorisés par Logos Biosystems. En cas d’utilisation d’une combinaison autre que celle qui a été recommandée, la sécurité du produit ne peut être garantie. -
Page 11: Consignes De Sécurité
Consignes de Lisez et comprenez attentivement tous les manuels d'utilisation avant d'utiliser l'instrument. sécurité Conservez tous les manuels d'utilisation dans un endroit sûr et accessible pour référence future. Lisez et comprenez toutes les fiches de données de sécurité avant de stocker, de manipuler ou de travailler avec des réactifs. -
Page 12: Product Introduction
Inspect the product package upon delivery to ensure that all components have been included. Contact your local distributor or Logos Biosystems if anything is missing. Damage that may occur during shipping and handling is not covered by warranty and must be filed with the... -
Page 13: Product Description
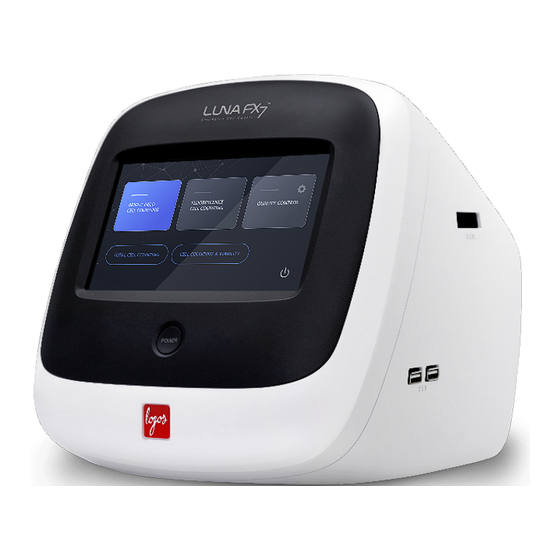
Product Description LUNA-FX7™ The LUNA-FX7™ is an automated, image-based cell counting device that features an accurate counting algorithm and increased counting volume and represents a fully automated Automated Cell solution for cell counting and viability analysis. The LUNA-FX7™ also provides flexible counting slide options from a single channel slide to a higher throughput, 8-channel slide. - Page 14 to remove and reinsert a slide. The increased counting volume yields more accurate and consistent results. Channel No. 1 Channel 2 Channel 3 Channel 8 Channel Reusable LUNA™ LUNA™ LUNA™ LUNA™ Cell Counting LUNA™ 1-Channel 3-Channel 8-Channel Slides / Reusable slides Slides Slides Slides...
-
Page 15: Getting Started
Connect the instrument to electrical outlets using the supplied power cord and AC adapter. Make sure the power cords are appropriate for your region. Always use power cord and AC adapter provided or approved by Logos Biosystems. If appropriate cord is not used, the electrical safety of the instrument cannot be guaranteed. -
Page 16: Screen Saver
Quality Control - Quality Control mode is only functional upon registration of Logos Biosystems brightfi eld or fluorescent validation slides. - The Quality Control menu is used to monitor the accuracy and variability of the instr ument. -
Page 17: Counting Cells
3. Counting Cells Sample Preparation Sample Staining Brightfield cell counting For Total and viability cell counting, prepare a cell suspension according to standard procedures. Mix the sample, 1:1, with Trypan Blue Stain, 0.4% (T13001) or Erythrosin B Stain (L13002) or Methylene blue Stain, 0.02% (L13004). Mix gently, but thoroughly to ensure a homogenous suspension. -
Page 18: Viewing Images
Press INSERT. The slide holder will automatically move into position. To remove the slide, press EJECT. The slide holder will automatically extend out of the instrument and the slide may be removed. Viewing Images By default, upon slide insertion, the viewing light will automatically turn on and the LUNA- FX7™... -
Page 19: Cell Counting
Important ! Adjusting light intensity levels in the COUNT screen will only be applied to the live view mode. Exposure levels for brightfield cell counting are automatically adjusted. Exposure levels for fluorescence cell counting may only be adjusted within a protocol (Section 5). Focusing To bring cells into focus, press Autofocus. -
Page 20: Results
Results Results After counting is complete, the data and images will appear in the RESULTS window. The counting results will be shown to the left of the screen. Press the left or right arrows under Chamber to view the results and images for each counted chamber. -
Page 21: Histograms
Histograms Press HISTOGRAM & GATING to open the histogram window. ② ④ ① ③ ① Cell concentration or number can be graphed according to cell size. To toggle between cell concentration, cell cluster, and cell number press the Y-Axis title. ②... -
Page 22: Save
from stock solution. Enter “1” (default value) if the counted sample was not diluted from stock solution. Enter the values for the desired concentration and final volume. Press CALCULATE and dilution instruction will appear in the grey message box. Save Press SAVE &... -
Page 23: Print
When saving, one of the following must be selected: Analyzed image, Raw image, or Report. It is not possible to save only the Bioprocess. Even if you specify the path as a USB drive, the Bioprocess will be saved only in the internal memory. -
Page 24: Review
4. Review Reviewing Data Review Images Press REVIEW. Select storage PROTOCOL Export Page navigation Erase ALL Image > Select SSD or USB drive. Navigate and open a folder from the internal or a USB drive. Select a subfolder, e.g., Ch A, Ch B. -
Page 25: Reanalyze
Reanalyze Raw images may be reanalyzed using a different protocol. Load or create the desired protocol. Important ! During reanalysis, changing exposure levels in the protocol will have no effect on the results of the reanalyzed counting data. Press REVIEW and select a folder from the SSD(internal storage) or USB drive. Select the subfolder/chamber to be reanalyzed. -
Page 26: Protocols
5. Protocols Protocol Selection Default Protocol Each counting mode comes with the following pre-set default counting protocols. These protocols cannot be edited. Counting mode Default Protocol Bright Field Cell Counting DEFAULT YEAST - Total Cell Counting Bright Field Cell Counting DEFAULT IQOQ-BF YEAST... -
Page 27: Editing Protocols
Editing Protocols Select a protocol that is not the Default protocol. Press EDIT. This will activate the arrows for each parameter, turning them black. Press the arrows to adjust the values of each parameter. Press SAVE AS to change the protocol name. Press LOAD to save the edited protocol under the selected name and activate it. -
Page 28: Protocol Parameters
Protocol Parameters Brightfield Cell Parameters for [Brightfield cell counting-Total cell counting] Counting Parameters Parameter Range DEFAULT* Min. search size (μm) 1-89 Max. search size (μm) 2- 90 Cell detection sensitivity 1-10 Noise reduction Dilution factor 1-100 Parameters for [Brightfield cell counting-Cell counting & Viability] Parameter Range DEFAULT*... -
Page 29: Min./Max. Search Size
Min./Max. search Search size refers to the approximate cell size that the algorithm recognizes as potential cell objects. By adjusting Min. and Max. search size, objects sized within the setting value will be size listed as a potential cell candidate. Clustered objects larger than the Max. -
Page 30: Gf/Rf Exposure Level
GF exposure level 0.1-10 RF exposure level 0.1-10 Cell size calculation BF/FL Min. cell size 1-89 Max. cell size 2-90 GF threshold level 1-10 RF threshold level 1-10 Dilution factor 1-10 1.11 The IQOQ-FL on the Protocol List is the protocol that is used for IQOQ with the fluorescence validation slide. -
Page 31: Fluorescence Cell Counting Parameters - Cell Lines & Primary Cells, Advanced Mode
Fluorescence Cell Parameters for [Fluorescence cell counting-Cell lines & primary cells, Advanced] Counting Parameters – Cell lines & Primary cells, Advanced mode Parameter Range DEFAULT* GF exposure level 0.1-10 RF exposure level 0.1-10 Min. search size (μm) 1-89 Max. search size (μm) 2- 90 Declumping sensitivity 1-10... -
Page 32: Min. Fl Intensity
Min. FL intensity Min FL intensity is used to set the minimum Green and Red fluorescence intensity values to be detected as cells. Objects with fluorescence intensity lower than Min. FL intensity value are excluded from counting. Increased Min. FL intensity value will remove objects with weak fluorescence intensity. -
Page 33: Bioprocess Feature
6. Bioprocess Feature Bioprocess Feature Bioprocess The LUNA-FX7™ bioprocess feature enables automated tracking of multiple bioprocessing activities. The bioprocess feature tracks individual batches according to protocol and will calculate and chart growth rates, doubling times, and viabilities based on count data. Creating a 1. -
Page 34: Review/Export Bioprocess Data
Review/Export 1. Select REVIEW. Bioprocess Data 2. Press REVIEW BIOPROCES. 3. From the protocol list on the left, select the protocol used to create your bioprocess data. 4. Insert a USB drive and press EXPORT to save selected bioprocess data as a CSV file and graph image file to the USB drive. -
Page 35: Quality Control
Quality Control mode is used to monitor the performance of the LUNA-FX7™. The Quality Control features may only be used in conjunction with the Logos Biosystems fluorescence or brightfield validation slides. Validation slides contain a pre-spotted pattern (brightfield) or pre- fixed beads (fluorescence) of known concentration and viability. - Page 36 Enter a Name, then press the right arrow button [>] to move to ‘Product key’. Enter the 20 digit Product key. Press the ‘space’ icon to advance. Press OK. Confirm control type: Fluorescence or Brightfield and Expiration date. Important ! The product key is included with the product information of the validation slide.
- Page 37 Set Acceptance limits (%). Acceptance limits produce upper and lower boundaries in QC graphing. Press Save to complete registration. After completing registration, the validation slide information may be viewed by selecting the appropriate registered control in the REGISTER main page, and pressing Load.
-
Page 38: Performing Quality Control
Press RESULTS to see the counting data. If the results are not within the acceptance range, redo RUN QC steps. If not met again, contact your local distributor or Logos Biosystems. To re-run QC, press NEXT COUNT, then press the COUNT button. - Page 39 Press GRAPH to view a graphical representation. Press the Y-axis title box to switch between ‘Concentration’ and ‘Viability’. Press ‘Day’, ‘Month’ or ‘Year’ to alter X-axis scale. Press EXPORT to export a CSV file with count data and graph images to a USB drive. Press RESULTS to view the most recent QC count.
-
Page 40: Settings
8. Settings LUNA-FX7™ Settings Screen Settings Navigate to either Brightfield or Fluorescence counting window and press SETTINGS. Within SETTINGS, software updates, date and time changes, and background calibrations may be performed. Additionally, options for ‘Cell Counting’, ‘Save & Review’, ‘Network’, ‘CountWire’ ™... - Page 42 Slide setting Select a slide format and Counting chamber area option. Counting chamber area: current Counts the chamber that is being viewed in the live view of the Count screen. All chambers are counted. Chamber designation One or more chambers may be selected. Combine results of selected chambers This option can only be selected when using a 3Ch Slide.
-
Page 43: Save & Review
Autofocus upon slide insertion When Autofocus upon slide insertion is activated, autofocus is automatically performed when a slide is inserted. Save & Review Press Save & review on the right menu. Auto save When Auto save is activated, cell counting results are automatically saved according to the Quick &... - Page 44 Ethernet connection Connect an Ethernet cable to the instrument. When connected, an IP address will appear on the screen in blue color. WiFi connection Insert the supplied WiFi dongle to a LUNA-FX7™ USB port. Press WiFi. Select appropriate WiFi, then press OK. Enter password, if necessary. When the instrument is connected, an IP address will appear on the screen in blue color.
-
Page 45: Countwire
MAC Address Available as a network address when you access the LUNA-FX7™. When using a Wi-Fi network with Mac address filtering When assigning a static IP CountWire This setting is required to use the CountWire™ system. Press COUNTWIRE. CountWire It must be ON to utilize the LUNA-FX7™ as a part of the CountWire™ system. network by FTP does not work. -
Page 46: Date & Power
Storage IP address IP address of the CountWire™ Data Storage. The same address that you input on the CountWire™ Client. Ask network administrator for details. Storage port Port number of the CountWire™ Data Storage. The Storages port number is 22. Press the Apply button after entering the required information. -
Page 47: S/W & Calibration
Logos Biosystems continually provides software updates to ensure optimal performance. The current software version is displayed in SETTINGS: S/W & CALIBRATION. 1. The most recent version may be downloaded from the Logos Biosystems website (www.logosbio.com) into the root directory of a compatible USB drive. - Page 48 Calibration The LUNA-FX7™ is calibrated prior to shipping. Calibration only needs to be performed 1) after any software/firmware updates, and 2) after switching Trypan blue or Erythrosin B or Methylene blue brands or formulations. To perform calibration: 1. Press S/W & CALIBRATION. 2.
-
Page 49: Data Transfer Via Network
9. Data Transfer via Network Network sharing Connected to Connect the LUNA-FX7™ to a network. Make note of the LUNA-FX7™ IP address in the SETTINGS: NETWORK screen. User PC In your Windows PC, open File Explorer (Windows key + E) Type the IP address connected to the LUNA-FX7™... - Page 50 If it is the initial access, it may require a log-in with User name and Password. User name: logosbio Password: logosbio You can right-click the folder to map the network drive or create shortcut for your convenience. Important ! If you cannot access the folder with the message below,...
- Page 51 Please check if the IP address is correct and the LUNA-FX7™ is well connected to the internet. If there is no connection issue, contact Logos Biosystems or your local distributor to receive a script in a Zip file to clean Windows authentication caches.
-
Page 52: 10. Maintenance And Troubleshooting
10. Maintenance and Troubleshooting Maintenance Powering on/off To turn on the LUNA-FX7 ™ , push the power button below the touchscreen for at least a second. To turn off the LUNA-FX7 ™ , press the power icon in the menu bar or push the power ™... -
Page 53: Slide Insertion
Optical components may be dirty or damaged. Please contact your local distributor or Logos Biosystems. Damaged or contaminated slide Use a new slide if it is disposable. Make sure that the counting area of the slide is transparent before loading the sampl Wear gloves and handle by the edges to avoid smudging and contamination. -
Page 54: 11. Product Specifications
11. Product Specifications LUNA-FX7™ Automated Cell Counter Physical and LUNA-FX7™ LUNA-FX7™ Basic Package Advanced Package Technical Onboard storage 250 GB 1 TB Characteristics Additional software Bioprocess software Cell size range 1 - 90 µm 1 x 10 - 5 x 10 cells/mL Detection range (Optimal: 5 x 10... -
Page 55: 12. Ordering Information
12. Ordering Information Instruments Cat # Product Quantity L70001 LUNA-FX7™ Automated Cell Counter, Basic Package L70002 LUNA-FX7™ Automated Cell Counter, Advanced Package Slides and Reagents Cat # Product Quantity L72011 LUNA™ 1-Channel Slides, 50 Slides 1 box L72012 LUNA™ 1-Channel Slides, 500 Slides 10 boxes L72013 LUNA™... -
Page 56: Countwire
CountWire™ Cat # Product Quantity CountWire™ Basic L71001 1 set (1 CountWire™ Data Storage + 1 CountWire™ Verification Key) L71002 CountWire™ Verification Key (additional) 1 unit CountWire™ Single L71005 1 set (1 USB Drive + 1 CountWire™ Verification Key) IQ/OQ Cat # Product Quantity... -
Page 57: 13. Purchaser Notification
13. Purchaser Notification Limited Use Label License Research Use Only The purchaser of this product should use this product only for research for the sole benefit of the purchaser. By use of this product, the purchaser agrees to be bounded by the terms of this limited use statement whether the purchaser is a for-profit or a not-for-profit entity. -
Page 58: Out Of Warranty Service
of any kind, either express or implied, including for merchantability or fitness for a particular purpose with regards to this Instrument. To obtain service during the Warranty Period, contact your local supplier or the Company’s Technical Support team. Out of Warranty Please contact your local supplier or the Company’s technical support team in order to obtain out-of- Service warranty service. - Page 59 Logos Biosystems Aligned Genetics, Inc. HEADQUARTERS FL 3 28 Simindaero 327beon-gil, Dongan-gu Anyang-si, Gyeonggi-do 14055 OUTH OREA Tel: +82 31 478 4185 Fax: +82 31 360 4277 Email: info@logosbio.com 7700 Little River Turnpike STE 207 Annandale, VA 22003 Tel: +1 703 622 4660...
Need help?
Do you have a question about the LUNA FX7 and is the answer not in the manual?
Questions and answers