Table of Contents
Advertisement
Quick Links
Advertisement
Table of Contents

Subscribe to Our Youtube Channel
Related Manuals for Geek Smart G6


Summary of Contents for Geek Smart G6
- Page 1 设计要求 尺寸: A5 封面250g铜版纸 内页128g铜版纸 双面印 骑马钉封面封底覆亚膜 彩印 外覆膜...
- Page 2 ROBOT VACUUM CLEANER User Manual Model No.: G6 IMPORTANT:Read the instructions carefully before operating the appliance and keep them for future reference.
- Page 3 Safety Instructions Product Components How To Use Cleaning And Maintenance Troubleshooting welcome GeekSmart bids you welcome to a world of smart home devices, the robot vacuum ceaner. GeekSmart strives to explore and develop the smart home industry for the good of all by combining cutting-edge technologies to develop products fit and ready for the market.
- Page 4 lmportant Safety lnstructions Please read the manual carefully before using the product and keep this instruc- tion for reference. Products cannot be used by children under 8 years of age or people with mental disabilities. If these kinds of people need to use it, please do so under the supervision of the guardian.
- Page 5 Do not place any product that is burning at the suction outlet. Do not use products when suction is blocked. Please clean the dust, cotton wool, hair, etc. at the suction port to ensure smooth air circulation at the suction port. Use the power cord carefully to avoid damage.
-
Page 6: Product Components
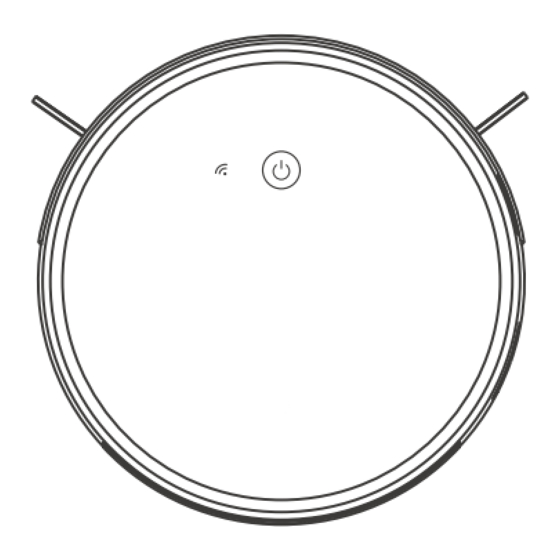
Product Components What’s in the Box Robot Vacuum Charging Base Clean Brush Power Adapter Side Brushes X6 HEPAX 2 Remote Control (Optional) ROBOT VACUUM CLEANER User Manual Model No.: G6 Instruction Manual IMPORTANT : Read the instructions carefully before operating the appliance and keep them for future reference. - Page 7 Robot Wifi Indicator Light Key (Start or Pause) Top View Lower Vision Sensor Unversial Wheel Charging Pole Piece Right Brush Left Brush Drive Wheels Roller Brush Assembly Dust Box Bottom View...
- Page 8 Dust Box Dust Box Infrared Sensors Switch Primary Filter Dust Box Upper Cover Dust Box Lower Cover Filter Sponge Dustbin Key High E ciency Filter (HEPA)
-
Page 9: Charging Base
Charging Base Cleaning Tools lndicator Light Charging Pole Piece Power Adapter Power Adapter Slots Power Return home Forward Left Right Backward Stop/Start Spot cleaning wall following Turbo... - Page 10 parameter Product Model lnput 100-240V/50-60Hz Power Consumptiom Battery Capacity Li-ion 2500mAh Dust Collector Capacity 0.6L Cleaning Time Max.100 mins Charging Time Round 300 mins Battery DC 3V(AAA) lnfrared Remote control method Emitting and receiving distance ≤5M lnput 100-240V/50-60Hz Output 19V/0.6A Install 2AAA batteries before using the remote control for the first time.
-
Page 11: How To Use
How To Use Install The Side Brushes Please install the right brush into the right bottom mounting port of the machine, the left brush into the left botom mounting port of the machine, andensure that the two side brushes are in place. - Page 12 Master Charge Place the master in the charging stand and pay attention to the charging pole piece.Turn on the power switch, the robot will enter standby mode.“ ” Red light flashes indicates that the battery need to be charged.“ ” Blue light breathing light flashes indicate charging.When the “...
- Page 13 Please install the right brush into the right bottom mounting port of the machine, the left brush into the left bottom mounting port of the machine, and ensure that the two side brushes are in place. Q : What should I do if the strength of vacuuming is weak? A : First of all, check whether the dust bin is full and the robot is fully charged.
-
Page 14: Wifi Connection
WiFi Connection Please scan the QR code or search “GeekSmart” and download APP. After the APP is installed . Please follow the APP instruction to register the account and login. Open the APP, click 【add device】 or click the button 【+】 and select the “Robot Vacuum”,then click the model you bought. - Page 15 3. Please make sure that the product is on (like the picture shows) 4. Long press “ ” for 3 seconds, and then“ ” flashes, input the wi-fi account and password.(only support 2.4Ghz wifi,5Ghz can not be connected.) A few seconds later ,the product will be connected to your phone.
-
Page 16: Cleaning And Maintenance
Cleaning And Maintenance Please refer to the following guidelines to check the cleaning area before the cleaner works. 1. Power lines and other debris scattered on theground may trip up the product, they must be removed. 2. Please roll the carpet tassels or let the product work on short-hair rugs. -
Page 17: Start/Stop Cleaning
Start/Stop Cleaning 1. Start or stop by pressing the master’s “ ” key or the remote control's“ ” / “ ” key. NOTE: Before starting the mode, make sure that the outer ring of the“ ” key is blue and the master is in the state of being awakened.lf the master does not wake up, short press the master“... -
Page 18: Edge Mode
Fixed-point Mode lt is suitable for the ground environment wherethe garbage is concentrated. The mastercentralized cleaning in the designated area, and master centralized cleaning with the “spiral” route. Edge Mode lt is suitable for cleaning at the corners of the room.The master is cleaned around the periphery of a fixed object (such as a wall) andcleaned back to the charging stand. - Page 19 Return Charging Mode During the cleaning process, the master can sense that its power isinsu cient,and automatically find the charging stand for charging. You can press the “home” button or press the “power” button twice to makethe master return to the charging stand for charging. NOTE: In the regular cleaning mode, the maximum run time of the mastercould be 100 minutes while it would automatically return charging for nexttask if it has...
- Page 20 Roller Brush Assembly and Cleaning Remove the roller brush brush cover plate, remove the roller brush, cut of the hair wound on it and then use the cleaning brush to clean it. Set roller brush assembly: take out sucking assembly first, set the roller brush, cover the board and press it to lock.
- Page 21 Please let these parts dry naturally formore than 24 hours.
-
Page 22: Side Brushes
Side Brushes Cleaning Side Brushes Pull out the side brush and wipe it with a clean rag. Other Assembly Cleaning the universal wheel to reduce hair entangle. Clear down the sensor to ensure the sensitivity of the sensor. To clean the charging pole pieces, use a dry rag to clean the charging poles on the bottom of the master or the charging stand. -
Page 23: Troubleshooting
Troubleshooting Cause of Display light APPcontent Solution lssue Please check side Side brush Red light on Clean side brush brushes are jammed Please wait an hour Red light on Motor cooling error before using abnormality Please check roller Roller brush Red light on Clean roller brush brush is jammed... - Page 24 Geek Technology Ltd. 1275 Bloomfield Ave Fairfield, NJ07004 Toll Free 1-844-801-8880 / (862) 352-0406 www.geektechnology.com...
Need help?
Do you have a question about the Smart G6 and is the answer not in the manual?
Questions and answers