Table of Contents
Advertisement
Available languages
Available languages
Quick Links
Safety • Assembly • Operation • Adjustments • Maintenance • Troubleshooting • Parts Lists • Warranty
OPERATOR'S MANUAL
21" Self-Propelled Mulching Mower — Model 556
IMPORTANT
READ SAFETY RULES AND INSTRUCTIONS CAREFULLY BEFORE OPERATION
Warning: This unit is equipped with an internal combustion engine and should not be used on or near any unimproved forest-covered, brush-
covered or grass-covered land unless the engine's exhaust system is equipped with a spark arrester meeting applicable local or state laws (if any).
If a spark arrester is used, it should be maintained in effective working order by the operator. In the State of California the above is required by law
(Section 4442 of the California Public Resources Code). Other states may have similar laws. Federal laws apply on federal lands. A spark arrester
for the muffler is available through your nearest engine authorized service dealer or contact the service department, P.O. Box 361131 Cleveland,
Ohio 44136-0019.
FORM NO. 769-02186
PRINTED IN U.S.A
TROYBILT LLC, P.O. BOX 361131 CLEVELAND, OHIO 44136-0019
11/2005
Advertisement
Chapters
Table of Contents

Subscribe to Our Youtube Channel
Related Manuals for Troy-Bilt 556


Summary of Contents for Troy-Bilt 556
- Page 1 Safety • Assembly • Operation • Adjustments • Maintenance • Troubleshooting • Parts Lists • Warranty OPERATOR’S MANUAL 21” Self-Propelled Mulching Mower — Model 556 IMPORTANT READ SAFETY RULES AND INSTRUCTIONS CAREFULLY BEFORE OPERATION Warning: This unit is equipped with an internal combustion engine and should not be used on or near any unimproved forest-covered, brush- covered or grass-covered land unless the engine’s exhaust system is equipped with a spark arrester meeting applicable local or state laws (if any).
-
Page 2: Table Of Contents
. This information will be necessary to use the manufacturer’s web TROY-BILT LLC P. O. BOX 3 6 1 1 3 1 site and/or obtain assistance from the Customer Support www.troybilt.com... -
Page 3: Slope Gauge
Use this page as a guide to determine slopes where you may not operate safely. Do not operate your lawn mower on such slopes. Slope Gauge WARNING Do not mow on inclines with a slope in excess of 15 degrees (a rise of approximately 2-1/2 feet every 10 feet). -
Page 4: Safe Operation Practices
WARNING: Engine Exhaust, some of its constituents, and certain vehicle compo- nents contain or emit chemicals known to State of California to cause cancer and birth defects or other reproductive harm. DANGER: This machine was built to be operated according to the rules for safe operation in this manual. - Page 5 The cutting blade continues to rotate for a few seconds after 7. Extinguish all cigarettes, cigars, pipes and other sources the engine is shut off. Never place any part of the body in of ignition. the blade area until you are sure the blade has stopped 8.
-
Page 6: Setup And Adjustment
1. Remove any packing material which may be between upper and lower handles. a. Pull up and back on upper handle as shown in Step 1. Make certain the lower handle is seated securely into the handle mounting brackets. b. Tighten star knobs securing upper handle to Setup and lower handle. - Page 7 6. Follow steps below to assemble the grass catcher: a. Place bag over frame so that its black plastic side is at the bottom. b. Slip plastic channel of grass bag over hooks on the frame. See Step 6. All the plastic channels except center top of bag attach from outside of bag.
-
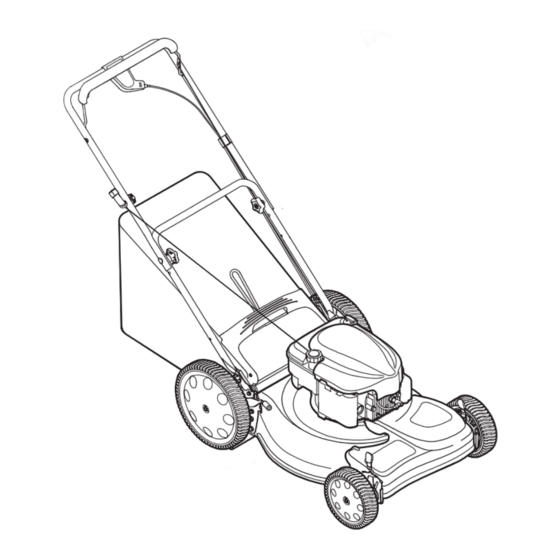
Page 8: Operating Your Lawn Mower
Know Your Lawn Mower Drive Control Blade Control Operating Your Lawn Recoil Starter Mower Grass Catcher WARNING Cutting Height Adjustment Levers The blade control mechanism is a Figure 1 safety device. Never Cutting Height Adjustment Levers Now that you have set up your lawn mower for op- eration, get aquainted with its controls and features. - Page 9 Starting Engine WARNING: Be sure no one other than the operator is standing near the lawn mower while starting engine or operat- ing mower. Never run engine indoors or in enclosed, poorly ventilated areas. Operating Engine exhaust contains carbon monox- ide, an odorless and deadly gas.
-
Page 10: Maintaining Your Lawn Mower
Lubrication 1. Lubricate pivot points on the blade control handle at least once a season with light oil. The blade control must operate freely in both directions. See Figure 3. 2. Lubricate the wheels at least once a season with Lubricate these light oil (or motor oil). - Page 11 Blade Care WARNING: When removing cutting blade for sharpening or replacement, protect your hands with a pair of heavy gloves or use a heavy rag to hold blade. 1. Disconnect spark plug wire from spark plug. Turn Maintaining mower on its side making sure that the air filter and the carburetor are up.
-
Page 12: Trouble Shooting
Problem Remedy Cause Engine fails to start 1. Blade control disengaged. 1. Engage blade control. 2. Spark plug wire disconnected. 2. Connect wire to spark plug. 3. Fuel tank empty or stale fuel. 3. Fill tank with clean, fresh gasoline. 4. -
Page 13: Off-Season Storage
Off-Season Storage 4. Coat mower’s cutting blade with chassis grease to prevent rusting. The following steps should be taken to prepare your lawn mower for storage. 5. Store mower in a dry, clean area. Do not store next 1. Clean and lubricate mower thoroughly as described in to corrosive materials, such as fertilizer. -
Page 14: Safety Labels
Safety Labels Found On Your Lawn Mower Safety Labels WARNING DO NOT remove safety (or any) labels from mower for any reason. -
Page 15: Parts List
Parts List IMPORTANT For a proper working machine, use Factory Approved Parts. V-BELTS are specially designed to engage and disengage safely. A substitute (non OEM) V-Belt can be danger- ous by not disengaging completely. Ref. Part No. Description Ref. Part No. Description For parts and/or 712-0214... - Page 17 Ref. Part No. Description Ref. Part No. Description 746-04206 Variable Speed Cable 750-04404 Sleeve Spacer 9.10” Lg. 710-0599 TT Screw 1/4-20 x 0.5 748-04015A Blade Adapter w/ Pulley Parts List 731-04150C Rear Baffle 21” Rd. 742-0741 21” Mulching Blade 710-04371 Screw 1/4-15 736-0524B Blade Bell Support...
-
Page 18: Notes
MANUFACTURER’S LIMITED WARRANTY FOR The limited warranty set forth below is given by Troy-Bilt LLC with respect Troy-Bilt does not extend any warranty for products sold or to new merchandise purchased and used in the United States, its posses- exported outside of the United States, its possessions and sions and territories. - Page 19 Seguridad-Ensamblaje-Operación-Ajustes-Mantenimiento-Solución de problemas-Lista de Partes-Garantías MANUAL DEL OPERADOR Podadora tipo abonadora autopropulsada de 21”- Modelo 556 IMPORTANTE LEA CON ATENCIÓN LAS REGLAS DE SEGURIDAD E INSTRUCCIONES ANTES DE OPERAR LA PODADORA Advertencia: Esta unidad está equipada con un motor de combustión interno y no debe ser utilizada en o cerca de un terreno agreste cubierto por bosque, malezas o hierba excepto que el sistema de escape del motor esté...
- Page 20 La presente información resultará necesaria para el uso del sitio web del fabricante y / o para TROY-BILT LLC P. O. BOX 3 6 1 1 3 1 solicitar ayuda del Departamento de Asistencia al Cliente o de www.troybilt.com...
-
Page 21: Indicador De Pendiente
Use esta página como guía para determinar las inclinaciones de las pendientes en las que podría no tener una operación segura. No opere la podadora en dichas pendientes. Indica- dor de pendien- ADVER- TENCIA No pode en inclina- ciones mayores a 15 grados (elevación aproximada de 2 1/2 pies por cada 10... -
Page 22: Prácticas De Operación Seguras
ADVERTENCIA: El escape del motor de este producto, algunos de sus componentes y algunos componentes del vehículo contienen o emiten productos químicos que el estado de California considera que pueden producir cáncer, defectos de nacimiento u otros problemas reproductivos. PELIGRO: Esta máquina está diseñada para ser utilizada respetando las reglas de seguridad contenidas en este manual. - Page 23 10. Muchas lesiones ocurren como resultado de pasar la cortadora opere la máquina en pendientes. sobre los pies durante una caída provocada por derrapes o tropiezos. 2. Esté atento a los agujeros, raíces, rocas, objetos ocultos o No se sostenga de la podadora si se está cayendo, suelte la manija abultamientos que puedan provocar que se derrape o se tropiece.
-
Page 24: Configuración Y Ajustes
1. Retire el material de empaque que pudiera estar entre las manijas superior e inferior. a. Tire y retroceda la manija superior como se muestra en el Paso 1. Asegúrese que la manija inferior esté asentada firmemente en los soportes de montaje de la manija. - Page 25 5. Una placa de ajuste y una palanca en cada rueda proporcionan el ajuste de la altura de corte. a. Presione la palanca hacia la rueda. b. Muévala a cualquiera de las nueve posiciones para la altura de corte deseada. Vea el Paso 5. c.
-
Page 26: Funcionamiento De La Podadora
Conozca las propiedades de la podadora Control de Paseo Control de Lámina Funcionamien- to de la Juez de salida podadora de Retroceso Bolso de Hierba ADVERTENCIA El Recorte de Palancas de Ajuste de Altura Este mecanismo de control de la cuchilla Figura 1 atro palancas tienen que estar en la misma posición es un dispositivo de... - Page 27 Encendido del motor ADVERTENCIA: Asegúrese que ninguna persona aparte del operador permanezca cerca de la podadora mientras arranca el motor u opera la misma. Nunca encienda un motor en espacios cerrados o en una zona con Funcionamien- poca ventilación. El escape del motor contiene monóxido de carbono, un gas to de la inodoro y letal.
-
Page 28: Mantenimiento De La Podadora
libremente en ambas direcciones. Vea la Figura 3. 2. Lubrique las ruedas por lo menos una vez por tempo- rada con aceite ligero o aceite para motor. Sin embargo, si las ruedas se quitan por cualquier razón, debe lubricar Lubrique estos la superficie del brazo giratorio y la superficie interna de puntos antes de la rueda con aceite ligero. - Page 29 Cuidado de la cuchilla ADVERTENCIA: Cuando saque la cuchilla para afilarla o reemplazarla, protéjase las manos usando un par de guantes para trabajo pesado o un trapo grueso para sostener la cuchilla. 1. Desconecte el cable de la bujía. Gire la podadora Mantenimiento sobre el costado y compruebe que el filtro de aire y el carburador queden hacia arriba.
-
Page 30: Solución De Problemas
Problema Remedio Causa El motor no arranca 1. Control de la cuchilla desenganchado. 1. Engrane el control de la cuchilla. 2. Se ha desconectado el cable de la bujía. 2. Conecte el cable a la bujía. 3. El tanque de combustible está vacío o el 3. -
Page 31: Almacenamiento Fuera De Temporada
Almacenamiento fuera de temporada 5. Almacene la unidad en una zona limpia y seca. No la almacene cerca de materiales corrosivos como por Se deben seguir estos pasos para la preparación de la ejemplo fertilizantes. podadora para su almacenamiento. 1. Limpie y lubrique la podadora como se describe en Cuando almacene cualquier tipo de equipo motor- las instrucciones de lubricación. -
Page 32: Etiquetas De Seguridad
Etiquetas de seguridad que se encuentran en la podadora de césped Etiquetas de seguridad ADVERTENCIA NO retire las etiquetas de seguridad (ni ninguna etiqueta) de la podadora por ninguna razón. -
Page 33: Lista De Piezas
Lista de piezas IMPORTANTE Para que la máquina funcione de manera adecuada, use repu- estos aprobados por el fabricante. LAS CORREAS EN V están diseñadas especialmente para que se engranen y desengranen sin riesgos. El uso de una correa en V sustituta (que no sea del fabricante del equipo original) puede resultar... - Page 35 Ref. Número de Descripción Ref. Número de Descripción pieza pieza 746-04206 Cable de velocidad variable 687-02044 Montaje de placa de pivote 710-0599 Tornillo TT de 1/4-20 x 0.5 710-1257 Tornillo hexagonal de 3/8-24 x 2.50 Lista de 731-04150C Deflector trasero 21” Rd. 749-0928A Manija inferior 710-04371...
-
Page 36: Notas
Para localizar al distribuidor en su área, busque en las páginas perjuicios incidentales o directos, o las limitaciones sobre la duración de las amarillas de su localidad o contacte a Troy-Bilt LLC al Apartado Postal garantías implícitas por lo que las exclusiones o limitaciones mencionadas 361131, Cleveland, Ohio 44136-0019, o llame al 1-866-840-6483 o anteriormente pueden no serle de aplicación.
Need help?
Do you have a question about the 556 and is the answer not in the manual?
Questions and answers