Table of Contents
Advertisement
Quick Links
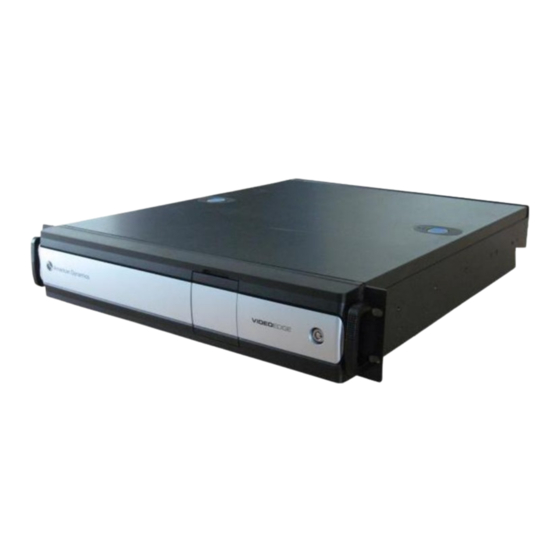
FRONT
1. Factory Reset Button (Pin-Hole Under Front Flap)
2. Power Button (Under Front Flap)
3.
USB Ports (2x 3.0 Under Front Flap)
4.
Bezel Lock (Key Located Behind Bezel)
PACKAGE CONTENTS
A. Recorder (1x VideoEdge 2U NVR)
B. USB Recovery Media (1x Bootable Installer)
C. Reset Pin (1x for Pin-Hole Factory Reset Button)
D. Power Cable (2x Localized)
•
Available Power Outlet on Power Surge and UPS
•
Video Cable (VGA or DVI)
•
Monitor (VGA or DVI input)
Step 01: Connect the keyboard (#7 & E) and mouse (#7 & F)
Step 02: Connect the monitor (Single video cable to #8 – VGA or DVI port)
Step 03: Connect the two network cables (two separate segmented networks – physical or logical)
eth0 LAN1 (#12 port)
to Corporate Network (Gigabit Switch or VLAN)
eth1 LAN2 (#14 port)
to Camera Network (PoE Switch or VLAN)
eth2 LAN3 (#15 port)
to Storage Network (Gigabit Switch or VLAN)
eth3 LAN4 (#16 port)
to Optional (Gigabit Switch or VLAN)
Page 1
FEATURE SET (Note: Based on "G" platform, so earlier platforms may have minor differences)
BACK
5. Power Connectors (2x 100~240VAC)
6. PS/2 Mouse/Keyboard Combo Port
7. USB Ports (2 x 2.0)
8. Video Ports (1x VGA or 1x DVI-D, Only Use One)
FRONT/TOP VIEW
E. Keyboard (1x USB)
F. Mouse (1x USB)
G. Rack Mount (1x Kit)
•
CAT5E/6 Ethernet Cables (IP)
•
IP Network Cameras (VideoEdge compatible models)
•
Ethernet Switches (Gigabit for Corporate LAN & PoE for IP Camera LAN)
Note: PCI bus limitation = half bandwidth
6 Technology Park Drive
Westford, MA 01886-3140
Tel: 978-577-4000
Fax: 978-577-4392
www.americandynamics.net
9. USB 5Gb/s Type C Port (Not supported)
10. HDMI Port (Not supported)
11. USB Ports (2 x 2.0, 2 x 3.0)
12. 1GbE Network Port (1x eth0 LAN1 Corporate)
Note: Redundant Power Supplies
• Max: 350W, 6.0A, 1000 BTU/hr
REQUIRED ITEMS THAT ARE NOT INCLUDED:
HARDWARE SETUP (Refer to above images)
Step 04: Connect the IP Cameras/Encoders to the Camera Network (PoE Switch or VLAN)
Step 05: Connect any other required items (e.g. #6, #11, #13, #15, #16)
Step 06: Connect the power cable (#5 & D)
Note: Recommend using Power Surge and Uninterrupted Power Supply (UPS)
Step 07: Power on the VideoEdge Recorder (#2 Under Front Flap)
Step 08: Connect your client PC to the Corporate Network (Gigabit Switch or VLAN)
Quick Start Guide – VideoEdge 2U NVR
Quick Start Guide – NVR
VideoEdge 2U (64 IP)
13. Audio (Line In: Blue; Line Out: Green; Mic: Pink)
14. 1GbE Network Port (1x eth1 LAN2 Camera)
15. 1GbE Network Port (1x eth2 LAN3 Storage Option)
16. 1GbE Network Port
(1x eth3 LAN4
Note: eth3 has PCI bus limitation = half bandwidth
BACK VIEW
•
Client PC with internet connection and access to both networks
(eth0 for LAN1 Corporate and eth1 for LAN2 Camera)
© 2018 Tyco Security Products. All Rights Reserved.
Option)
Not Supported on BACK:
• USB 5Gb/s Type C Port
• HDMI Port
• Line In (blue) , Mic (pink)
Document #: 8200-1587-12 A0
Advertisement
Table of Contents

Subscribe to Our Youtube Channel
Related Manuals for American Dynamics VideoEdge 2U


Summary of Contents for American Dynamics VideoEdge 2U
- Page 1 Note: PCI bus limitation = half bandwidth Step 08: Connect your client PC to the Corporate Network (Gigabit Switch or VLAN) Page 1 Quick Start Guide – VideoEdge 2U NVR © 2018 Tyco Security Products. All Rights Reserved. Document #: 8200-1587-12 A0...
- Page 2 5. Select Products, then select Register a Product, and then select VideoEdge. 6. Select American Dynamics from the Brand list, select VideoEdge from the Product list, and then click Next. 7. Review the Personal Data Processing Consent pop-up, and then click I consent and confirm.
Need help?
Do you have a question about the VideoEdge 2U and is the answer not in the manual?
Questions and answers