American Dynamics Intellex Intellex Ultra Installation And Configuration Manual
American dynamics intellex intellex ultra: install guide
Hide thumbs
Also See for Intellex Intellex Ultra:
- Datasheet (6 pages) ,
- Upgrade instructions (3 pages) ,
- User manual (46 pages)

Related Manuals for American Dynamics Intellex Intellex Ultra


Summary of Contents for American Dynamics Intellex Intellex Ultra
- Page 1 Installation and Configuration Guide Intellex® Ultra Version 4.0 Part Number 8200-0563-00 A0...
-
Page 2: Customer Service
Customer Service Thank you for using American Dynamics products. We support our products through an extensive worldwide network of dealers. The dealer through whom you originally purchased this product is your point of contact if you need service or support. Our dealers are empowered to provide the very best in customer service and support. -
Page 3: Rack Mounting
Warnings WARNING: TO REDUCE RISK OF ELECTRIC SHOCK, DO NOT REMOVE COVER. NO USER SERVICEABLE PARTS INSIDE. REFER PERSONNEL. DO NOT EXPOSE THIS APPLIANCE TO RAIN OR MOISTURE. DO NOT INSTALL THIS PRODUCT IN HAZARDOUS AREAS WHERE HIGHLY COMBUSTIBLE OR EXPLOSIVE PRODUCTS ARE STORED OR USED. The lightning flash/arrowhead symbol, within an equilateral triangle, alerts the user to the presence of a shock hazard within the product’s enclosure. - Page 4 Le présent appareil numérique n’émet pas de bruits radioélectriques dépassant les limites applicables de la Classe A prescrites dans le Réglement (ICES-003) sur le brouillage radioélectrique édicté par le Ministère des Communications du Canada.
-
Page 5: Software License
License Information READ THIS LICENSE AGREEMENT BEFORE OPENING THE DISK PACKAGE, INSTALLING THE SOFTWARE, OR USING YOUR SYSTEM. THIS LICENSE AGREEMENT DEFINES YOUR RIGHTS AND OBLIGATIONS. BY BREAKING THE SEAL ON THIS PACKAGE, INSTALLING THE SOFTWARE, OR USING YOUR SYSTEM, YOU AGREE TO ALL OF THE TERMS AND CONDITIONS OF THIS AGREEMENT. -
Page 6: Important Information
if Sensormatic or an authorized representative has been advised of the possibility of such damages. Further, Sensormatic does not warrant that the operation of the Software will be uninterrupted or error free. This limited warranty gives you specific legal rights. You may have other rights that vary from state to state. Some states do not allow the exclusion of incidental or consequential damages, or the limitation on how long an implied warranty lasts, so some of the above limitations may not apply to you. -
Page 7: Table Of Contents
Before Installing the Intellex Safety Guidelines ........... . . 1 System Requirements . - Page 8 Contents Adding/Updating a User-Defined Camera Handler..... 22 Removing a User-Defined Camera Handler ......23 PTZ Cameras.
- Page 9 RAID Installing the Hard Drives ..........57 3Ware 3DM2 Utility User’s Manual .
- Page 10 Contents Intellex® Ultra...
-
Page 11: Before Installing The Intellex
Safety Guidelines • Ensure that installation work complies with electrical, fire, safety, communication, and building codes and ordinances. • Install the Intellex in a clean, dry location, where temperature and humidity are within product specifications. • Install the Intellex away from Electrical Magnetic Inducing (EMI) equipment, such as electrical generators, motors, unshielded speakers, and high voltage cables. -
Page 12: System Requirements
Before Installing the Intellex System Requirements Note This section includes system requirements for Intellex Ultra, DVMS, and LT. Intellex 4.0 Ultra Hardware Configuration Hard drive 800 or 1600 GB options Memory 512 MB Media drive Includes DVD-RW Chassis Operating System: Intellex 4.0 software is compatible only with Microsoft XP Pro with embedded restrictions Note * = a feature is enabled... - Page 13 Features Ultra Text recording Tape archive DVMS 16-Camera 8-Camera Camera Premier Premier Premier only only only Installation and Configuration Guide Before Installing the Intellex Camera Camera Premier Premier only only...
-
Page 14: Programmable Settings
Before Installing the Intellex Programmable Settings Setting Camera names Camera termination Security access Administrator PIN Schedule mode Record settings Alarm duration Alarm record settings Alarm on video loss Alarm display message Latch message Alarm input names Alarm input polarity Live sequencer dwell Live display format Playback overlay Video Format... -
Page 15: Record Options
Note Pixel count reflects the digital display area and is not affected by NTSC/PAL signal differences. Format 1×1 2×2 3×3 4×4 (16 channel only) Record Options Record mode Linear, Circular Image sensitivity High, Normal Image quality Super, Normal, Extended Record Ultra Record rate DVMS... -
Page 16: Power Supply
Before Installing the Intellex Connector Printer DB25-S. Parallel printer output. Serial DB9-P. Dome controller (Sensormatic VM16 or American Dynamics ADTT16) input. SCSI-3 High density 68-pin female connector. For use with external storage devices. Network RJ-45. Category 3 or Category 5 twisted-pair Ethernet (CAT 3 TPE or CAT 5 TPE) connector. -
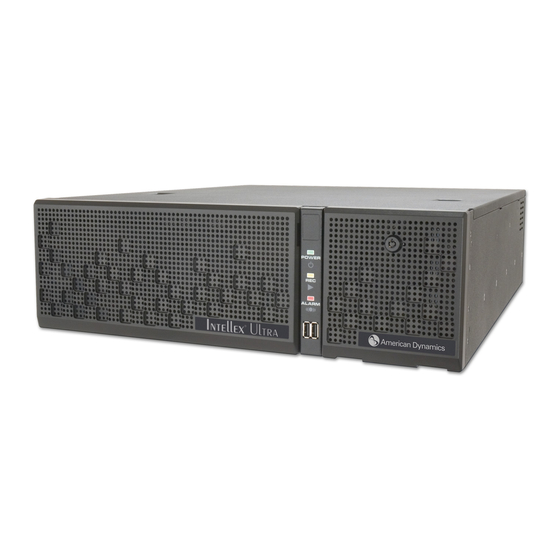
Page 17: Front Panel
Front Panel DVD-RW Drive Ultra Alarms indicator • Illuminates when alarm events • Blinks when the notification screen Power: Insert the reset tool into the pinhole to power on or off. Reset: If the unit does not power on, insert the reset tool into the Power indicator pinhole to reset. -
Page 18: Rack-Mounted Intellex
Before Installing the Intellex Rack-mounted Intellex Alarms indicator Do not modify any BIOS or system settings or reconfigure any hard drives. During power-up, the Intellex splash screen appears. During initial power-up, a message may appear. Do not press buttons on the front panel or keys on the keyboard until this screen and message disappears, which may take 2 minutes. -
Page 19: Installing Hardware
Connecting Cameras and Peripherals Caution Protect the unit against lightning. If part of a cable is installed outside a building, the entire cable is vulnerable to lightning. Install surge protectors on all vulnerable cables. Video Devices 1 Connect the cameras: a Connect the video cables from the cameras to the left BNC connector of each pair of connectors on the rear of the unit. -
Page 20: Connecting Audio Devices (Optional)
Installing Hardware 4 Connect an optional call monitor to the BNC connector on the Call Monitor board to see live video from a single camera (call mode) or from alarmed cameras in sequence (spot mode). BNC Camera in Ultra Power entry BNC Camera in DVMS/Rackmount Mouse... -
Page 21: Connecting Optional Components
Log Off and Shut Down and to other applications. The Intellex Security Option does not control this access. To restrict user access to these features, do not install a keyboard. • Connect a dome controller (Sensormatic VM16E or American Dynamics ADTT16E) to the COM2 connector through an electrical interface module (EIM). - Page 22 Installing Hardware • For DVMS only, connect an optional Live/Playback monitor to the BNC connector on the VACD board to view live, or playback, video without the Intellex interface. Ultra Keyboard DVMS/Rackmount Mouse Keyboard USB ports COM2 Printer connector COM2 Printer USB ports connector...
-
Page 23: Connecting Alarms To The Intellex
Connecting Alarms to the Intellex The alarm connectors on the back of the unit accept up to 18 alarm inputs and 16 alarm outputs. Ultra Alarm connectors DVMS The polarity of all alarm inputs is programmable. However, the polarity of all alarm outputs is active–high. -
Page 24: Connecting The Intellex To A Network
Installing Hardware Alarms In Pin No. Input 4 Ground Input 5 Ground Input 6 Ground Input 7 Ground Input 8 Ground Time sync signal Ground Export signal Ground Connecting the Intellex to a Network Only connect the Intellex to a network if you have installed the Network Client, Browser Client, or other software designed to connect to an Intellex on the network. -
Page 25: Safety Guidelines
Safety Guidelines Ensure adequate air flow around the unit for safe operation. The maximum temperature for rack- mounted units is 35° C. Check the product label for power supply requirements to assure that no overloading of supply circuits or overcurrent protection occurs. Mains grounding must be reliable and uncompromised by any connections. - Page 26 Installing Hardware Intellex® Ultra...
-
Page 27: Configuring The Intellex
Configuring the Operating System The Intellex uses the Windows® operating system to configure the regional, mouse, time zone, network, printer, and language settings; you must exit to Windows. Note Exiting to Windows is a protected feature. You must have the Exit to System privilege to access it. Windows screens appear in English, regardless of the language version of Intellex. - Page 28 Configuring the Intellex If default setting is PAL, to change to NTSC: a At the desktop, click NTSC.reg icon. b Click Yes to add the information in NTSC.reg to the registry. c Click OK. 3 Configure the mouse for right- or left-handed operation: a From the Control Panel, double-click Mouse.
-
Page 29: Setup Options
Configuring the Intellex Setup Options On the main screen, click Setup. The Setup Options screen appears. Note You must have appropriate privileges to access setup options. See page 40. Setting Up Cameras 1 From the Setup Options screen, click Cameras. 2 From the Names tab, name each camera. -
Page 30: Termination
Configuring the Intellex Termination From the Termination Tab, select 75 • Set the termination to 75 • Select the Hi-Z if the video signal is looped to another device. Gain Mode From the Gain Mode tab, adjust video signals that are too bright or dark: Reduce Gain: Decrease the video signal Normal:... -
Page 31: Camera Control
Camera Control 1 From the Camera Control tab, choose a camera handler, a driver allowing the Intellex to control specific cameras or devices. The Setup button adjacent to that camera is now active. Note If you want to select a camera that Intellex does not directly support, you can install a custom handler from the User-Defined Handlers tab. -
Page 32: User-Defined Handlers
Configuring the Intellex 3 Select the camera address, comm port, and monitor number from the handler setup screen. Note Some camera handlers do not use comm ports or monitors. For these, the Comm Port and Monitor Number fields do not appear. Make sure that you set up every camera that has a selected camera handler, so that Intellex functions properly. -
Page 33: Removing A User-Defined Camera Handler
A standard Windows file browsing window appears. 2 From the Windows dialog, select the handler definition file for your dome camera, and click Open, which closes the Windows dialog. The User-Defined Handlers screen appears with the handler you selected, indicating Intellex now recognizes it. 3 Click OK. -
Page 34: Ptz Cameras
Configuring the Intellex PTZ Cameras Use this feature to activate PTZ (pan, tilt, zoom) cameras based on an alarm event. The PTZ Triggers tab displays a list of previously defined triggers. Lists the camera The alarm types that trigger a that is alarmed to PTZ action trigger a PTZ action... -
Page 35: Trigger Dialog
Specify the conditions that cause an alarm to trigger a PTZ camera action. Trigger Dialog 1 From the Alarm Camera dropdown list, select the alarmed camera that you want to trigger a response. 2 From the Alarm Types list, select one or more alarm types to trigger the response. You must select at least one alarm type. - Page 36 Configuring the Intellex After configuring the PTZ triggers, during normal Intellex operation, if another camera control session is already controlling the PTZ camera when its triggering alarm occurs, the triggered action fails and registers in the Activity Log. The category is called Surveillance, and the activity is called Camera Control.
-
Page 37: Covert Mode
Covert Mode 1 To remove the selected camera from view and appear disconnected, from the Covert Mode tab you can choose Covert. Note Covert mode is not available for camera 1. 2 Click OK. Note You must have Administrator authorization to enable or disable viewing covert cameras. When Covert mode is disabled in classic security mode, all live and recorded video is visible to all users. -
Page 38: Setting Up Live Filters
Configuring the Intellex a Click an option: Super Normal Extended Record b Select the sensitivity and resolution. Higher sensitivity and resolution offer better quality but less recording time. 4 Select the Time tab. Set start times for day and night operation 5 Optionally, set up filters for each camera from the Camera tabs by selecting a live filter from Day Filter and Night Filter. -
Page 39: Setting Up Perimeter Protection
2 If you are using Regular Schedule mode, Camera 1-8 and 9-16 tabs appear. From these tabs, choose Day Filter > Motion Detection. Click Setup. Note If you are using Custom Schedule mode, see step 4b on page 33, to navigate to the live filters. 3 In the draw zone: click and draw the target area, or click All to select the entire area. -
Page 40: Setting Up Light Change
Configuring the Intellex 5 Repeat steps 2–4 for the Night Filter. Draw zone Setting Up Light Change 1 From the Setup Options screen, click Schedule. 2 From the Camera 1-8 and 9-16 tabs, choose Day Filter > Light Change. Click Setup. 3 In the draw zone: click and draw the target area. -
Page 41: Select A Data Lifetime Mode
2 From the Camera 1-8 and 9-16 tabs, select Day Filter > Motion Exception. Click Setup. 3 From the Motion Exception screen, select the target area’s shape from the draw zone list. 4 Click and drag in the draw zone to form the target area. Custom shapes must form an enclosed boundary. -
Page 42: Setting Up Custom Schedules
Configuring the Intellex • Disabled prevents any scheduled deletion of video data (default). • Select Cameras specifies individual cameras. Click Setup to display available cameras and their data lifetime, then select individual cameras and data durations. • All Cameras specifies the data duration for all cameras. Setting Up Custom Schedules Set up custom schedules for weekday, weekend, and holiday operation for each camera. - Page 43 a To schedule active record time, select Active (default). Click and drag to highlight the time block for custom scheduling. b Click Setup. Choose the Quality, Sensitivity, Resolution, and Live Filter. Click OK. For information about live filters, see page 28. c To schedule alarm recording time, click Alarmed then click and drag to highlight the time block for custom scheduling.
-
Page 44: Using Single Camera Schedule
Configuring the Intellex 7 Select a Data Lifetime Mode: • Disabled to prevent any scheduled deletion of video data (default). • Select Cameras to specify individual cameras. Click Setup to display available cameras and their data lifetimes, then select individual cameras and data durations. •... - Page 45 2 Select a rate mode: • Use Auto Rate Mode evenly distributes ips rate across active cameras; go to step 3 to set up Auto Rate Mode. • Use Camera Selectable Rate Mode sets the rate of each camera; go to step 4 to set up Camera Selectable Rate.
- Page 46 Configuring the Intellex d Click OK. Rate slider The first number represents how much of the recording capacity is being used The second number represents the total available capacity. Individual sliders. If you cannot drag the slider any further to the right, it means that you have used the maximum recording...
-
Page 47: Adding, Editing, And Deleting Text Source
• For General Text, the end-of-line delimiter allows Intellex to parse the text correctly for matching search criteria as well as display. • For American Dynamics Printer Interface, select one or both options. 5 Select a connection type, and click Setup. - Page 48 Configuring the Intellex If you select COM Port, the following screen appears: 6 Select a COM Port, Bits Per Second, Data Bits, Parity, Stop Bits, and Flow Control from the lists. For information about text, see the User’s Guide. If you select IP Port, the following screen appears: 7 Enter an unused IP port number in the Text Stream TCP/IP Port edit box.
-
Page 49: Setting Up Audio
9 From the Alarms tab, click Apply selected exceptions as a group to generate an alarm: • If you selected at least one receipt definition • If a receipt definition marker is in the current receipt • If all selected text exceptions report a match for the current receipt 10 Click Build Exceptions to generate advanced text exceptions. -
Page 50: Setting Up Classic Security Options
Configuring the Intellex Setting Up Classic Security Options 1 From the Setup Options screen, click Security. 2 Select Classic Security and click OK. Select the level of security. 3 At the prompt to enable security, click Yes. 4 Using the virtual or physical keyboard, enter the security administrator’s PIN. Click OK. 5 At the prompt, click OK. -
Page 51: Policy Manager For Intellex
d Click OK. This window displays all authorized users. Select functions the user can modify. 11 To remove a user, click Delete. Policy Manager for Intellex This software is installed on a server that provides advanced security for the video network. Use this software to: •... -
Page 52: Setting Up Alarms
Configuring the Intellex Setting Up Alarms 1 From the Setup Options screen, click Alarms. 2 From the General tab, set the alarm duration. Click the corresponding radio button to set: • Latch Messages—to require the operator to clear alarm messages manually from screen using Utility >... -
Page 53: Setting Up Display Settings
4 Select the sensitivity and resolution. Higher sensitivity and resolution offer better quality but less recording time. 5 From the Alarms In Names tab, name each physical alarm input. Use these names when reviewing alarm images and searching the alarm database. 6 From the Alarm In Polarity tab, select the alarm polarity, the signal that triggers an alarm input. -
Page 54: Setting The Date And Time
Configuring the Intellex 3 Select the 2×2, 3×3, and 4×4 tabs to configure any display format: a Select the name of the camera from the list. b Move the mouse pointer to any location on the grid. c Click the grid location for the selected camera. The camera’s name displays in that grid location. -
Page 55: Setting Up The Port Address And Live Net Client Connections
Setting Up the Port Address and Live Net Client Connections Specify a fixed port address for the Intellex. Change the default settings only if network conditions require. 1 From the Setup Options screen, click Port Address. 2 Highlight and enter new settings. 3 Choose the number of Max Live Clients to limit the number of remote users who access the Intellex. -
Page 56: Archiving All
Configuring the Intellex Archiving All 1 From the Setup Options screen, click Archive Schedule. 2 From the Mode tab, click Archive All to configure the same archive schedule for all cameras, every day of the week. 3 Select the Time tab and set start times for day and night operation. Setting up a Custom Archive Schedule 1 From the Setup Options screen, click Archive Schedule. -
Page 57: Setting Up Email Notification
Setting Up Email Notification 1 To generate email notification to specific individuals or distribution lists in case of system events and camera alarms, from the Setup Options screen, click Email. The Email Notification Setup screen appears. 2 From the Summary tab, view the list of events and cameras that can trigger email notification. List of events and cameras that trigger email Enabled... - Page 58 Configuring the Intellex 3 To modify an item in the source list, highlight it, and click Edit (or double-click it). The Email Setup screen appears. 4 From the Email Setup screen, you can: a Enable or disable email b Set the email priority c Set the frequency d Add more text to the email message e Select entries from the Master Recipient list to add to the Destination Recipient list...
-
Page 59: Sending A Test Message
6 Select the Configuration tab to set up an email configuration. 7 In the Email Server fields, enter the name and port number of the recipient’s email SMTP server. 8 In the Sender fields, enter the name and email address of the user sending the notification. 9 In the Authorization fields, enter the method (determines what security protocol is used by the sender’s SMTP server), User ID, and Password. -
Page 60: Saving The Set Up
5 Edit the email address as desired, and save the update. Updated master list appears. Saving the Set Up American Dynamics recommends saving the configuration to a floppy disk or CD. 1 Exit to Windows. a From the main screen, click Utility. The Utility Options screen appears. - Page 61 Configuring the Intellex 3 Select the media path (defaults to the floppy drive) where the configuration is saved. 4 Enter a name for the configuration. For example, Intellex 1. 5 Click Save Settings. Recommendation: Store the floppy disk with the Intellex. Installation and Configuration Guide 51...
- Page 62 Configuring the Intellex Intellex® Ultra...
-
Page 63: Configuring Anti-Virus Detection
The Intellex Anti-Virus (AV) modules are compatible with: • McAfee 7.1 Enterprise Edition • Symantec AntiVirus 8.1 Corporate Edition Note Refer to McAfee or Symantec documentation for setup and use information. Configuring the McAfee Module 1 Install McAfee 7.1 Enterprise Edition software. 2 Verify that it is installed on Intellex: the virus shield icon must appear in the system tray. -
Page 64: Configuring The Symantec Module
Configuring Anti-Virus Detection 9 The McAfee AV configuration tool for Intellex creates a new automatic update task only if you have any automatic update tasks scheduled before running the Intellex AV module. Note Any previous user settings are reset. Schedule automatic updates during a period of low usage to avoid losing frames of recorded video. - Page 65 Configuring Anti-Virus Detection 2 From the Scan Options screen, set the Throttling Options (priority when idle and priority when not idle) to the lowest setting, 3. Caution This setting has the least impact on the Intellex system, but even at the lowest setting, some recording data may be lost.
- Page 66 Configuring Anti-Virus Detection Intellex® Ultra...
-
Page 67: Installing The Hard Drives
Installing the Hard Drives You must install the 4 hard drives packaged with the Intellex Ultra. The hard drives are each contained in a caddy and are easy to install. 1 Remove the drives from the packaging. 2 Unlock the front cover of the Intellex Ultra unit and open the front cover. 3 Press the latch release on the left side of the drive caddy. -
Page 68: Setting Up E-Mail Alerts
RAID Setting Up E-mail Alerts Set up your Intellex Ultra system to send e-mail notifications in case of drive problems. To set up e-mail notifications, use the 3ware 3DM2 Windows utility. 1 Double-click the 3DM2 icon on your Windows desktop, or go to Start >... -
Page 69: Troubleshooting A Raid Problem
4 On the ensuing screen under E-mail notification, select the new type of event for notification from the dropdown list 5 Click Save E-mail Settings button. Troubleshooting a RAID Problem Caution Prompt action is needed when the array status becomes degraded. Any new drive failure results in complete loss of stored data. -
Page 70: Recovering Rms Offline Array To Functional System
RAID 4 Click Information > Drive Information on the top navigation bar. 5 A list of drives and their status displays. Check which drive has failed. 6 Check all connections to the drive and refresh the 3DM2 page. If the drive is still degraded, follow the on-screen recommendation. -
Page 71: Setting Up A Drive At The Intellex Level
2 Right-click My Computer. Select Manage. The Computer Management window appears. 3 Under Storage, click Disk Management. Disk 1 shows Unallocated Disk Space for the 4 data drives combined. 4 Right-click in the Unallocated space. Select Create Partition. A Create Partition Wizard appears. -
Page 72: Questions & Answers
RAID Questions & Answers Question Are the Intellex RMS drives hot-swappable? What do I do if a hard disk fails? How long will I have to stop recording to replace the hard disk? How long does it take to rebuild a hard disk? What replacement drive should I use? I would like to use another RAID method. -
Page 73: Intellex Ip
Intellex IP Intellex IP v1.0 is a variation of the Intellex system that accepts video information from IP devices rather than from conventional video cameras. This system lets users record video, monitor alarms, and control cameras that are attached to the Internet. The software in Intellex IP is an extension of Intellex software version 4.0 and is compatible with the Windows XP operating system. -
Page 74: Setting Up The Intellex Ip System
Intellex IP Setting Up the Intellex IP System Analog Video Cameras IP Video Server 1 For information on setting up and installing Intellex IP, see the Intellex IP Quick Setup Guide. 2 Follow the prompts and enter information as for the standard Ultra 4.0 application. RS-422 Control Network Switch Intellex IP... - Page 75 3 From the main screen, select Setup. The Setup Options screen appears. IP Sources button replaces Cameras button on standard Intellex Select to open the IP Source Selection dialog 4 Configure the IP device according to the manufacturer’s instructions before adding it to the Intellex IP application.
-
Page 76: Setting Up Parameters For Ip Devices
Intellex IP • Assigning an IP address or device name • Ensuring that video can be viewed using the device manufacturer’s viewer Manage IP sources List of configured IP sources Click to add a new IP source. The IP Device Type screen appears. -
Page 77: Setting The Record Rate
Note To configure the IP address of a device, see the manufacturer’s instructions. The server type depends on the device category. Specify the communications port of IP device, typically 80 for a camera/server. Specify a name for each video stream. Select a resolution for each video stream. -
Page 78: Setting Up The Rate
Intellex IP 3 Example: If cameras 1–8 are in CIF mode and cameras 9-16 are in 4 CIF mode: • 480/16 = 30 • For cameras 1–8: 30/1 = 30 • For cameras 9–16: 30/4 = 7.5 • Max. aggregate = (30 x 8) + (7.5 x 8) = 300 ips Setting Up the Rate From the Setup Options screen, click Rate. - Page 79 Intellex IP To monitor the security system from computers connected to the corporate network, Intellex IP’s 10/100 NIC is connected to the corporate network, and Network Client is installed on corporate network computers. Network Client can monitor the dedicated IP video security network without exposing the corporate network to the entire video load.
- Page 80 Intellex IP Intellex® Ultra...
-
Page 81: Index
Symbols 3Ware 3DM2 Utility 57 alarms 13, 42 alerts setting up notifications 58 anti-virus tools 53 archive schedule 45 audio 39 Camera control 21 camera rate 34 classic security 40 configuring operating system 17 configuring alarms 42 configuring schedules 27 connecting alarms 13 audio devices 10... - Page 82 Index McAfee 53 Microsoft Installer 17 miscellaneous parts 15 network connections 14 Offline array 59 Overview, Intellex SDK 9, 53 Policy Manager 41 port address 45 power supply 6 PTZ cameras 24 rack mounting 14 rear panel connectors 5 record mode 41 record options 5 record rate 67 Safety guidelines 1...
Need help?
Do you have a question about the Intellex Intellex Ultra and is the answer not in the manual?
Questions and answers