
Related Manuals for Smart Optics mini


Summary of Contents for Smart Optics mini
- Page 1 Operating Manual A product from smart optics Sensortechnik GmbH Copyright © 2023 smart optics Sensortechnik GmbH. All rights reserved. – Translation of the Original Operating Manual –...
- Page 2 SILADENT Dr. Böhme & Schöps GmbH, DE-38644 Goslar SilaPart Triple Tray Premier Dental, Plymouth Meeting, PA 19462, US Windows Microsoft Corporation .NET Framework Visual C++ Copyright © 2023 smart optics Sensortechnik GmbH. All rights reserved. – Translation of the Original Operating Manual –...
-
Page 3: Table Of Contents
Operating Manual smart optics mini Table of Contents Explanation of Symbols ..........4 Scanning ..............17 General Information ........... 17 Technical Data ............... 5 Scanning a Jaw Model..........18 7.2.1 Jaw Model on Mounting Plate ........18 Scope of Delivery ............6 7.2.2... -
Page 4: Explanation Of Symbols
Operating Manual smart optics mini Explanation of Symbols Symbols on the Device Warning against electrical voltage Conformity of the scanner with EU directives USB connector Hollow plug connector Symbols in these Instructions Characters Signal Word Meaning Warning against possible: Notice –... -
Page 5: Technical Data
Operating Manual smart optics mini Technical Data Housing Dimensions W × H × D 337 × 347 × 322 mm Weight 9.5 kg Rotary swivel unit removable Material PUR, Acrylic, Aluminum Sheet Color black and white (matt) Power switch... -
Page 6: Scope Of Delivery
Manual PC and screen are not in the scope of delivery. General Safety Information smart optics mini was developed according to applicable safety standards and produced with protective measures. Nevertheless, some residual risks cannot be ruled out. Intended Use... -
Page 7: User Qualification
Operating Manual smart optics mini User Qualification To commission, install and operate the scanner, you need specialist know- ledge of dental technology, in particular CAD/CAM technology, as well as knowledge of the scanner from operating instructions, instruction or training. -
Page 8: Protection Against Damage To Property
Operating Manual smart optics mini CAUTION Pulling in of garments, jewelry, hair Loose garments, jewelry or hair can be pulled in by automatically moving components. At the scanner workstation, avoid scarves, ties, long chains, open long hair, etc. -
Page 9: Components
Operating Manual smart optics mini Components Scanner Front 3D sensor (LED projector, camera) Rotary swivel unit (removable) LED pressure switch (ON/OFF) Right Side 3D sensor (LED projector, camera) Rotary swivel unit 2a Retaining pins (2 at the top, 2 at the bottom) -
Page 10: Accessories
Operating Manual smart optics mini Rear Rear panel screw connection Ports (power, USB) Type plate Sensor number Serialno 3D-Sensor SO-20293.00-23-001 Accessories 5.2.1 Universal Plate View from Above Place for jaw models Fixing hooks for rubber bands (simple occlusion) Plate type Splitex/Adesso Split ®... -
Page 11: 3D Calibration Model
Operating Manual smart optics mini 5.2.2 3D Calibration Model Hemispheres (for distance measurement) Cylinders (for height measurement) Label with model number and reference values Commissioning Workplace The scanner must be next to the PC, preferably on a laboratory table or professional work table. -
Page 12: Unpacking
Operating Manual smart optics mini Unpacking The original packaging is the best transport protection for scanners and accessories. Keep them for later transporting. Check the delivery for visible damage and discoloration on the shock indicators (indicator label). Log and complain damages in accordance to the shipping terms. -
Page 13: Procedure
Operating Manual smart optics mini NOTICE Incorrect data transmission or device damage due to inappropriate cabling USB Hubs, USB extensions and USB cables longer than 2 meters deteriorate the data transfer. The scanner requires an external power supply for the power ... -
Page 14: Attaching The Rotary Swivel Unit
Operating Manual smart optics mini 6.3.3 Attaching the Rotary Swivel Unit The rotary swivel unit is delivered separately in a box. NOTICE Malfunction due to damage to contact surfaces The contact surfaces on the rotary swivel unit and on the attachment plate in the scanner are sensitive electronic components for the transmission of data and electricity. -
Page 15: Installation
6.4.3 Upgrades New versions of the scan software are available free of charge. smart optics recommends using the current version. www.smartoptics.de | Download Center (Software + Release-Notes) Install an upgrade to the same destination folder as the previous ... -
Page 16: Calibration Procedure
Operating Manual smart optics mini The adhesive pads can remain on the universal plate. 6.5.2 Calibration Procedure Calibration is mandatory for commissioning. How to proceed: Turn on the scanner (front LED pressure switch). Insert the scanner-specific data carrier into the PC port. -
Page 17: Scanning
Operating Manual smart optics mini Start the calibration. Wait until the final message. After successful calibration, you can start scanning. Data backup Calibration data is not transferable to other scanners. After initial installation, the calibration data are permanently available for operation and calibration. -
Page 18: Scanning A Jaw Model
Operating Manual smart optics mini Service Position of the Rotary Swivel Unit When positioning scan objects, the rotary swivel unit can be moved unintentionally. As a result, the position of the rotary swivel unit stored in the scan software no longer corresponds to the actual position. -
Page 19: Jaw Models In Simple Occlusion
Operating Manual smart optics mini Jaw Models in Simple Occlusion Jaw models in simple occlusion are scanned on the universal plate. The simple occlusion is closed with rubber bands (texture: new, stable, about 0.4 cm thick). Ring rubbers and cruciate rubbers are possible. The material does not interfere with the vestibular scan. -
Page 20: Rotary Swivel Unit
Operating Manual smart optics mini You can change the steps positioning the articulator and starting the scan. With a little practice, you will save time. You can change the timer, i.e. the waiting time until the scan, in the software settings (5 seconds by default). -
Page 21: Maintenance And Cleaning
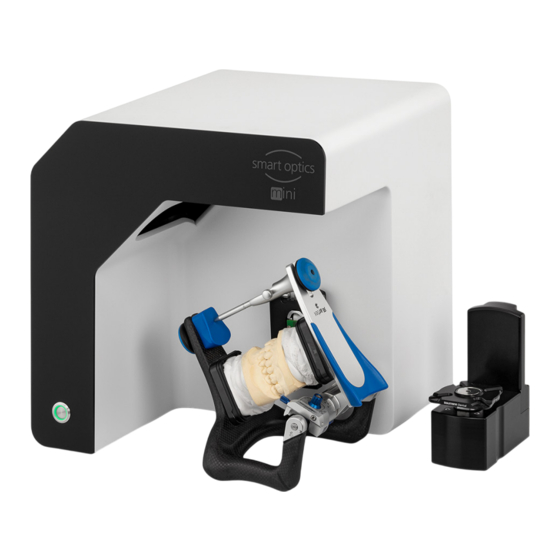
Operating Manual smart optics mini Image for illustrative purpose Artex Articulator There are two different types of articulators. For example, Artex can be ® presented to the sensor via the rear legs in a 45° position. Other articulators that do not have such a function must be held with both hands to be presented to the sensor. -
Page 22: Cleaning
You are not allowed to work with a defective scanner and defective accessories. First Level Support First Level Support is responsible for complex fault analyses and repairs. If necessary, you can find a smart optics reseller in your region in our www.smartoptics.de reseller locator for the dental sector. - Page 23 Operating Manual smart optics mini Type of question Problem Error analysis Description of the fault or damage Repair Measures taken so far PC data Operating system Model/design Windows version Scanner Scan software Purchase date Version number (Extras | About) ...
-
Page 24: First Help
Operating Manual smart optics mini First Help The following measures can help to find the cause of a malfunction or fix the malfunction itself. The smart optics Help Center offers further information in the areas of smart optics Help Center Dental Cross Product. -
Page 25: Hardware Problems
9.2.4 Connectivity Problems Connectivity problems can result from a faulty USB connection, camera drivers, and unfavorable Windows settings. The smart optics Help Center offers further information on these topics in smart optics Help Center the areas of Cross Product and Dental. -
Page 26: Scan Problems
USB cable (USB 3.0). 9.2.5 Scan Problems Startup Problems Further information on this topic can be found in the smart optics Help smart optics Help Center Center in the field of Dental. Clarify in advance: Is the software installed correctly and completely? ... -
Page 27: Paid Extensions
Operating Manual smart optics mini Paid Extensions The following extensions are available for smart optics mini: Article Designation Description 90340 Impression holder Use with adhesive pads 90539 multiDie Use with adhesive pads 90543 smart optics Speed update + software functions,... -
Page 28: Impression Holder
Operating Manual smart optics mini 10.2 Impression Holder Space for impression tray Plate type Splitex/Adesso Split ® The impression holder is an extension for scanning full impressions and Triple Tray impressions. ® The impression holder must be covered with at least three strips of ... -
Page 29: Multidie
Operating Manual smart optics mini 10.3 multiDie Slots for Single Segments Plate Type Splitex/Adesso Split ® Marking, Position 0 multiDie is an extension for the multiDie and multiDie+ presentation modes as well as for the multiCase project definition (scanning of individual segments from different treatment cases). -
Page 30: Smart Optics Comfort Mode
Operating Manual smart optics mini 10.4 smart optics Comfort Mode The smart optics Comfort Mode is an extension consisting of a speed update and software functions (see availability). You do not need any special accessories for use. Speed Update With the speed update, scan times and processing are around 25% faster. -
Page 31: Availability Of Software Functions
Operating Manual smart optics mini 10.5 Availability of Software Functions Locked functions are grayed out in the scan software and displayed with a tooltip. Availability Accessories Projects Patient Universal plate Orthodontics Universal plate multiCase multiDie adapter ... -
Page 32: Disposal
Operating Manual smart optics mini Disposal 11.1 Disposing of Packaging You can dispose the packaging after the warranty has expired. smart optics recommends storing the packaging for transportation of the scanner. 11.2 Disposing of the Device This symbol is for devices according to the European Directive 2002/96/EC for WEEE (Waste Electrical and Electronic Equipment). -
Page 33: Ce Conformity
Operating Manual smart optics mini CE Conformity Edition: 08-2023 CE Conformity... - Page 34 Manufacturer smart optics Sensortechnik GmbH Lise-Meitner-Allee 10 D-44801 Bochum, Germany www.smartoptics.de...
Need help?
Do you have a question about the mini and is the answer not in the manual?
Questions and answers