
Subscribe to Our Youtube Channel
Related Manuals for VEVOR TW180

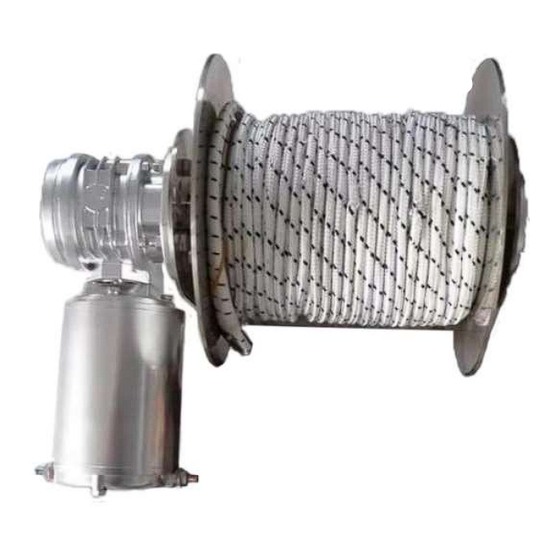
Summary of Contents for VEVOR TW180
- Page 1 INSTALLATION AND OPERATING INSTRUCTIONS ANCHOR WINCHES Drum Winch 1000W TW240 TW200 TW180...
- Page 2 Installation and Operating Instructions Please read and save these instructions. Read carefully before attempting to assemble, install, operate or maintain this anchor winch. Protect yourself and others by observing all safety information. Failure to comply with instructions could result in personal injury and/or property damage! Retain instructions for future reference.
- Page 3 Control Unit for easy operation at the winch itself. A second switch may be located at the helm, or anywhere the installer chooses. PRODUCT SPECIFICATIONS TW240/1000W TW200/TW180 Maximum Rode Weight 60 lbs. (27kg) 60 lbs. (27kg) (weight of the anchor, line, chain)
- Page 4 INSTALLATION TOOLS REQUIRED: 1. Electric Drill with 7/8” (22mm), 5/16” (10mm) and 1/8” (3mm) Drill Bits 2. Adjustable (Crescent style) wrench 3. Socket and driver MATERIALS REQUIRED 1. Mounting Hardware - For1000w/ TW240use countersink head bolts – for TW200/TW180use hex head or round head bolts. 4 sets- 5/16 (10mm) stainless steel bolts (length = mounting surface + 1.5”...
- Page 5 INSTALLING THE SWITCH PANEL This winch includes a second switch and connector cable. Determine the location of the second switch (usually at the helm). Hold the switch in the desired location and mark the center hole location and drill a 7/8” (22mm) hole for the connector to pass through. Pass the switch connector through the hole and lay the switch flat on the installation surface.
- Page 6 700 ft ^ 500 ft* 330 ft* 300 ft*~ 200 ft* 100 ft * 60 ft ^ 40ft ^ TW200/TW180 400 ft ^ 300 ft* 200 ft*~ 180 ft* 120 ft* 100 ft ^ * plus 20 ft. of chain + plus 15 ft.
- Page 7 Over-run If the rope tangles or spills over the side of the drum, apply tension on the rope while pressing the UP or DOWN button in the appropriate direction to unwind the tangle. Actuator Malfunctions Check for power present on the connector (CU side) when unplugged and FREE FALL or LOCK buttons are ...
- Page 8 1000W TW240 TW200 TW180 9 & 10 TW180...
Need help?
Do you have a question about the TW180 and is the answer not in the manual?
Questions and answers
I need the wiring diagram please
The wiring diagram for the VEVOR TW180 Electric Anchor Winch includes the following steps:
1. Battery Wire Routing: Route the battery wires between the winch and the battery.
2. Positive Wire Connection: Connect the RED positive (+) wire to the LOAD side of the circuit breaker.
3. Negative Wire Connection: Connect the BLACK negative (–) wire to the battery negative terminal.
4. Circuit Breaker: Never connect the circuit breaker to the negative battery terminal.
5. Wire Gauge Recommendations:
- Use 4 AWG wire for up to 15 ft (4.6 m).
- Use 2 AWG wire for up to 25 ft (7.6 m).
- Use larger gauge wire if possible for better performance.
6. General Wiring Safety:
- Disconnect the battery positive wire before installation or service.
- Use industry-standard crimped connectors.
- Keep wires away from heat sources and bare wires.
- Ensure circuit breakers and wires are installed before applying power.
This answer is automatically generated
The manual states that if you need to rotate the motor undo the 4 nuts and 4 bolts from the unit and rotate the motor then refit nuts and bolts, but on my unit TW200 the 4 bolt cannot be taken out within the space between the winch mounting body and the motor mounting plate which prevents me from rotating the body which I need to do. What process do I use to rotate the winch motor 90 degrees with my model winch