
Related Manuals for Seuic AUTOID Q9


Summary of Contents for Seuic AUTOID Q9
- Page 1 SEUIC Reference Manual AUTOID Q9 Industrial Smartphone Android Product UserManual Version 1.0 SEUIC Technologies Co., Ltd.
- Page 2 The information contained in this manual is provided on an "AS IS" basis and is subject to change without further notice. Seuic makes no warranties of any kind with respect to the contents of this manual, including, but not limited to, implied warranties of merchantability and fitness for a particular purpose.
-
Page 3: Table Of Contents
7.1.4 Hotspot & tethering ................28 7.1.5 VPN ......................30 7.1.6 Airplane mode ..................30 7.2 Connected devices ................... 30 7.2.1 Bluetooth ....................31 7.2.2 NFC ......................35 7.3 Apps & notifications ..................35 7.4 Battery ....................... 35 7.5 Display .........................36 SEUIC Technologies Co., Ltd. - Page 4 8.5.7 Show Scan Float Button ................. 71 8.5.8 Hardware Keyboard Tones ..............71 8.5.9 Prohibit Fall Detection ................71 8.6 Digital Certificates Whitelist ................71 8.7 Hotkey Settings ....................74 Chapter 9. Troubleshooting ................... 78 Optional Accessories ...................... 8 0 SEUIC Technologies Co., Ltd.
-
Page 5: Chapter 1. Instructions For Use
Pressing the screen with force may damage the screen. Do not touch the screen with aresistive touchscreen pen to avoid scratching or damaging the screen. To clean the screen, spray a small amount of commercial LCD cleaner on a soft cloth. SEUIC Technologies Co., Ltd. - Page 6 It will take a long time to charge the battery when the device is usedfor the first time or reused afterlong storage. If there is a malfunction, write down the information about themalfunction and contact the service personnel. SEUIC Technologies Co., Ltd.
-
Page 7: Chapter 2. Appearance
Chapter 2. Appearance Figure 2- 1 Front View SEUIC Technologies Co., Ltd. - Page 8 Figure 2-2 Back View SEUIC Technologies Co., Ltd.
- Page 9 Figure 2 - 3 Battery Compartment Back View SEUIC Technologies Co., Ltd.
-
Page 10: Chapter 3. Keyboard
Chapter 3. Keyboard The keyboard on the AUTOID Q9 device is 24 keys + 2 side scan keys+ 1 PTT key, and there are 3 buttons on the touchscreen (Menu, Home, Back). Keys Description: Table 3- 1 Keys Description Main Function... - Page 11 Configurable as per user requirements Sleep/ wake up, shutdown Power button Symbol . Becomes * key in Fn mode Number 0 Becomes Space in Fn mode Enter factory pattern/the same function as the # key on the mobile phone SEUIC Technologies Co., Ltd.
-
Page 12: Chapter 4. Quick Start Guide
2 s to open the power menu, then select Restart and tap Confirm to turn off and restart the device normally. 4.5 Install SIM card Follow the instructions below to install Nano SIM card: Remove the battery, and the left card holder is a Nano SIM- 1 card holder, follow SEUIC Technologies Co., Ltd. -
Page 13: Install Sd Card
Slide the battery cover lock to the right side to unlock, remove the cover and then the battery. Install the battery and cover as labelled, slide the cover lock to the left side to lock up. SEUIC Technologies Co., Ltd. -
Page 14: Chapter 5. About Charging
The battery can be recharged repeatedly, but is consumable and should be replaced when the device standby time is significantly reduced. The charging time of the battery varies according to the temperature SEUIC Technologies Co., Ltd. -
Page 15: Led Indicators
When connected to the USB or charging adapter, the solid green light on both side LEDs indicates that the battery is fully charged. When the device scans a barcode, the LEDs on both sides flash once in green, indicating that the barcode has been read. SEUIC Technologies Co., Ltd. -
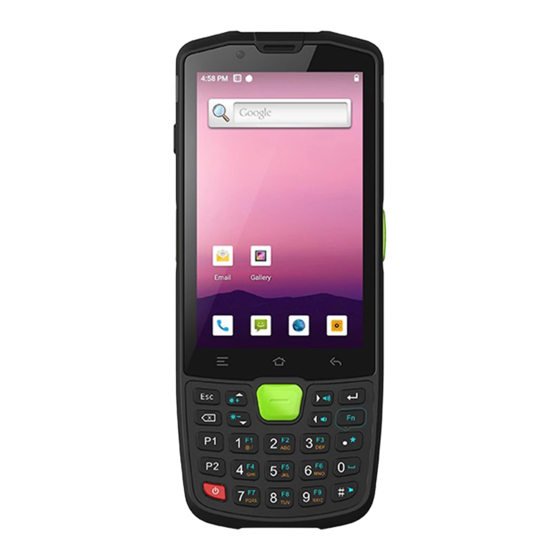
Page 16: Chapter 6. Main Screen
Chapter 6. Main screen AUTOID Q9 has two home screens, configurable at your preference. Figure 6- 1 Main Screen Table 6- 1 Main Screen Items ① Status Bar: displays notifications and status icons. ② Display Area: used to p lace application icons, desktop folders and widgets. - Page 17 Battery fully charged Alarm clock Low battery Multiple notification icons, out Preparing the microSD card of display range Bluetooth GPS locating Uploading data Downloading data USB debugging Table 6- 2 Status Icons and Notification Bar Icons SEUIC Technologies Co., Ltd.
-
Page 18: Chapter 7. Settings
Note: Wi- Fi signal availability and coverage depends on the signal number, the infrastructure, and the objects that the signal penetrates. Turn on Wi- Fi and connect to a wireless network 1 . Tap the WLAN Off/ On button to enable Wi- Fi, And the system automatically SEUIC Technologies Co., Ltd. - Page 19 Figure 7-2 Wi-Fi menu 4. WLAN Frequency Band ([WLAN Advanced Settings] --> [WLAN Frequency Band] ) , when you choose to use only 5 GHz/ 2 . 4 GHz, you can only search for APs in 5GHz/2.4GHz. SEUIC Technologies Co., Ltd.
- Page 20 AP is less than the threshold value ( premise: in a roaming environment) , then the roaming will be triggered. As shown in the figure, the roaming threshold value is set to - 6 5 d Bm, when the signal strength is lower than that, the roaming mechanism is triggered. SEUIC Technologies Co., Ltd.
- Page 21 APs is greater than 5 dBm ( also need to reach the Roaming RSSI Threshold standard), roaming can start normally. Figure 7- 6 WLAN Roaming RSSI Difference WIFI Operating Mode configuration supports configuring fixed operating mode (a/b/g/n/ac), which by default is 802.11 AUTO. SEUIC Technologies Co., Ltd.
- Page 22 [ Maximum Performance] means have the best performance experience but consume the most power. As shown below: Figure 7-8 Power Saving Mode 8. Black/White List Policy and Configure Black/White List SEUIC Technologies Co., Ltd.
- Page 23 (2) Configure Black/White List includes blacklist management and whitelist management. Figure 7- 10 Configure Black/White List Note: When the device is connected to a wireless network, the status bar displays the Wi- Fi icon( ) and the approximate signal strength (number of lit bars). SEUIC Technologies Co., Ltd.
-
Page 24: Mobile Network
In the Wi- Fi screen, tap Scan. The Wi- Fi networks discovered will be displayed in the Wi- Fi network list. Tap another Wi- Fi network to connect to that network. 7.1.2 Mobile network 1. Turn on mobile data network : [Settings] --> [ Network & internet] --> [ Mobile SEUIC Technologies Co., Ltd. - Page 25 Figure 7- 13 Mobile data roaming 3 . Network type: insert different SIM card, system automatically identifies the network type according to the SIM card type. The default network type is 4G (recommended). SEUIC Technologies Co., Ltd.
- Page 26 Figure 7- 15 Access Point Names APN 5. Add dedicated APN, tap button, and tap New APN, then a pop-up interface will be shown as below, which generally requires adding the name (custom), SEUIC Technologies Co., Ltd.
- Page 27 Note: When adding an APN, other options can be set according to the user' s own access point requirements. Figure 7- 16 Adding and Deleting APN 6. Network provider: searches for network provider resources in the current SEUIC Technologies Co., Ltd.
-
Page 28: Data Usage
Figure 7- 17 Data usage 7.1.4 Hotspot & tethering (1) Portable hotspot function, which uses this device as a Wi- Fi hotspot to provide signal access to cell phones and computers with Wi- Fi modules within a SEUIC Technologies Co., Ltd. - Page 29 (3) Configure a portable hotspot, as shown below: Figure 7- 19 Modify a WLAN Hotspot (4) The other party can search for the hotspot, enter the corresponding password to share the hotspot network of the device. SEUIC Technologies Co., Ltd.
-
Page 30: Vpn
Figure 7-20 VPN Settings 7.1.6 Airplane mode When the airplane mode is checked, the wireless module will automatically turn off. 7.2 Connected devices Find this icon: -> Settings -> Connected devices SEUIC Technologies Co., Ltd. -
Page 31: Bluetooth
2. From the list of discovered devices, tap on the device to be connected to pair. 3 . After entering the PIN code in the pairing request pop- up dialog, tap Pair to connect the device. SEUIC Technologies Co., Ltd. - Page 32 MP3 and other files to be sent through Bluetooth. For example, to share pictures, press and hold the pictures you want to share in the file manager, and in the sharing interface select the Bluetooth device you want to send to. Then a details interface SEUIC Technologies Co., Ltd.
- Page 33 Figure 7-24 Bluetooth Transmission When sending, there is an upward arrow mark on the top left screen, which you can pull down to view the transmission progress, as shown below: SEUIC Technologies Co., Ltd.
- Page 34 7 . There is a corresponding notification when the files are sent. Figure 7-26 Bluetooth shared results view 8. Paring for Bluetooth earphone is the same as normal Bluetooth pairing. Bluetooth earphone can be used for voice communication and multimedia playback. SEUIC Technologies Co., Ltd.
-
Page 35: Nfc
-> Settings -> Apps & notifications Apps and notifications (recent apps, notifications, app permissions, default apps, emergency alerts, special app permissions) . Figure 7-27 Apps & Notifications 7.4 Battery Find this icon: -> Settings -> Battery SEUIC Technologies Co., Ltd. -
Page 36: Display
7.5 Display Find this icon: -> Settings -> Display 1 . Brightness level : move the cursor bar left and right to adjust the backlight. [Adaptive brightness] : optimize the brightness according to the ambient light conditions. SEUIC Technologies Co., Ltd. - Page 37 [ Wallpaper] : system built- in default wallpapers. Figure 7-30 Wallpaper 3. Screen timeout : sets the timeout before system sleep. Upon the set time, the system will automatically sleep. SEUIC Technologies Co., Ltd.
- Page 38 5. Auto-rotation (only supported on standard models) : auto-rotation ON: automatically switch between horizontal and vertical screen according to the rotation angle of the device; auto- rotation OFF: keep the screen in portrait orientation, not changing with the rotation angle of the device. SEUIC Technologies Co., Ltd.
-
Page 39: Sound
Settings for volume, phone ring tone and default notification tone, where you can also turn on/ off to enable/ disable ringtone and vibration for incoming calls, dial pad tones, screen locking sounds, charging sounds, touch sounds and touch vibration, as shown in below: SEUIC Technologies Co., Ltd. -
Page 40: Storage
Figure 7-34 Sounds and Notifications 7.7 Storage Find this icon: -> Settings -> Storage You can view the available internal storage space, SD card storage space, and external USB flash drive storage space. SEUIC Technologies Co., Ltd. -
Page 41: Location
1. Turn on Use Location to enable GPS locating function. You can download third- party locating software’s. Figure 7-36 Location 7.9 Security Find this icon: -> Settings -> Security Set screen lock mode, device admin apps, unknown source application installation password settings, SIM card lock, screen pinning, etc. SEUIC Technologies Co., Ltd. -
Page 42: Accounts
7.10 Accounts Find this icon: -> Settings -> Accounts Set up accounts and sync data (you can sync contact information, calendars, etc., to other product clouds, but you need to set up appropriate accounts and server). SEUIC Technologies Co., Ltd. -
Page 43: Accessibility
Here you can set up the system, caption, magnification, large font size, high- contrast text, power button ends call, auto-rotate screen, speak your password, accessibility shortcuts, text-to-speech (TTS) output, and touch & hold delay. Figure 7-39 Accessibility SEUIC Technologies Co., Ltd. -
Page 44: System
Find this icon: -> Settings -> System Figure 7-40 System 7.12.1 Languages & input Select your language, choose your preferred keyboard and input method, spell check tool, autofill service, personal dictionary, pointer speed, and text-to-speech (TTS) output. SEUIC Technologies Co., Ltd. -
Page 45: Gestures
If enabled, press the power and volume-up buttons (downwards-arrow and right- arrow buttons in FN mode) simultaneously to switch to selected mode. Figure 7-42 Gestures 7.12.3 Date & time You can use network- provided time or time zone, or manually set the date and SEUIC Technologies Co., Ltd. -
Page 46: Reset Options
You can also select the format in which the time and date are displayed. Figure 7-43 Date & Time 7.12.4 Reset options Reset WLAN, mobile data network& Bluetooth, reset app preferences, and erase all data (factory reset) Figure 7-44 Reset options SEUIC Technologies Co., Ltd. -
Page 47: About Phone
Model & hardware: model, serial number, device serial number, user-defined serial number, function number IMEI: IMEI, IMEI SV Android version: 10 IP address WLAN MAC address Bluetooth address Build number SEUIC Technologies Co., Ltd. -
Page 48: Chapter 8. Introduction Of Typical Applications
8.1 Scanner 1.Find this icon , enter the application interface and tap on Scan for scanning. Figure 8- 1 Scanner Main Interface 2 . Select [ Barcode Settings] to enter interface to set the desired barcode type. SEUIC Technologies Co., Ltd. - Page 49 Please refer to the specific settings of your model. Figure 8-4 2D Scanner Basic Settings Interface 4. Open [Application Settings], where you can turn on/off settings for scanning, as shown in Figure 8-5: (1) Scan sound : if on, sound alert during scan. SEUIC Technologies Co., Ltd.
- Page 50 ( simulate keyboard needs to select the input method that supports hard keyboard), as shown in Figure 8-7. (18) Developer options: enter the password 888888 in order to modify the developer options (not recommended), as shown in Figure 8-8. SEUIC Technologies Co., Ltd.
- Page 51 Figure 8 -5 Application Settings SEUIC Technologies Co., Ltd.
- Page 52 5. Program Hide or Exit ( 1) Select [ Hide], the program will run in the background, and allows scan by pressing scan key in any editing interface. (2) Select [ Exit], the program will exit and close. SEUIC Technologies Co., Ltd.
-
Page 53: System Update
Figure 8- 10 System Update 2 . With internet access, tap the check- for- update button. If there is no update, it will show that the current version is the latest version; if there is an update, it will SEUIC Technologies Co., Ltd. - Page 54 3 . Tap Download. Once downloaded, tap Update Immediately and the device will restart into update mode, as shown. Figure 8- 12 Update Immediately When the power level is below 30%, the following message will appear and the update cannot be performed. SEUIC Technologies Co., Ltd.
-
Page 55: Mobile Butler
This product is designed to enable customers to set permissions on the Android handheld terminal and disallow the use of unspecified applications. • Find this icon Settings -- > Applications, click on the upper right corner SEUIC Technologies Co., Ltd. - Page 56 Figure 8- 16 No Password Interface As shown in the above, the administrator password has to be set first if not already. Tap [OK] button to jump to the change password interface, as below: SEUIC Technologies Co., Ltd.
- Page 57 Confirm button to successfully set the password. Note: The password cannot be empty and the passwords in new password column and in confirm password column must be the same. (2) Tap the menu button again, as follows: Figure 8- 18 Password Entry Interface SEUIC Technologies Co., Ltd.
- Page 58 Select an app in [ Autostart] column, then the app will auto start after the device reboot (Note: currently autostart only supports one app), as shown below: Figure 8-20 Main Interface (3) Administrator, Change Password In the Add Applications interface, click [Settings] in the upper right corner to SEUIC Technologies Co., Ltd.
- Page 59 Figure 8-21 Change Password (4) Administrator, Change Name Enter [Settings], tap [ Mobile Butler] to change the name of "Mobile Butler". Figure 8-22 Change Name (5) Replace Wallpaper Enter [Settings], tap [Change Wallpaper] to show the below: SEUIC Technologies Co., Ltd.
- Page 60 As shown in the left picture above, when the security setting is completed, the corresponding option "Forget Password" will be shown in the location where password is required ( as shown in the right picture above) , which allows to reset the password, otherwise you cannot retrieve the password. SEUIC Technologies Co., Ltd.
- Page 61 ( by default, the device has a default launcher option when you first enter Mobile Butler). (9) Mobile Butler Autostart ON <---> Mobile Butler Autostart OFF Control whether Mobile Butler is used as the default launcher. [ Mobile Butler SEUIC Technologies Co., Ltd.
-
Page 62: Quick Configuration
Figure 8- 26 Quick Configuration Main Interface 8.4.1 Import 1. File Import Put the eligible configuration zip file in the specified directory of the external SD card to achieve configuration. The external SD card system path is: external SD SEUIC Technologies Co., Ltd. - Page 63 1 ) Put the configuration zip package (file name is Setinfo.tar.gz) into the external SD card/SysSetting directory, as shown below: Figure 8-27 Configuring Zip Directory 2) Enter Quick Configuration, click [ File Import], and the following prompt pops up, tap [Confirm]. Figure 8-28 File Import SEUIC Technologies Co., Ltd.
- Page 64 QR codes to import configuration files. ( 1) Enter Quick Configuration, tap [QR code Import], place the QR code to be imported in the scan box, as shown below: Figure 8-30 QR Code Import Screen SEUIC Technologies Co., Ltd.
-
Page 65: Export
(1) Enter the Quick Configuration, tap [ File Export], the following interface pops up to indicate that the export was successful, where the external SD card already has a configuration document, the export will prompt notification to SEUIC Technologies Co., Ltd. - Page 66 This function exports a QC code which can be scanned by another device to establish a Bluetooth channel to transfer the configuration file. (1) Enter Quick Configuration, tap [ File Export] and the following interface will SEUIC Technologies Co., Ltd.
-
Page 67: User Configuration
( 2 ) The generated QR code image is at the bottom of the application and can be viewed by clicking on the small QR code icon. Figure 8-35 QR Code Image 8.4.3 User Configuration 1. User Configuration File Name: UserConfig.xml Storage location: a) External SD card/SysSetting/ UserConfig.xml SEUIC Technologies Co., Ltd. - Page 68 (for example, place on an external SD card): Figure 8-36 User Configuration File Enter the Quick Configuration and tap [ File Export], the following interface appears, which means the export is successful : SEUIC Technologies Co., Ltd.
-
Page 69: Feature Key Settings
Figure 8- 37 User Configuration Files Export Success 8.5 Feature Key Settings This application is used for quick and easy implementation of customer specific needs. SEUIC Technologies Co., Ltd. -
Page 70: Fn Sticky Keys
If enabled, the P5 key function is disabled. 8.5.3 Block P7 Function Key If enabled, the P7 key function is disabled. 8.5.4 Touchscreen Glove Mode If enabled, support touchscreen operation with gloves, where the touchscreen is more sensitive. SEUIC Technologies Co., Ltd. -
Page 71: Disable Status Bar Dropdown
If enabled: the system will not go to sleep when the device is dropped. If disabled : the system will immediately go to sleep when the device is dropped. 8.6 Digital Certificates Whitelist This software is used to add specific digital certificates to the whitelist. SEUIC Technologies Co., Ltd. - Page 72 The user can import the certificates from the selected APK files into the system by tapping the [ Import] button after checking single or multiple display items. SEUIC Technologies Co., Ltd.
- Page 73 APK files into the system by tapping the [ Import] button after checking single or multiple display items. Figure 8-41 Installed Package List 3. Remove Certificates from Whitelist SEUIC Technologies Co., Ltd.
-
Page 74: Hotkey Settings
8.7 Hotkey Settings This application is used for shortcut key ( Fn) settings, which allows customers to quickly use frequently used applications. 1. Find this icon and enter [ Hotkey Settings] interface. SEUIC Technologies Co., Ltd. - Page 75 Figure 8-43 Hotkey Settings Main Interface Hotkey settings, tap the Fn key (e.g., F2) to enter the settings interface, as shown below: Figure 8-44 Adding Hotkeys Interface Simply select the appropriate application, as shown below: SEUIC Technologies Co., Ltd.
- Page 76 4 . To use hotkeys, switch the keys on the device to FN mode, the taskbar at the top of the screen will show the FN mode, and then press the keyboard F1- F9. But for SEUIC Technologies Co., Ltd.
- Page 77 P1-P7 shortcut keys, no need to switch to Fn mode. SEUIC Technologies Co., Ltd.
-
Page 78: Chapter 9. Troubleshooting
Bluetooth devices, Cannot find within 10 meters (32.8 devices. feet) of each other Bluetooth device Turn on the Bluetooth of nearby. Bluetooth is not enabled on the device you are looking the nearby device. for. SEUIC Technologies Co., Ltd. - Page 79 Unable to access the Incorrect network mode Go to Settings and select Internet using mobile selection, and SIM card is the correct network mode. data. not registered. SIM card payment default. Timely top up SIM card. SEUIC Technologies Co., Ltd.
-
Page 80: Optional Accessories
Optional Accessories Please keep the original box and packaging for future maintenance or storage of the device. The following accessories can better enhance your work and can be purchased if needed. 入 One AUTIOD Q9 Series Device 入 One USB Cable (standard) 入... - Page 81 Device Single Charging Dock Rated Input Voltage DC 4.75~5.5V Rated Input Current DC 5A (MAX) DC 4.75~5.5V (charging for the whole device) Rated Output Voltage DC 4.40V±0.05V (charging for the battery) DC 2A MAX (charging for the whole device) Rated Output Current DC 2A MAX (charging for the battery) Power status indicator (red light: power adapter) LED Indicators...
- Page 82 Battery Tetra Charging Dock Rated Input Voltage DC 12± 1V Rated Input Current DC 5A (MAX) Rated Output Voltage DC 4 4± 2% V * 4 Rated Output Current DC 2A*4(MAX) Power status indicator ( green light: power adapter) Battery charging indicator *4 (red light: charging in progress; green light: charging LED Indicators complete) Device + Grip...
- Page 83 Device Single Charging Dock(BC03) Rated Input Voltage DC 8.75~9.25V Rated Output Current DC 3A (MAX) DC 4.75~5.5V( charging for the whole device ) Rated Output Voltage DC 4.40V±0.05V( charging for the battery ) DC 2A MAX( charging for the whole device ) Rated Output Current DC 2A MAX(...
Need help?
Do you have a question about the AUTOID Q9 and is the answer not in the manual?
Questions and answers