Advertisement
Quick Links
www.costway.com
USER'S MANUAL
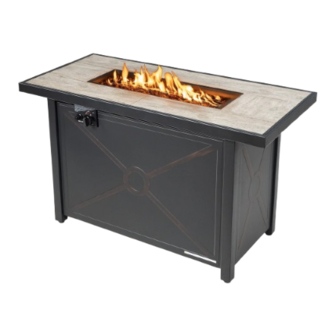
42-Inch Propane Fire Pit Table
OP70369
THIS INSTRUCTION BOOKLET CONTAINS IMPORTANT SAFETY INFORMATION. PLEASE READ AND KEEP FOR FUTURE REFERENCE.
Follow Costway
Please give us a chance to make it right and do better!
Visit us: www.costway.com
Contact our friendly customer service department for help first.
Replacements for missing or damaged parts will be shipped ASAP!
Advertisement

Subscribe to Our Youtube Channel
Related Manuals for Costway Patiojoy OP70369


Summary of Contents for Costway Patiojoy OP70369
- Page 1 THIS INSTRUCTION BOOKLET CONTAINS IMPORTANT SAFETY INFORMATION. PLEASE READ AND KEEP FOR FUTURE REFERENCE. Follow Costway Please give us a chance to make it right and do better! Visit us: www.costway.com Contact our friendly customer service department for help first. Replacements for missing or damaged parts will be shipped ASAP!
-
Page 2: Fire Or Explosion Hazard
Contact Us! Do NOT return this item. Contact our friendly customer service department for help first. E-mail US: cs.us@costway.com DANGER UK: cs.uk@costway.com FIRE OR EXPLOSION HAZARD If you smell gas: Shut off gas to the appliance. • B B efore You Start efore You Start Extinguish any open flame. - Page 3 Before you assemble or operate this unit, please carefully read this entire manual. Failure to do so may result in a fire, explosion, injury or death. WARNING • The installation of this unit must adhere to local codes or Propane Storage and Handling Code, CSA B149.2.
- Page 4 • Combustible material should not be within 60 inches of the top of the unit, or within 48 inches around the entire unit. • Keep the appliance area clear and free fr vapors and liquids. • • Do not add water into the unit.
- Page 5 Only use the regulator and hose assembly provided with this unit. Replacement parts must be supplied directly by Teamson design corp . Inspect the burner before use of this unit. If the burner shows any kind of damage, do not operate the appliance.
- Page 6 DESCRIPTION ITEM# PICTURE Table Leg Table Leg Table Leg Panel Panel Panel Door Tank Holder/Base Battery(AAA) Table Lid Fire Table with Burner...
- Page 7 PICTURE ITEM# DESCRIPTION lava rocks 1BOX 20 PCS Screw(M6*12MM) Screwdriver M6 Washer 20 PCS 1 PC Screw(M6*20MM)
- Page 8 Do not lock the screws until the assembly is complete. 1.Connect panel (D,E,F)with table legs(A,B,C) by 12pcs screws (N) and 12pcs M6 washers(P). 2.Hang the bottom (G) of the door plate on the round bracket.Top with 1PC screw(Q)lock.
- Page 9 3.Attach the assemble base to the bottom of top using 4pcs of screws (N), and 4pcs M6 washers(P), make sure the panel (K) faces the valve stem. 4. Connect the tank holder/base (I) With table Lets(A/B/C) by 4pcs screws (N) and 4pcs...
- Page 10 5.Put the table lid. 6.Remove the rubber cap on the electronic igniter by unscrewing and slide battery (I) into the battery slot. Make sure the positive side of the battery faces outwards. Screw the electronic igniter cap over the battery tightly.
- Page 11 Place propane gas tank (not included) into the metal stand (H). Make sure the gas tank sits on the metal stand (H) completely. Turn the cylinder valve on the tank clockwise to close the propane tank. Attach the preassembled regulator from the table top (L) to the cylinder valve by turning the regulator coupling nut clockwise.
- Page 12 Before performing a leak test, be sure that no sparks can occur and you are in a spacious outdoor area. Connect the propane gas tank to the regulator and turn the valve on the unit to the “off” position. Brush a soap and water mixture on all connections. Turn the gas supply on; if bubbles occur on any connection there may be a leak.
- Page 13 • Before performing any maintenance always disconnect propane gas tank. Store your product indoors during winter months. Avoiding extreme cold temperatures will • prevent from exposure damage. • Keep the heating item free and clear from combustible materials. • Visually inspect burner for obstructions and keep tank enclosure free and clear from debris.
- Page 14 Igniter battery is incorrectly inserted Check which direction the battery is inserted Igniter pin is broken Contact COSTWAY for a replacement part Heating unit won’t light Electrode wire is loose or disconnected Reconnect wire to the igniter box located inside the fire pit behind the igniter box Contact Contact COSTWAY.
- Page 15 February 24, 2019 Great products so far. Fast delivery, easy setup, and working without any issues. With your inspiring rating, COSTWAY will be more consistent to offer you EASY SHOPPING EXPERIENCE, GOOD PRODUCTS and EFFICIENT SERVICE! US office: Fontana, California...
Need help?
Do you have a question about the Patiojoy OP70369 and is the answer not in the manual?
Questions and answers