Chapters
Table of Contents

Subscribe to Our Youtube Channel
Related Manuals for Amica SHGG 11568 E


Summary of Contents for Amica SHGG 11568 E
- Page 1 507GG5.33ZpDNQ(Xv) / SHGG 11568 E (EN) INSTRUCTION MANUAL..........2 (NL) GEBRUIKERSHANDLEIDING.......34 IO-CFS-0534 / 8071768 (02.2018 / v1)
- Page 2 DEAR CUSTOMER, The cooker is exceptionally easy to use and extremely efficient. After reading the instruction manual, operating the cooker will be easy. Before being packaged and leaving the manufacturer, the cooker was thoroughly checked with regard to safety and functionality. Before using the appliance, please read the instruction manual carefully.
-
Page 3: Table Of Contents
TABLE OF CONTENTS Safety instructions ......................4 Description of the appliance ................... 10 Installation ......................... 12 Operation ........................... 18 Baking in the oven – practical hints ................23 Cleaning and maintenance ....................26 Technical data ........................33... -
Page 4: Safety Instructions
SAFETY INSTRUCTIONS Warning: The appliance and its accessible parts become hot during use. Care should be taken to avoid touching heating elements. Children less than 8 years of age shall be kept away unless continuously supervised. This appliance can be used by children aged from 8 years and above and persons with reduced physical, sensory or mental capabilities or lack of experience and knowledge if they have been given supervision or instruction concerning... - Page 5 SAFETY INSTRUCTIONS Warning: Do not use harsh abrasive cleaners or sharp metal scrapers to clean the oven door glass since they can scratch the surface, which may result in shattering of the glass. Warning: Ensure that the appliance is switched off before re- placing the lamp to avoid the possibillity of electric shock.
- Page 6 SAFETY INSTRUCTIONS Please pay attention to children whilst the cooker is in operation, as children do not know the rules of cooker use. In particular, hot surface burners, the oven chamber, grates, the door pane, and pans containing hot liquids standing on the hob may cause burns to children.
- Page 7 SAFETY INSTRUCTIONS Do not make your own alterations to the cooker in order to adapt it to a different type of gas, move the cooker to another place or make changes to the power supply. These operations may only be carried out by an authorised electrician or fitter. ...
- Page 8 HOW TO SAVE ENERGY Using energy in a respon- Make sure the oven door is properly sible way not only saves closed. money but also helps the Heat can leak through spillages on the door environment. So let’s save seals. Clean up any spillages immediately. energy! And this is how you Do not install the cooker in the direct can do it:...
- Page 9 DISPOSAL OF THE APPLIANCE UNPACKING During transportation, protec- Old appliances should not sim- tive packaging was used to ply be disposed of with normal protect the appliance against household waste, but should any damage. After unpack- be delivered to a collection and ing, please dispose of all recycling centre for electric and elements of packaging in a...
-
Page 10: Description Of The Appliance
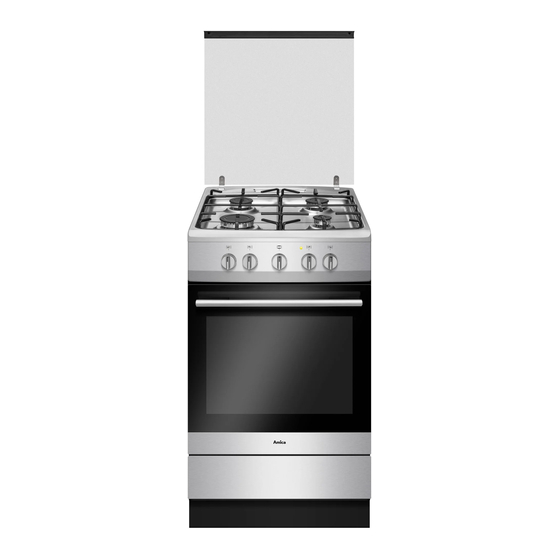
DESCRIPTION OF THE APPLIANCE Medium burner Auxiliary burner Medium burner Grate Cover Large burner Signal light grill Push-button oven light Gas burner Gas burner control knobs control knobs Temperature Oven door handle regulator knob Burner safety valve* Spark ignitor* *optional... - Page 11 SPECIFICATIONS OF THE APPLIANCE Cooker fittings: Grill grate Baking tray* (drying rack) Roasting tray* Sideracks *optional...
-
Page 12: Installation
INSTALLATION The following instructions are addressed to the qualified specialist installing the cooker. These instructions aim at ensuring that hood OKAP installation and maintenance activities are performed as professionally as possible. Min. 600 mm Prior to installation, ensure that the local distribution conditions (nature of the gas and gas pressure) and the adjustment of the appliance are compatible. - Page 13 INSTALLATION Gas connection Mounting the overturning prevention bracket. Caution! The cooker should be connected to a The bracket is mounted to prevent overtur- gas supply of the particular type of gas ning of the cooker. When the overturning that the appliance is manufactured to prevention bracket is installed, a child who function with.
- Page 14 INSTALLATION Connection with a flexible steel hose Electrical connection If the cooker is connected according to the class 2 specifications, sub-class I, only flex- The cooker is manufactured to work with ible metal hose can be used which meet the a one-phase alternating current (230V valid national regulations.
- Page 15 INSTALLATION Adapting the cooker to another In order to adapt the cooker to burn a different type of gas, you should: type of gas. exchange nozzles (see tables below), This operation may only be carried out by an adjust the “economical” flame. appropriately authorised fitter.
- Page 16 INSTALLATION The procedure for changing the gas type Conversion from natural Conversion from LPG Flame Burner gas to LPG to natural gas full flame 1.Replace burner nozzle 1.Replace burner nozzle with the appropriate nozzle with the appropriate nozzle according to the table. according to the table.
- Page 17 INSTALLATION Surface burners applied do not require adjust- Caution! ment of primary air. A correct flame has dis- After adjustment is completed, place tinct internal cones of blue and green colour. a label indicating the type of gas to A short, humming flame or long, yellow and which the cooker is now adapted.
-
Page 18: Operation
OPERATION Before first use remove packaging elements, gently (slowly) remove labels from the oven door, trying not to break the glue tape. If any visible trace is left on the glass, warm up the oven chamber (see below), spray the warmed-up glass with a glass cleaner, and wipe off with a soft cloth. - Page 19 OPERATION Ignition without an ignitor How to use surface burners light a match, Choice of cookware press in the knob to the end and turn it left to the “large flame” position Mind that the diameter of a pan base is always ...
- Page 20 OPERATION Caution! Operation of the burner protection valve In cooker models equipped with a surface burner safety valve, hold the Some models are equipped with an automatic knob pressed down to the end when system that cuts off gas supply to a burner igniting for 10 seconds at the “large when the flame has disappeared.
- Page 21 OPERATION Oven functions and operation. To ignite the oven: strike a match, The oven can be heated by oven gas burner press down the knob to the stop and turn or by electric grill*. The oven function is left to the position corresponding to the tem- controlled by one knob, which contains a perature chosen, digital scale corresponding to thermoregula-...
- Page 22 OPERATION Use of the grill The grilling process operates through infrared rays emitted onto the dish by the incandes- cent grill heater. In order to switch on the grill you need to: set the oven knob to the position marked with, heat the oven for approximately 5 minutes (with the oven door shut).
-
Page 23: Baking In The Oven - Practical Hints
BAKING IN THE OVEN – PRACTICAL HINTS Baking we recommend using the baking trays which were provided with your cooker which should be put on the drying rack; before the cake is taken out of the oven, check if it is ready using a wooden stick (if the cake is ready the stick should come out dry and clean after being inserted into the cake);... - Page 24 BAKING IN THE OVEN – PRACTICAL HINTS Roasting meat cook meat weighing over 1 kg in the oven, but smaller pieces should be cooked on the gas burners. use heatproof ovenware for roasting, with handles that are also resistant to high temperatures;...
- Page 25 BAKING IN THE OVEN – PRACTICAL HINTS Oven functions: grill heater LEVEL GRILLING TIME [MINUTES] TYPE OF DISH TEMPERATURE FROM THE [°C] BOTTOM SIDE 1 SIDE 2 Pork chop 8-10 Pork schnitzel 10-12 Shish kebab Sausages 8-10 8-10 Roastbeef, (steak approx. 1kg) 12-15 10-12 Veal cutlet...
-
Page 26: Cleaning And Maintenance
CLEANING AND MAINTENANCE By ensuring proper cleaning and mainte- Make sure that burner is correctly nance of your cooker you can have a sig- reassembled after cleaning. nificant influence on the continuing fault-free Misalignment of the burner cap can result in permanent damage operation of your appliance. - Page 27 CLEANING AND MAINTENANCE Oven Ovens in cookers marked with the letter D are equipped with easily removable wire shelf supports. To remove them for The oven should be cleaned after every washing, pull the front catch, then tilt the use.
- Page 28 CLEANING AND MAINTENANCE Replacement of the oven light bulb In order to avoid the possibility of an electric shock ensure that the appliance is switched off before replacing the bulb. Set all control knobs to the position “”/“0” and disconnect the mains plug, ...
- Page 29 CLEANING AND MAINTENANCE Removing the inner panel Door removal 1. Using a flat screwdriver unhook the up- per door slat, prying it gently on the sides In order to obtain easier access to the oven (fig. B). chamber for cleaning, it is possible to remove 2.
- Page 30 CLEANING AND MAINTENANCE 3. Pull the inner glass panel from its seat (in the lower section of the door). Fig. D, D1. 4. Clean the panel with warm water with some cleaning agent added. Carry out the same in reverse order to reassemble the inner glass panel.
- Page 31 CLEANING AND MAINTENANCE Caution! Regular inspections All repairs and regulatory activities should be carried out by the ap- propriate service centre or by an Besides keeping the cooker clean, you appropriately authorised fitter. should: carry out periodic inspections of the con- trol elements and cooking units of the cooker.
- Page 32 OPERATION IN CASE OF EMERGENCY In the event of an emergency, you should: switch off all working units of the cooker disconnect the mains plug call the service centre some minor faults can be fixed by referring to the instructions given in the table below.
-
Page 33: Technical Data
TECHNICAL DATA Voltage rating 230V~50 Hz Power rating max. 2,0 kW Appliance category DE II2ELL3B/P, NL II2L3B/P, AT II2H3B/P Cooker dimensions H/W/D 85/50/60 cm Complies with EU regulations EN-30-1-1, EN 60335-1, EN 60335-2-6 standards Certificate of compliance CE The Manufacturer hereby declares that this product complies with the general requirements pursuant to the following European Directives: ... - Page 34 GEACHTE KLANT, De fornuizen combineren uitzonderlijk gebruiksgemak en optimale doeltreffendheid. Na het lezen van deze gebruikershandleiding zult u zonder problemen dit fornuis kunnen bedienen. Voor het ingepakt werd en de fabriek verliet, werd dit fornuis bij de controleposten grondig gecontroleerd op het gebied van veiligheid en functionaliteit. Voordat u het toestel aanschakelt, dient u deze gebruikershandleiding grondig door te lezen.
- Page 35 INHOUDSTAFEL Veiligheidsinstructies....................... 36 Beschrijving van het toestel .................... 42 Installatie ........................... 44 Bediening .......................... 50 Bakken in de oven – praktische tips................55 Reiniging en onderhoud van het fornuis ............... 58 Technische gegevens ...................... 65...
-
Page 36: Veiligheidsinstructies
VEILIGHEIDSINSTRUCTIES Attentie. Dit apparaat en de bereikbare onderdelen ervan worden tijdens het gebruik heet. Wees bijzonder voorzichtig bij het aanraken van de verwarmingselementen. Zorg dat kinderen die jonger zijn dan 8 jaar niet bij het apparaat kun- nen komen, tenzij ze onder permanent toezicht staan. Dit apparaat mag gebruikt worden door kinderen van 8 jaar en ouder en personen met lichamelijke of geestelijke beperkingen of personen zonder ervaring met of kennis... - Page 37 VEILIGHEIDSINSTRUCTIES Attentie. Gebruik geen schurende schoonmaakmiddelen of scherpe metalen voorwerpen voor het schoonmaken van het glas van de deur, omdat deze krassen kunnen veroorzaken op het oppervlak. Dit kan leiden tot barsten van het glas. Attentie. Om elektrocutie te vermijden dient u het toestel uit te schakelen vooraleer u het lampje vervangt.
- Page 38 VEILIGHEIDSINSTRUCTIES Wees bijzonder voorzichtig als er kinderen in de buurt van het fornuis zijn, want ze kennen de bedieningsprincipes van het fornuis niet. De hete branders van de gaskookplaat, de ovenkamer, het rooster, de ruit van de deur, en potten en pannen met hete vloeistoffen kunnen brandwonden veroorzaken! ...
- Page 39 VEILIGHEIDSINSTRUCTIES Het is verboden om zelfstandig het fornuis aan te passen aan een ander soort gas, het fornuis naar een ander plaats te verplaatsen of aanpassingen door te voeren aan de voeding. Deze handelingen moeten uitgevoerd worden door een erkend installateur. ...
- Page 40 ENERGIEBESPARING Door op verantwoorde wijze energie te gebruiken be- Sluit de deur van de oven zorgvuldig. spaart u niet alleen op de Otherwise energy consumption increases kosten van het huishouden, unnecessarily. maar werkt u ook bewust Bouw het fornuis niet in in de onmid- mee aan de bescherming dellijke nabijheid van koelkasten of diep- van het milieu.
- Page 41 RECYCLAGE VAN GEBRUIKTE TO UITPAKKEN ESTELLEN Het toestel wordt door zijn Op het einde van de gebruiks- verpakking beveiligd tegen periode mag dit product niet bij beschadigingen tijdens het het gewone huisvuil geplaatst transport. Na het uitpakken worden, maar moet afgegeven van het toestel dient u de worden bij een verzamelpunt verpakkingselementen te...
-
Page 42: Beschrijving Van Het Toestel
BESCHRIJVING VAN HET TOESTEL Gemiddelde brander Hulpbrander Gemiddelde brander Deksel Rooster Grote brander Controlelampje van de grill Van de ovenverlichting Draaiknoppen voor de Draaiknoppen voor de bediening van de bediening van de gasbranders gasbranders Greep van de deur Draaiknop van de van de oven temperatuurregelaar Gaslekbeveiliging*... - Page 43 KENMERKEN VAN HET TOESTEL Uitrusting van het fornuis – overzicht: Grillrooster Bakplaat voor gebak* (droogrekje) Bakplaat voor gebraad* Laddertjes *Bepaalde modellen...
-
Page 44: Installatie
INSTALLATIE Onderstaande instructies zijn bestemd voor correcte verbranding van het gas. De gekwalificeerde installateurs die het toestel luchttoevoer mag niet minder zijn dan installeren. Met behulp van deze instructies 2m3/h voor 1 kW vermogen van de kan het toestel op een zo professioneel mo- branders. - Page 45 INSTALLATIE Aansluiting van het fornuis op Het fornuis moet opgesteld worden op een harde, effen ondergrond (niet op een de gasinstallatie onderstel zetten). Opgelet! Voordat u het fornuis in gebruik neemt, Het fornuis moet op een gasinstal- moet u het waterpas zetten. Dit is vooral latie aangesloten met het soort gas belangrijk voor het gelijkmatige versprei- waaraan het fornuis in de fabriek werd...
- Page 46 INSTALLATIE Aansluiting op een elastische stalen Opgelet! leiding. Na de installatie van het fornuis moet Als het fornuis in overeenstemming met de de afdichting van alle aansluitingen principes voor klasse 2, subklasse I, geïn- gecontroleerd worden met bv. water stalleerd wordt, dan raden we aan om bij de met zeep.
- Page 47 INSTALLATIE Aanpassing van het fornuis aan Om het fornuis aan te passen aan de verbranding van een ander soort gas, moet u: een ander soort gas de branderkoppen vervangen (zie tabel hieronder), Deze handeling mag enkel uitgevoerd wor- de “spaarvlam” instellen. den door een erkend installateur met de gepaste kwalificaties.
- Page 48 INSTALLATIE Handelswijze bij omschakeling naar een ander soort gas Omschakeling van Omschakeling van Vlam Brander vloeibaar gas aardgas naar aardgas naar vloeibaar gas 1.Gaskop van de brander 1.Gaskop van de brander volledig v e r v a n g e n d o o r e e n vervangen door een gepaste kop volgens de tabel met gepaste kop volgens de...
- Page 49 INSTALLATIE Opgelet! De toegepaste branders van de gaskookplaat Kleef na de instelling een etiketje met vereisen geen instelling van de basislucht- een beschrijving van het soort gas stroom. waaraan het fornuis aangepast is, op Een correcte vlam heeft binnenin duidelijk het fornuis.
-
Page 50: Bediening
BEDIENING Voordat u het fornuis voor de eerste maal aanschakelt verwijder alle verpakkingsonderdelen, verwijder voorzichtig (langzaam) de eti- ketten van de deur van de oven om de kleefband niet te breken. Als er resten lijm op de ruit achterblijven, kunt u gewone kleefband op de restjes plakken en die er daarna aftrekken. - Page 51 BEDIENING Aansteken van de branders zonder ont- Bediening van de branders van de steker gaskookplaat steek een lucifer aan, druk de draaiknop in totdat hij niet meer Keuze van de potten en pannen verder kan en draai hem naar links in de Zorg ervoor dat de diameter van de bodem stand “grote vlam”...
- Page 52 BEDIENING Opgelet! Werking van de gaslekbeveiliging Bij fornuismodellen met een gaslek- Bepaalde modellen (zie tabel p. 10) zijn uit- beveiliging voor de branders van de gerust met een automatisch systeem dat de kookplaat moet u tijdens het aanste- gastoevoer naar de brander afsluit wanneer ken ongeveer 10 sec.
- Page 53 BEDIENING Functies en bediening van de Om de oven aan te schakelen moet u: oven een lucifer aansteken, De oven kan opgewarmd worden met behulp de draaiknop diep indrukken en naar links van de gasbrander van de oven of met het draaien tot op de gewenste temperatuur, elektrische grillelement*.
- Page 54 BEDIENING Gebruik van de grill Tijdens het grillproces ondergaan de gerech- ten de inwerking van infrarood dat uitgezon- den wordt door het verhitte verwarmingsele- ment van de grill. Om de grill aan te schakelen moet u: de draaiknop van de oven op de stand de oven ongeveer 5 minuten verwarmen (met gesloten deur) de bakplaat met het gerecht op het ge-...
-
Page 55: Bakken In De Oven - Praktische Tips
BAKKEN IN DE OVEN – PRAKTISCHE TIPS Gebak het is aan te raden om gebak te bereiden op de bakplaten die deel uitmaken van de uitrusting van het fornuis, voordat u het gebak uit de oven neemt, kunt u de kwaliteit ervan controleren met een houten stokje (als het gebak gelukt is, blijft het stokje droog en zuiver wanneer u het erin steekt), ... - Page 56 BAKKEN IN DE OVEN – PRAKTISCHE TIPS Vlees braden in de oven kunnen porties vlees van meer dan 1 kg bereid worden. Kleinere stukken worden beter op de gasbranders van het fornuis bereid. bij het braden worden best vuurvaste schotels gebruikt. Ook de handgrepen van deze schotels moeten bestand zijn tegen hoge temperaturen.
- Page 57 BAKKEN IN DE OVEN – PRAKTISCHE TIPS Functies van de oven: verwarmingselement grill NIVEAU BRAADTIJD [MIN.] TEMPERATUUR SOORT GERECHT VAN ON- [ºC] DERAF ZIJDE 1 ZIJDE 2 Varkenskotelet 8-10 Varkensschnitzel 10-12 Brochette Worstjes 8-10 8-10 Rosbief, (steak ca. 1 kg) 12-15 10-12 Kalfskotelet...
-
Page 58: Reiniging En Onderhoud Van Het Fornuis
REINIGING EN ONDERHOUD VAN HET FORNUIS De zorg waarmee de gebruiker het fornuis Controleer of de elementen van de reinigt en onderhoudt, heeft een belangrijke brander na het reinigen op de juiste invloed op zijn levensduur en probleemloze manier zijn teruggeplaatst. werking. - Page 59 REINIGING EN ONDERHOUD VAN HET FORNUIS Fornuizen die zijn aangeduid met de Oven letter D zijn uitgerust met eenvoudig te verwijderen zijwandgeleiders voor de De oven moet na elk gebruik gereinigd ovenroosters. Trek aan de klem aan de worden. Bij de reiniging moet de verlich- voorkant, kantel vervolgens de geleider ting aangeschakeld worden, zodat u beter en verwijder hem uit de klemmen aan de...
- Page 60 REINIGING EN ONDERHOUD VAN HET FORNUIS Vervanging van het verlichtingslampje van de oven Om elektrocutie te vermijden dient u het toestel uit te schakelen vooraleer u het lampje vervangt. Stel alle draaiknoppen in op stand “”/“0” en schakel de voeding uit, ...
- Page 61 REINIGING EN ONDERHOUD VAN HET FORNUIS Wegnemen van de deur Verwijderen van de binnenruit 1. Duw met behulp van een platte schroe- Om gemakkelijker toegang te hebben tot vendraaier de bovenrand van de deur de ovenkamer en die te reinigen, kunt u de los, terwijl u hem aan de zijkanten voor- deur wegnemen.
- Page 62 REINIGING EN ONDERHOUD VAN HET FORNUIS 3. Trek de binnenruit uit de houder (in het onderste deel van de deur). Fig. D, D1. 4. Was de ruit met warm water en een klein beetje reinigingsmiddel. Ga omgekeerd te werk om de ruit op- nieuw te monteren.
- Page 63 REINIGING EN ONDERHOUD VAN HET FORNUIS Opgelet! Periodieke controle Alle herstellingen en instellingen moeten uitgevoerd worden bij een Naast het lopende onderhoud en reiniging erkende onderhoudsdienst of door van het fornuis moet u ook: een erkend installateur met gepaste regelmatig de werking van de bedienings- kwalificaties.
- Page 64 HANDELSWIJZE BIJ PROBLEEMSITUATIES Bij probleemsituaties moet u: de werkende onderdelen van het fornuis uitschakelen de elektrische voeding ontkoppelen een herstelling aanvragen sommige kleine problemen kan de gebruiker zelf oplossen met behulp van de aanwijzingen in de tabel hieronder. Controleer opeenvolgend alle punten in de tabel voordat u de onderhouds- of klantendienst contacteert.
-
Page 65: Technische Gegevens
TECHNISCHE GEGEVENS Nominale spanning 230V~50 Hz Nominaal vermogen max. 2,0 kW Categorie van het toestel DE II2ELL3B/P, NL II2L3B/P, AT II2H3B/P Afmetingen van het fornuis 85/50/60 cm Voldoet aan de vereisten van de Europese voorschriften normen EN 30-1-1, EN 60335-1, EN 60335-2-6 Verklaring van de producent De producent verklaart hierbij, dat dit product voldoet aan de basisvereisten van de hieronder vernoemde... - Page 68 Amica S.A. ul.Mickiewicza 52, 64-510 Wronki, Poland tel. +48 67 25 46 100, fax +48 67 25 40 320 www.amica.pl...
Need help?
Do you have a question about the SHGG 11568 E and is the answer not in the manual?
Questions and answers