Table of Contents
Advertisement
Quick Links
Advertisement
Table of Contents

Related Manuals for AV Access 4KMX44-H2


Summary of Contents for AV Access 4KMX44-H2
- Page 1 4x4 Matrix with Audio Outputs 4KMX44-H2 User Manual...
-
Page 2: Table Of Contents
Table of Contents Introduction ......................2 Overview ............................2 Features ............................2 Package Contents ........................2 Panel .............................. 3 Front Panel ......................... 3 Rear Panel ........................... 3 Installation and Application................... 4 Bracket Installation ........................4 Application ..........................4 IR Remote Control ....................5 RS232 Control ...................... -
Page 3: Introduction
Introduction Introduction Overview 4KMX44-H2 is a 4x4 compact HDMI matrix switcher, specially designed for cost conscious projects and buyers. It features not only basic functions like cross-point switching and control (IR, RS232, IP), but also advanced functions like auto-downscaling for each HDMI output when it is connected to 1080P display. -
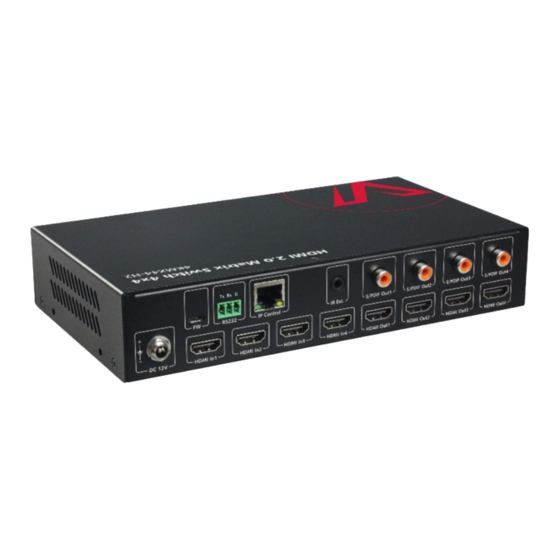
Page 4: Panel
Introduction Panel Front Panel Name Description IR Window Receive IR signals. On: The current HDMI input is selected. Input LED (1-4) Off: The current HDMI input is not selected. Output Click to select input source for Output (1-4) Selection separately. Button (1-4) Rear Panel Name... -
Page 5: Installation And Application
Installation and Application Installation and Application Bracket Installation Note: Before installation, please ensure the device is disconnected from the power source. Attach the installation bracket to the enclosure using the screws that were provided in the package separately. Attach the brackets to the surface you want to hold the unit against using the screws (provided by others). -
Page 6: Ir Remote Control
IR Remote Control IR Remote Control You can switch among multiple inputs for each output display by pointing the matrix IR remote directly at the IR window on the front panel or the IR receiver connected to the rear panel. Steps for IR Remote Operation: Point the matrix IR Remote directly at the IR window on front panel or at the IR receiver connected to the rear panel. -
Page 7: Rs232 Control
RS232 Control Select previous input Select next input for Output 1 for Output 1 Output 1 Select specific input for Output 1 To cycle through multiple inputs for your target output, press the previous ( ) or next ( ) button. Virtual IR Code Supported by Default (Matrix Switching Code): Code IN 3... -
Page 8: Web Ui Control
Web UI Control Parameters Value Parity None Stop Bits 1 bit Flow Control None Web UI Control The Web UI designed for the matrix is available for switching control, general and advanced settings. The Web UI is accessible through a browser with latest version, e.g., Chrome, Firefox, Safari, Opera, IE10+, etc. - Page 9 Web UI Control The Switch section manages distribution of input sources to output displays. By default, Input 1 corresponds to Output 1, Input 2 corresponds to Output 2, Input (n) corresponds to Output (n), n = 1, 2, 3, 4. Click the button in the table to select the input for the output display (button turns from white to green once selection is done).
- Page 10 Web UI Control Select Port: Click from the drop-down menu to choose an output/input port (1-4) for EDID setting. Read: Click to read the EDID of the output port you choose. Write: Click to write the read EDID of the output port or the uploaded ...
-
Page 11: Advanced
Web UI Control Auto CEC: Click “ON/OFF” button to set Auto CEC control enable/disable. The default setting is “ON”. Delay Time (min): Click the up/down arrow to set the time for the display to power off automatically when no signal is present. Then click “Apply”... - Page 12 Web UI Control Upgrade, System, Firmware Version. (1) Network Network is used to toggle between the dynamic and static IP addressing. DHCP: When enabled, the IP address of the Matrix is assigned automatically by the DHCP server connected. Static: When enabled, set up the IP address manually. ...
- Page 13 Web UI Control To create customized Web UI logo: 1) Click “Browse” button to upload a LOGO file. 2) Click “Apply”, When the operation is successful, the new logo will appear on the upper left corner of the screen and the login page. (4) WEB Firmware Upgrade 1) Click “Browse”...
- Page 14 Web UI Control 1) Click “Browse” for the update bin file. 2) Click "Upgrade" to start the MCU Firmware upgrade. 3) The matrix will upgrade and reboot automatically when upgrading MCU is completed. Please wait for about 30s and then refresh and log in again.
-
Page 15: Specifications
Specifications Note: Please wait about 30 seconds to re-access Web UI by refreshing the browser. (8) Firmware Version This section allows you to obtain information of the current firmware in use. Specifications Technical 4 x HDMI In, 4 x HDMI Out, 1 x RS232, 1 x IP Control Input/Output Port (RJ45), 4 x S/PDIF Out (Digital), 1 x FW (Micro USB), 1 x DC 12V IN... - Page 16 Specifications Technical mode. VESA: 800x600 , 1024x768 , 1280x768 , 1280x800 1280x960 , 1280x1024 ,1360x768 , 1366x768 1440x900 , 1600x900 , 1600x1200 Input/Output 1680x1050 ,1920x1200 Resolution SMPTE: Supported 720x576P , 1280x720P , 1920x1080P 6,7,8 2,5,6,7,8 3840x2160 2,3,5,6,8 , 4096x2160 2,3,5,6,8 2 = at 24 Hz, 3 = at 25 Hz, 5 = at 30 Hz, 6 = at 50 Hz, 7 = at 59.94 Hz, 8 = 60 Hz HDMI IN/OUT: Fully supports audio formats in HDMI...
-
Page 17: Warranty
The warranty has expired. The defects are caused by the fact that the product is repaired, dismantled or altered by anyone that is not from an AV Access Technology Limited authorized service partner. The defects are caused by the fact that the product is used or handled improperly, roughly or not as instructed in the applicable User Guide.
Need help?
Do you have a question about the 4KMX44-H2 and is the answer not in the manual?
Questions and answers