
Related Manuals for Unitor UWI 500 TP


Summary of Contents for Unitor UWI 500 TP
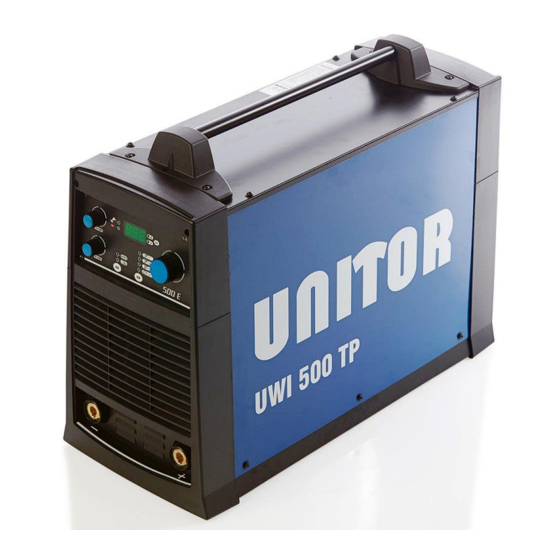
- Page 1 Instruction manual Unitor Welding Inverter UWI 500 TP & UWF 102 MMA, ACA, TIG and Wire welding Revision date: 10/07/2017 Page 1 of 40...
-
Page 2: Table Of Contents
16. COMPONENTS AND SPARES UWF-102 17. WIRING DIAGRAM FOR UWF-102 18. SAFETY INSTRUCTIONS 19. NOTES 20. UNITOR HANDBOOK FOR MARITIME WELDERS DO NOT INSTALL, OPERATE OR REPAIR THIS EQUIPMENT WITHOUT READING THIS MANUAL INCLUDING THE SAFETY INSTRUCTIONS Revision date: 10/07/2017... -
Page 3: General Description
1 GENERAL DESCRIPTION UWI-500TP Automatic adjustment to any primary voltage between 380 and 440V. Line Voltage compensation keeps output of the power source constant regardless of fluctuation in input power from 10% below lowest to above highest rated input voltage. Safe in use. -
Page 4: Technical Data
2 TECHNICAL DATA Type of welding machine Three-phase static transformer rectifier with frequency converter and DC output. Standards EN 60974-10 European Norm for electromagnetic compatibility. EN 60974-1 European Norm for arc welding appliance: Current sources for welding. Processes MMA (Manual Metal Arc welding (stick electrode welding) TIG Tungsten Inert Gas welding MIG/MAG Metal Inert/Active Gas shielded welding (wire welding) Revision date: 10/07/2017... - Page 5 Safety Marking Suitable for use in areas with increased electric shock hazard X: Duty cycle Duty Cycle is the percentage of 10 minutes that the unit can weld at rated load without overheating. It refers to a 40°C environmental temperature. If the unit overheats a thermal switch stops the output, the warning light for over-temperature is lit and the cooling fan continues to run.
- Page 6 Primary connection = Effective input voltage which must be between 380 and 440V = Maximum value of input current at the corresponding duty cycle. 1max = Effective value of input current at the corresponding duty cycle. 1eff Maximum input power is 26,5 kVA. Power factor 0,85. Duty Cycle 50% 32A slow fuses will be the right fuse size for this machine.
-
Page 7: Installation
3 INSTALLATION Only qualified personnel should perform this installation. Only personnel that have read and understood this Manual should install and operate this equipment. Machine must only be plugged into a receptacle which is grounded in accordance with valid regulations. Note The power switch should be in the OFF position when installing work cable and electrode cable and when connecting power cord to input power. -
Page 8: Front Panel Controls
4 FRONT PANEL CONTROLS Select process (1) Normal stick electrodes Cellulosic stick electrodes Air Carbon Arc Gouging TIG welding Press button until light for the process is on. No light for wire welding Select remote control (2) Control from wire feeder: The wire feeder must be connected to the back panel bottom section Remote control for electrode holder or TIG torch: Connect to the machine back panel top section Press button to turn light for remote control on. - Page 9 Hot start (4) Hot start increases the start current for 0,4 seconds: It makes arc striking easier and reduces the possibility for electrode sticking. With setting for normal stick electrodes the increase can be adjusted from 0-100% of set current. For cellulosic stick electrodes the increase is up to 200% Warning lights (5) Power on warning.
-
Page 10: Stick Electrode Welding
5 STICK ELECTRODE WELDING Normal coated electrodes Electrodes with cellulosic coating Select button Select top setting, MMA welding for normal stick electrodes Select setting CEL for optimal welding characteristic for cellulosic electrodes. Connect return (ground) cable with good contact directly to the work piece. Select polarity and amperage as recommended for the electrode and start the arc as follows: 1 Electrode 2 Work piece... -
Page 11: Air Carbon Arc Gouging
6 AIR CARBON ARC GOUGING Select ACA gouging on the front panel. Select button Select maximum Hot start and Arc force. Connect electrode holder to plus (+) polarity. Connect return (ground) cable to negative (-) polarity with good contact directly to the work piece. If possible bring machine to the work place with a primary cable extension instead of welding cable extensions. -
Page 12: Tig Welding
7 TIG (GTAW) WELDING Select TIG process and connect the TIG torch to the regulator with flow control. The torch should have gas valve on the handle. Connect TIG torch to the negative (-) terminal of the machine. Connect return (ground) cable with good contact directly to TIG welding the work piece. -
Page 13: Wire Welding
8 WIRE WELDING (MIG/MAG, GMAW, FCAW) The wire feeder UWF-102 Air is a wire feeder specially developed for the multi-process welding power source UWI-500TP. By connecting UWF-102 to UWI-500TP it is, in addition to wire welding, also possible to do stick electrode welding and Air Carbon Arc gouging from the wire feeder without reconnecting Connecting UWF-102 to UWI-500TP and shielding gas... - Page 14 Front panel controls Select process (1) Wire welding (MIG / MAG / FCAW) Coated electrodes, (not cellulosic) Air Carbon Arc gouging Select button Wire welding torch connection Stick electrode holder and ACA torch connection For Stick electrodes: Select + or – according to electrode spesification and connect this polarity from the welding machine to the back of the wire feeder.
- Page 15 Select wire welding process Connect proper polarity for the wire from the front of the welding machine to the back of the wire feeder, and the return cable from the work-piece to the welding machine Select trigger function (2) 2-stroke function. Press trigger to start wire feed and welding, and keep trigger pressed. Release trigger to stop wire feed and welding.
- Page 16 Warning signals 9: The welding machine has overheated and needs cooling See ch.4:5 10: “HOLD”: The displays 7 and 8 show last real measured values. The light will go out when welding starts again and real values will be shown 11: When lit this light informs that power is available at the wire feeder terminals Display 8 warning messages Remote control from wire feeder has not been selected on the welding machine, see...
- Page 17 Wire loading Pull the pressure arm (1) outwards to release the spring loaded wire feed drive rolls (2). Check that correct wire feed drive rolls for the wire is installed with correct groove size in position (see next section), if not unscrew the fixing caps (3+4) and turn rolls or replace with correct rolls.
-
Page 18: Routine Maintenance
9 ROUTINE MAINTENANCE Checkpoint Action Interval Primary plug Check connections 3 months or more and socket and stretch relief often if needed Check for damage and replace if 3 months or more Primary cable necessary often if needed Primary cable Check for damage 3 months or more stretch relief... -
Page 19: Troubleshooting
10 TROUBLESHOOTING SYMPTOM POSSIBLE REASON SOLUTION Mains fuses blown Machine is not plugged in Broken primary cable No output, no Primary power does not warning light, fan reach the machine not running Cable connection to machine is loose Machine not switched on On/off switch damaged One phase is missing in Check the supply power from the vessel for blown... - Page 20 RESETTING SOFTWARE Unidentified software problems may prevent the welding power source from functioning correctly. If normal troubleshooting does not help the below software reset procedure should be used. The reset procedure involves complete restoration of the default values, parameters and memory settings to original values.
-
Page 21: Ordering Information Machines
11 ORDERING INFORMATION MACHINES UWI-500TP Multi process welding Undercarriage for UWI-500TP inverter Order no191-500500 Order no 196-500103 Spare part kit for UWI-500TP includes power board, necessary additional components and complete instructions for replacement Order no191-500505 UWF-102 Wire Feeder for UWI-500TP Order no 191-500102 Revision date: 10/07/2017 Page 21 of 40... -
Page 22: Ordering Information Basic Accessories
12 ORDERING INFORMATION BASIC ACCESSORIES Basic accessories Basic accessories kit for UWI-500TP 196 670406 Consisting of: (Order numbers to be used when re-ordering) Flip-Vision shield with flip-up frame, head band and filter shade 11 glass 196 709485 Long lined welding gloves, 1pair 196 632786 (re-ordering number is for 6 pairs) Electrode holder with 3m cable and connector... -
Page 23: Tig And W1Re Torches With Spares
13 TIG AND WIRE TORCHES WITH SPARES TIG torch T-200 complete with long back-cap, 2,4mm electrode, collet and nozzle Order number 197-200000 Pos. Order number Unit Product description 197-551192 Short back-cap 197-551200 Long back-cap 197-613767 Heat shield 197-551168 Collet 1.6mm 197-551150 Collet 2.4mm 197-551184... - Page 24 T-400 torch for gas shielded wire welding, complete with contact tip 1,0-1,2mm and Teflon liner. Order number 193-607451 6 inside Pos. Order number Unit Product description 193-551192 Gas nozzle for torch 193-613766 Nozzle insulator 5 pcs 193-594622 Contact tips 0,6-0.8 mm 10 pcs 193-594630 Contact tips 1,0-1,2 mm 10 pcs 193-607455...
- Page 25 T-350 torch for gasless welding with self-shielded wire, complete with 1,6mm contact tip and 1,4-1,6mm steel liner. Order number 193-750179 Pos. Order number Unit Product description n.a. End of swan neck on torch 193-594614 Torch liner, Steel for 0.6-1.0 mm wire (blue) 3.0 m long 193-607457 Torch liner, Steel for 1.0-1,4 mm wire (red) 3.0 m long 193-777846...
-
Page 26: Wiring Diagram Uwi-500Tp
14 WIRING DIAGRAM UWI-500TP Revision date: 10/07/2017 Page 26 of 40... - Page 27 Revision date: 10/07/2017 Page 27 of 40...
-
Page 28: Components And Spares Uwi-500Tp
15 COMPONENTS AND SPARES UWI-500TP Revision date: 10/07/2017 Page 28 of 40... - Page 29 COVER FOR HANDLE SUPPORT PLATE 011.0013.0013 HANDLE 011.0001.0513 LATERAL LEFT COVER 022.0002.0156 REMOTE DEVICE CONNECTION WIRING 011.0013.0018 REAR SOCKET PLATE For ordering spares please state: Model: UWI 500 TP Serial no: ..………..….…. Pos no: …………………. …………………. Code: Revision date: 10/07/2017 Page 29 of 40...
-
Page 30: Components And Spares Uwf-102
16 COMPONENTS AND SPARES UWF-102 Revision date: 10/07/2017 Page 30 of 40... - Page 31 N° CODE DESCRIPTION 011.0006.0003 SLIDE CLOSURE 050.5324.2400 LOGIC FRONT PANEL WF102 AIR 014.0002.0005 KNOB WITH POINTER 014.0002.0009 KNOB WITH POINTER 021.0001.2014 STING 021.0001.2000 COUPLING EURO 021.0001.2004 PLASTIC HOUSING 021.0001.2027 CAPILLARY TUBE 021.0001.0279 FIXED SOCKET 500A 95mmq 002.0000.0287 PRESSURE CAP 046.0004.0013 PLASTIC SUPPORT 011.0014.0005 LOWER COVER...
-
Page 32: Wiring Diagram For Uwf-102
17 WIRING DIAGRAM UWF-102 Revision date: 10/07/2017 Page 32 of 40... -
Page 33: Safety Instructions
15 SAFETY INSTRUCTIONS Arc Welding Hazards The safety information given below is only a summary of the more complete safety information found in the Safety Standards listed in Section 1-5. Read and follow all Safety Standards. Only qualified persons should install, operate, maintain, and repair this unit. During operation, keep everybody, especially children, away. - Page 34 FUMES AND GASES can be hazardous. Welding produces fumes and gases. Breathing these fumes and gases can be hazardous to your health. Keep your head out of the fumes. Do not breathe the fumes. If inside, ventilate the area and/or use exhaust at the arc to remove welding fumes and gases. If ventilation is poor, use an approved air-supplied respirator.
- Page 35 CYLINDERS can explode if damaged. Shielding gas cylinders contain gas under high pressure. If damaged, a cylinder can explode. Since gas cylinders are normally part of the welding process, be sure to treat them carefully. Protect compressed gas cylinders from excessive heat, mechanical shocks, slag, open flames, sparks, and arcs.
- Page 36 EMF Information Considerations about welding and the effects of low frequency electric and magnetic fields. Welding current, as it flows through welding cables, will cause electromagnetic fields. There has been and still is some concern about such fields. However, after examining more than 500 studies spanning 17 years of research, a special blue ribbon committee of the National Research Council concluded that: “The body of evidence, in the committee’s judgment, has not demonstrated that exposure to power-frequency electric and magnetic fields is a human-health hazard.”...
- Page 37 Revision date: 10/07/2017 Page 37 of 40...
-
Page 38: Notes
19 NOTES ………………………………………………………………………………………………… ………………………………………………………………………………………………… ………………………………………………………………………………………………… ………………………………………………………………………………………………… ………………………………………………………………………………………………… ………………………………………………………………………………………………… ………………………………………………………………………………………………… ………………………………………………………………………………………………… ………………………………………………………………………………………………… ………………………………………………………………………………………………… ………………………………………………………………………………………………… ………………………………………………………………………………………………… ………………………………………………………………………………………………… ………………………………………………………………………………………………… ………………………………………………………………………………………………… ………………………………………………………………………………………………… ………………………………………………………………………………………………… ………………………………………………………………………………………………… ………………………………………………………………………………………………… FOR FULL INFORMATION ON THE UNITOR WELDING OFFER Revision date: 10/07/2017 Page 38 of 40... -
Page 39: Unitor Handbook For Maritime Welders
USE THE UNITOR WELDING HANDBOOK FOR MARITIME WELDERS You can download it here http://www.wilhelmsen.com/services/maritime/companies/buss/DocLit/PorductLiterature/Pages/Maintenanceandrepair.aspx …or contact Wilhelmsen Ships Service for a paper copy Revision date: 10/07/2017 Page 39 of 40... - Page 40 Instruction manual Fraser/surrey Gaspe Gros Caouna Halifax Hamilton Harbour Grace Holyrood Kitimat Long Pond Marytown Montreal Nanaimo New Westminster Bc Pictou/halifax Pointe Aux Pic.quebec Port Alfred Port Cartier Port Colborne Port Hawkesbury Port Mellon Port Moody & spare part list Port Of Quebec Port Weller Powell River Prince Rupert Roberts Bank Saint John Sarnia, Ontario Sept Iles Seven Islands Sorel Souris/ halifax Squamish St.
Need help?
Do you have a question about the UWI 500 TP and is the answer not in the manual?
Questions and answers