Table of Contents
Advertisement
Advertisement
Table of Contents

Subscribe to Our Youtube Channel
Related Manuals for Atomos NINJA V+


Summary of Contents for Atomos NINJA V+
- Page 1 U S E R MA N U A L...
-
Page 2: Ninja V+ User Manual
NINJA V+ User Manual © ATOMOS 2022. TM ®All trademarks and registered trademarks are the property of their respective owners. Specifications are subject to change without notice. All information assumed correct at time of publishing. This user manual assumes that you are using AtomOS firmware version 10.82 or later. -
Page 3: Table Of Contents
Mounting disks in the Master Caddy II Mounting Disks in Master Caddy III AtomX Expansion Modules ATOMOS CONNECT AtomOS 10 Operating System The Main Screen - Home Screen The Main Screen - Information Bar The Main Screen - Monitoring Features... - Page 4 Sony Metadata Crop Pulldown H.265 (HEVC) Wi-Fi Menu Ethernet Menu Connect Menu Connect Menu - Atomos Cloud Studio Connect Menu - Capture to Cloud Connect Menu - Atomos Stream Timelapse Menu Timecode Menu Timecode Menu - Wireless Timecode & Sync...
- Page 5 Activation Menu AtomX Menu Info Menu The AtomRemote App Connecting to AtomRemote Using the AtomRemote app AtomRemote - Input, Monitor and Output AtomRemote - Record menu AtomRemote - Monitor Assist Settings Using the AtomX CAST Attaching AtomX CAST to your NINJA V+ Powering the AtomX CAST Connecting the AtomX CAST to your Computer CAST - Main Screen...
- Page 6 Waveform tab Focus Peaking tab Zebra tab LUTs tab Monitor tab Display tab Frame Guide tab Onion Skin tab Playback mode Playlists Video Format menu Playback - Output Menu Playback - Audio menu Edit Mode Markers and Tagging Icons (SmartLog) Using Edit tools during recording, playback and monitoring Using Extended Tags Exporting Tags...
-
Page 7: Introduction
Introduction Thank you for choosing the Atomos NINJA V+ 5 inch HDR Monitor-Recorder. With NINJA V+ you can record up to 8Kp30 and 4Kp120 in Apple ProRes RAW, and 4Kp60 and HDp120 video, and integrate these new formats seamlessly into the timeline of your exist- ing ProRes RAW or ProRes projects. -
Page 8: Safety Instructions
Safety Instructions The NINJA V+ is designed to a high standard but there are some things you should be aware of to prolong the life of the unit and for your own safety. Using the NINJA V+ safely Although the NINJA V+ is very lightweight compared to all the devices it replaces, it is still a solid object that could cause injury if misused. - Page 9 HDMI cables Please remember that almost all HDMI cables do not use locking connectors and will simply pull out if they are jerked or tripped over. Please ensure your cables make a secure connection and avoid flexing them excessively to maintain reliability.
-
Page 10: Software License Agreement
Software. By installing, copying or otherwise using the Software, you agree to be bound to the terms of this EULA. If you do not agree to the terms of this EULA, ATOMOS is unwilling to license the Software to you. - Page 11 ATOMOS. ATOMOS reserves the right to terminate this license without prejudice to any addi- tional recourse ATOMOS may have against you if you violate any of its terms and con- ditions. Notice Copyright © 2022 ATOMOS Global Pty Ltd (‘referred to as ATOMOS’). All rights reserved.
-
Page 12: Registering Your Product
Registering your product Register your NINJA V+ at my.atomos.com within twelve months of purchase to upgrade to a 3 year warranty. Registering your product ensures you receive communication on all future updates. -
Page 13: International Hardware Limited Warranty
Paying the cost of having the goods repaired; The customer must notify ATOMOS of any defect in the goods in writing prior to the expiry of the warranty periods set out above. The customer will be solely responsible for return- ing the goods to ATOMOS or its authorized distributor. -
Page 14: Warranty Exclusions
ATOMOS does not warrant that the goods will operate in a manner that is error free, or uninterrupted. The goods are not intended to be the primary or only data storage device for data –... -
Page 15: User Manual Conventions
User Manual Conventions To keep things simple but clear, we’ve only adopted two conventions in this manual A helpful tip, suggestion or something to note because it’s not obvious at first. An important note or warning... -
Page 16: What's Included
AtomX SSDmini, a compatible HDMI cable (Camera out/NINJA V+ in) and compatible batteries. Optional AtomX accessories including power and accessory kits are also avail- able. Visit the ATOMOS website for the latest accessory options. What's in the box: NINJA V+... -
Page 17: Ninja V+ Connections
The calibration 2.5mm jack on the right hand side (looking from the front), allows for the connection of the Calibrite ColorChecker Display Pro / Display Plus calibration device. The calibration unit utilizes the optional USB to serial adapter cable. The latest version of the ATOMOS Calibration software is available at www.atomos.com/support... - Page 18 For optimal calibration it is recommended that your NINJA V+ is powered for 30 minutes prior to calibration. For remote operations via this port, ATOMOS supports both LANC in Sony and Canon format. The NINJA V+ uses LANC Client so a LANC controller must first be attached to a camera and the output taken out via a Y cable to the NINJA V+.
- Page 19 Video Scale Convert Video out also has the option for a downscale to be applied allowing your 4K input to be converted to a 1080 HD output for use with existing HD equipment. DCI signals with a 17:9 aspect ratio have the option to be cropped to 16:9 to support a wider range of out- put displays.
-
Page 20: Best Practice
Best Practice Understanding the basic controls and 'housekeeping' functions will save you time in the future. Before you start enjoying your NINJA V+ it will help to set the date and time, the 'device name' and file naming conventions. Date & Time It is vital you set the correct date and time on your NINJA V+ to ensure that the metadata for your files is correct. - Page 21 Use the -+ icons for each setting to set the time and date used on the NINJA V+. For more information refer to the Date page in the Using the NINJA V+ section. Format Media Make sure your drive is correctly inserted and all data from previous shoots has been securely backed-up.
- Page 22 The NINJA V+ uses the exFAT file system for broadest compatibility. Secure Erase Format For drives that carry the ATOMOS Logo such as the G-Technology 4K SSD, Angelbird 4KRAW, AtomX SSDmini by Angelbird and Sony, an option for Secure Erase is also presen-...
- Page 23 Unit Name You can also modify the unit name for your NINJA V+. Creating a unique name for each NINJA V+ you are using can be very useful when using multiple devices or with multicam shoots. Practicing good file management during production will save you valuable time in post production.
- Page 24 How to change the Unit Name: Using the < > icons at Unit Name, select the letter to update. The character you are updating will display in the Letter indicator. Tap the Letter - + icons to change the character. When the correct letter is displayed, use the select control to move to the next character.
- Page 25 File Naming The File menu also allows you to adjust the Scene and Shot number that will form part of the recorded clip filename: NINJVP_S001_S001_T001 How to modify the File Name: Use the - + icons at Scene and Shot, to increase or decrease the numerical values. Once you have finished making changes, tap on Apply.
- Page 26 When changing the drive please ensure that you take note of the last scene and take number so you can append this, as formatting a drive will reset the scene and take counter to 001,001,001. Screen Lock Lock the Display Screen You can lock the display of the NINJA V+ by tapping the power button.
- Page 27 Images on screen will indicate whether tapping the power button has locked or unlocked the screen. The lock screen can be combined with the Display Off function so that when the screen is locked, the display is turned off. The Tally light on the front of the unit will still display Rec (Red) or idle (green) status.
- Page 28 AtomOS version for NINJA V+ which will be listed at the top of the page. In the image below AtomOS 10.72.1 is greater than the AtomOS version number displayed on the NINJA V+ in the image above, so a firmware update is required.
- Page 29 Insert a compatible, formatted drive into your Docking Station and connect it to your computer. Always format your drives in the NINJA V+ first. It formats the drive for optimal performance for video Unzip the downloaded zip file and copy the ATOMNJP.FW file to the root of the drive in the docking station.
- Page 30 NINJA V+ will restart and you will be able to use the device as nor- mal. This process can take up to 5 minutes. Press the Power Button to power the NINJA V+ on. The AtomOS update process will begin automatically.
- Page 31 Delete the ATOMNJP.FW file from your drive. Power itself down. Power your NINJA V+ on and check that the AtomOS version is the version expected (menu>info tab). For further information and troubleshooting on updating AtomOS, click here. IMPORTANT: Problems when installing AtomOS Very rarely, the firmware update process can go wrong.
-
Page 32: What You Also Need
What you also need These are some of the things you also need to use your NINJA V+. -
Page 33: Hdmi Cables
HDMI cables ATOMOS makes a range of professional HDMI cables which are ideal for connecting between your camera and NINJA V+. For 4Kp50/60p and RAW recording we advise the use of ATOMOS HDMI 2.0 cables. For more information and to purchase ATOMOS... -
Page 34: Media
There are quite a large number of drives available on the market, and newer models appear all the time. To avoid potential data loss and/or write/read errors, ATOMOS only recommends the use of AtomX SSDmini, approved SSD media and CFAST II media only. - Page 35 The AtomX CFast adapter from Angelbird, utilizes the AtomX SSDmini form factor and allows you to use CFast 2.0 Type I cards for recording on ATOMOS NINJA V+. When com- bined with the Angelbird AV PRO CF – CFast 2.0 memory card, you can capture RAW in high resolution and high frame rates.
- Page 36 To ensure the integrity of data writes and to avoid situations such as fragmentation, the ATOMOS operating system on the NINJA V+ does not support the deletion of files. We also do not advise removing or deleting files randomly from the disk on your computer.
-
Page 37: Master Caddy Docking Station
ATOMOS Powered Docking Station models, the ATOMOS Powered Docking Station with USB 3.1 Gen 1 & 2.0 and the ATOMOS USB-C 3.1 Powered Docking Station. Both models support a single drive caddy at a time and efficiently offload the drive contents dir- ect to your computer via integrated USB cables. - Page 38 ATOMOS USB-C 3.1 Powered Docking Station The integrated USB cable features one USB-C 3.1 connector for use with com- puters with a USB-C connection. When connecting the AtomX USB-C 3.1 Docking Station II with older computers a USB 3.0 Male to Type C Female adapter is required...
-
Page 39: Standard 1/4" Or 3/8" Mount/Arm
Standard 1/4” or 3/8” Mount/Arm Below are some examples of tripod and hot shoe mounts, available from most camera and video specialists. A secure mount will greatly enhance usability and security of HDMI, power, remote and audio connections. Your NINJA V+ has 3/8-16 connectors with 1/4-20 adapters and an ARRI style anti-rota- tional pin system on the top and bottom of the unit. -
Page 40: Mounting Options
It is compatible with the latest mounting solutions from com- panies such as Shape, SmallRig and Wooden Camera. For information and to purchase the ATOMOS AtomX 5″ NINJA V+ Cage by SmallRig, visit 5" NINJA V Cage page on the ATOMOS website. -
Page 41: Choosing Your Power Source
The NINJA V+ can be powered by the included AC-powered Battery Eliminator, or by using a compatible DC battery. If you are the owner of other ATOMOS devices, the bat- teries you have for these devices (NP-F/L Series) will be compatible with your NINJA V+. - Page 42 Choosing the right battery for your application Battery Size Cells Life* 5200mAh Up to 2 hrs 7800mAh Up to 3 hrs Battery Continuous Eliminator Source D-Tap dependent * Battery life tested during Monitor/Record 4Kp60 operation. Before any type of disposal the battery should be discharged completely. Tape the contacts with electrical tape and package so as to prevent con- tacts accidentally coming together at any time.
- Page 43 ATOMOS Fast Battery Charger (optional) The ATOMOS Fast Battery Charger has been designed to rapidly charge NP-F type bat- teries, yet be lightweight so that is easy to travel with. To purchase an ATOMOS Fast Bat- tery Charger , visit atomos.com/accessories/fast-battery-charger-power-supply...
- Page 44 NINJA V+ and AtomX CAST. DC to D-Tap Coiled Cable The DC to D-Tap Coiled Cable is an optional ATOMOS accessory. It is designed to allow you to power your device from an external battery system with a D-Tap port. Simply con- nect the D-Tap connector to your power source.
-
Page 45: Powering On And Off
The Power button is located on the top right hand side of the unit (as you look at the screen). With a power source connected, momentarily press the Power button. After a couple of seconds you will see the ATOMOS logo then the NINJA V+ Home Screen. Turning OFF power to the NINJA V+ To turn the unit off, tap the battery icon on the top right of the home screen to open the Power menu screen. - Page 46 The icon will turn red when touched to indicate activation of the button. The unit will then power off. You can also do a forced power down by pressing the physical Power button on the side of your NINJA V+ for four seconds. For more information on the Power menu see the "Power Menu"...
-
Page 47: Inserting And Removing Media
The AtomX SSDmini Handle is available as an optional accessory, and can be attached to your AtomX SSDmini. This allows it to be used with existing ATOMOS Master Caddy II devices, and also reduces handling and potential damage to the disk casing. - Page 48 AtomX SSDmini is backwards compatible with previous ATOMOS recorders. The original Master Caddy 1 is NOT compatible with NINJA V+ as the key- ways are on one side only.
-
Page 49: Mounting Disks In The Master Caddy Ii
- Master Caddy II and Master Caddy III. Master Caddy II is still supported on NINJA V+, however, if you are using an ATOMOS CONNECT with your NINJA V+, then you must mount your disks in a Master Caddy III to ensure that the disks can be inserted into the media slot when an ATOMOS CONNECT is attached to your NINJA V+. - Page 50 Master Caddy II drives are backwards compatible with previous ATOMOS recorders, however Master Caddy 1 is not forward compatible with the NINJA V+ due to the compact latch design How to Mount Disks in the Master Caddy II...
-
Page 51: Mounting Disks In Master Caddy Iii
Master Caddy III was introduced with the release of the ATOMOS CONNECT accessory, and must be used when ATOMOS CONNECT is attached to the NINJA V+. If you have used Master Caddy II before with other ATOMOS products, you will notice that Master Caddy III has a slimmer, lighter weight design to ensure that the disks can be inserted into the media slot when an ATOMOS CONNECT is attached to your NINJA V+. - Page 52 Correct alignment Incorrect alignment It is important to properly align the drive correctly with this gap in the Master Caddy III, so that the drive can connect to the SATA connectors on NINJA V+ when inserted. SSDs are very sensitive to damage from static electricity. Please observe all the usual precautions when handling them and NEVER touch the exposed SATA connector as static electricity may be harmful to your disk.
- Page 53 For information on attaching media to a Master Caddy Docking Station see "Connecting media" on page 362 Master Caddy II is still supported on NINJA V+ when an ATOMOS CONNECT is not attached to your NINJA V+. For information on using Master Caddy II,...
-
Page 54: Atomx Expansion Modules
AtomX Expansion Modules AtomX expansion modules attach to the AtomXpansion port on your NINJA V+, and provide additional connections and functionality. AtomX SDI Expansion Module The AtomX SDI Expansion Module (A) adds the quality and convenience of SDI con- nectivity to your NINJA V+, which allows you to monitor and record SDI video up to 4Kp60 from a range of professional cameras and video sources. - Page 55 You can add the SDI RAW feature to your NINJA V+ by purchasing the optional SDI RAW upgrade at my.atomos.com After activating the feature on your NINJA V+, you can use the AtomX SDI Expansion module to record RAW over SDI from compatible cameras. Refer to Activation section for more information on the activation process.
- Page 56 This allows for perfect synchronization with a range of other products includ- ing iOS devices, professional audio recorders and cameras. The ATOMOS UltraSync ONE and UltraSync Blue can also be used to bring multiple cameras and devices into perfect sync.
- Page 57 Create broadcast quality multicamera programs and use features like logos, graphics and picture in picture to enhance your online meetings, presentations, conferences, remote learning/training, virtual conferences or demon- strations. To purchase an AtomX CAST visit atomos.com/accessories/atomxcast...
- Page 58 To use AtomX CAST with your NINJA V+, firmware version 10.71 or later needs to be installed.
-
Page 59: Atomos Connect
DSLR cameras into fully connected devices that support a range of advanced cloud-based workflows. For more information on cloud- based workflows refer to the "Connect Menu - Atomos Cloud Studio" on page 145 section. and Bluetooth LE capabilities for flexible connections. - Page 60 ATOMOS CONNECT Connections a. RJ45 Ethernet Port 1Gbe Ethernet for a high-speed robust hardwired network connection. b. RF Antenna Connector Connect the supplied RF antenna for AirGlu™ wireless SYNC functionality. c. Tally Light Red Tally light on the rear of the unit will flash when recording. Tally light can be enabled/disabled in the "Monitor tab"...
- Page 61 CFast Adapter should be used in this scenario. Attaching / Removing ATOMOS CONNECT The ATOMOS CONNECT attaches to your NINJA V+ in the same way that you attach AtomX modules to your NINJA V+. To attach the ATOMOS CONNECT to your NINJA V+:...
- Page 62 Gently slide ATOMOS CONNECT into the AtomXpansion port until it clicks into place.
- Page 63 When mounting ATOMOS CONNECT, make sure that it clicks into place. Tighten the thumbscrews (h) to secure ATOMOS CONNECT in place. Take care not to over tighten the thumb screws. To remove ATOMOS CONNECT from your NINJA V+: Ensure that any inserted media is removed from your NINJA V+ before attempting to remove the ATOMOS CONNECT from your NINJA V+.
- Page 64 Press the release button on the NINJA V+ and gently slide the ATOMOS CONNECT upwards and away from the NINJA V+.
- Page 65 Attaching the Antennas to ATOMOS CONNECT There are three antennas inside the ATOMOS CONNECT box. Two of the antennas are identical in size and shape and one is smaller in length. The two longer antennas are the Wi-Fi antennas, and the smaller antenna is the RF antenna.
- Page 66 Unscrew the Antenna mount covers from the positions indicated, and store them in a safe place. When the antennas are not attached, these covers should be screwed in place to protect the antenna connectors.
- Page 67 Screw the 2 x Wi-Fi antennas into the Wi-Fi connectors on the top of ATOMOS CONNECT.
- Page 68 Screw the smaller antenna into the RF connector on the back of ATOMOS CONNECT.
- Page 69 Attaching Power to ATOMOS CONNECT The ATOMOS CONNECT can be powered by the DC Power Supply and Battery Eliminator that were supplied with your NINJA V+, an optional D-Tap to DC Barrel Coiled Cable (ATOMDTPCB2) or NP-F / L-Series type batteries. Connect your chosen power source to...
- Page 70 NINJA V+ and CONNECT. The first time you power on your NINJA V+ with ATOMOS CONNECT attached, you will be prompted to select your region of use. Tap Region to cycle through the options and then tap on Confirm. This message will also appear after performing a factory reset and after installing new AtomOS firmware.
- Page 71 To attach a Battery Eliminator to ATOMOS CONNECT Gently slide the Battery Eliminator into the battery slot (f) until it clicks into position.
- Page 72 Secure the DC power supply to the DC jack on the Battery Eliminator. Alternatively, secure the optional ATOMOS D-Tap to DC Barrel Coiled Cable (ATOMDTPCB2) to the DC jack and connect the other end to a D-Tap power source.
- Page 73 To remove a Battery Eliminator or battery from ATOMOS CONNECT Press the battery release (g) and gently slide the power source upwards to remove it.
- Page 74 Menu" on page 124 and "Ethernet Menu" on page 129 pages. For information on the Atomos Cloud Studio and the procedure for connecting to the Atomos Cloud, refer to "Con- nect Menu" on page 133 and "Connect Menu - Atomos Cloud Studio" on page 145...
-
Page 75: Atomos 10 Operating System
AtomOS 10 Operating System With the AtomOS 10 Operating System, you get the ultimate touch interface for mon- itoring and recording and an operating system that has a clean, intuitive and elegant design. It’s simple and straightforward, but at the same time it provides access to the complete range of features. -
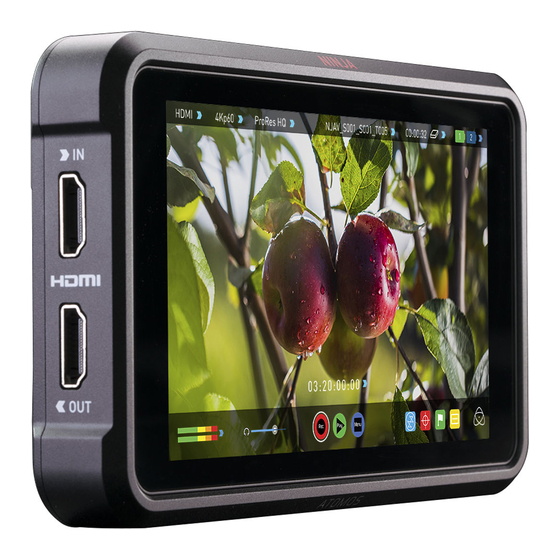
Page 76: The Main Screen - Home Screen
The Main Screen - Home Screen The ATOMOS 10 home screen is designed for unobstructed monitoring at all times. The clean and uncluttered design of ATOMOS 10 concentrates the attention on the image, not on the device’s operation. From the muted main button controls through to flexible his- togram size and positioning, all on-screen controls are non-obtrusive and incredibly intu- itive to use. - Page 77 LUMA WAVEFORM: Luma Waveform is a constant on your home screen, to allow for greater control over monitoring without compromising the subject. AUDIO: Audio Meters. Touching the Audio meter will open the Audio Menu. TIME REMAINING: Time Remaining on Disk (at current record settings). Changing Recording Format will change Time Remaining.
-
Page 78: The Main Screen - Information Bar
The Main Screen - Information Bar At the top of the NINJA V+ screen is the area referred to as the Information Bar. It displays the settings of your input device/camera, current settings of your NINJA V+, media, audio, disk capacity and more. Touching any of these areas will take you to the rel- evant menu and allow you to make changes to your setup. - Page 79 Monitor Mode / Features In the image the NINJA V+ has an input and an output, and is ready to record the signal or play the last recorded file from disk. VIDEO INPUT: (Rec & Mon mode) Resolution and frame rate from input device VIDEO INPUT: (Play &...
- Page 80 MEDIA INFO: This shows the remaining recording time based on the chosen codec and remaining capacity of the drive. BATTERY: Touch to access Power Menu. Battery Indicator shows power level and flashes red when power is running low. NETWORK STATUS When you are in Connect mode, the following network status icons will appear in the Information Bar.
-
Page 81: The Main Screen - Monitoring Features
The Main Screen - Monitoring Features At the bottom of the Monitoring screen are the Monitoring Features, accessible by tog- gling the MON icon. Monitoring Features do not affect your recorded file and can be turned on and off, or adjusted whilst recording (unless you choose to burn a LUT into your footage). - Page 82 Any Monitoring functions you have enabled will remain active until deac- tivated. EDIT: Press to show Editing Features and Information Bar. Press again to return to home. Any Monitoring functions you have activated will remain active until they are turned off. SETTINGS (yellow): Touch to access Monitoring Feature Settings.
-
Page 83: Home Screen And Menu Functions
Home screen and menu functions REC (Record) This is the icon you touch to begin a recording. Touch it again to stop a recording. While recording the Rec icon changes to a Stop icon and a red frame is present around the screen. - Page 84 Playback Home screen Touching the folder icon will reveal the available playlist. NINJA V+ uses a unit name, scene, shot and take convention to name the clips. Select the clip you want to play by touching the file name and this will start to playback. To exit the playlist simply touch close, or any other button.
- Page 85 Close Screen Tap to close the screen. Folder level up Tap to navigate one level up in the folder structure. Playlist Options Tap to enable Playlist options. For more information on using playlists, refer to "Playlists" on page 342...
- Page 86 No disk / disk not secure The Play button will be dimmed and disabled if there is no disk, where there is a poor connection or the disk is not correctly formatted and during record- ing. See the "Best Practice" on page 19 section for more information. MON (Monitor) Pressing MON reveals Monitor Assist icons as shown in "The Main Screen - Monitoring Features"...
-
Page 88: The Ninja V+ Menu System
The NINJA V+ Menu system Tap on the Input, Output, Codec, Media or Battery indications in the Information bar at the top of the home screen to open the menu related to that item. Menu pages contain information as well as settings that can be adjusted. Across the top of the menu page that opens are menu tabs that link to the other menu pages. -
Page 89: Source Menu
V+ operation when you do not have AtomX CAST connected. For SDI sources connected to an AtomX SDI Module or ATOMOS CONNECT that is attached to your NINJA V+. To be available for selection, an an AtomX SDI Module or... - Page 90 AtomX CAST Select to use the features of the AtomX CAST. To be available for selection, the AtomX CAST module needs to be connected to the NINJA V+ before powering it on. When AtomX CAST is connected to your NINJA V+, the AtomX SDI option will be greyed out since you cannot use the SDI module when the AtomX CAST is attached.
-
Page 91: Input Source
When you have an AtomX SDI module or ATOMOS CONNECT attached to your NINJA V+, you will be able to tap on Input to switch between HDMI and SDI inputs. For more inform- ation refer to "Input via AtomX SDI Expansion Module" on page 92 and "Input via Atomos CONNECT" on page 94 You can only switch from HDMI input to SDI input when the AtomX SDI Expansion Module or ATOMOS CONNECT is connected to your NINJA V+. - Page 92 HDMI Standard When connected to an HDMI source, tap on HDMI Standard to toggle between the fol- lowing: HDMI 1.4, HDMI 2.0 and Compatibility Mode. Compatibility Mode (HDMI) This mode improves the signal locking process when working with HDMI signals from specific cameras.
-
Page 93: Input Via Atomx Sdi Expansion Module
You can only switch from HDMI input to SDI input when the AtomX SDI Expansion Module or ATOMOS CONNECT is connected to your NINJA V+. To use the AtomX SDI Module with your NINJA V+, or the SDI RAW feature,... - Page 94 Where SDI has been selected as your input, a Compatibility Mode toggle switch will be vis- ible under Source. This mode improves the signal locking process over SDI, when working with specific cameras that use a slightly different version of the 12G standard. For more information refer to atomos.com/support...
-
Page 95: Input Via Atomos Connect
Input via Atomos CONNECT With the ATOMOS CONNECT attached, you will be able to tap on Input in the Input Menu to switch to SDI as your input. The Source Menu will open, where you can select SDI. A note will advise that changing input source will take a few seconds. Tap Ok and wait for your device to switch to SDI source mode. - Page 96 12G standard. For more information refer to atomos.com/support...
-
Page 97: Trigger
Trigger Source (Trigger Source) The NINJA V+ can be remotely triggered to record from your camera. For HDMI inputs, tap Source to cycle through the following trigger sources: HDMI: If HDMI timecode is selected, you have the choice to start and stop recording remotely from the source camera timecode. -
Page 98: Device
Device Manufacturer: Displays the camera or device manufacturer. Name: HDMI Devices will display an EDID Device name if the information is available from the HDMI device connected. Not all cameras carry an EDID device name. For cameras such as the Panasonic LUMIX GH5 this will display as ‘Unknown’. -
Page 99: Remote
Tap to cycle through the options: Camera Controls: Allows you to control supported cameras via the screen of your NINJA V+. Refer to the section below for ATOMOS Camera Menu Control for ZCAM Series cameras. Calibration: Every brand of monitor in the field and in the editing suite naturally drifts in color over time. - Page 100 Use an HDMI cable that supports 4Kp60 to connect the output of the Z CAM to the HDMI input of your NINJA V+. Connect the 3.5mm end of an ATOMOS USB-C to Serial LANC cable to the Remote/Calibration Port on your NINJA V+, and the USB-C end of the cable to the USB Type-C port on the Z CAM.
- Page 101 How to control a Z CAM camera with camera control mode on NINJA V+: Once you have entered the camera control mode, you can manually adjust the settings of your ZCAM from the display of your NINJA V+. Tap one of the settings across the top of the screen like aperture, shutter speed, ISO or WB to bring up the adjustment arrows below the selected setting.
- Page 102 Access the Z CAM Menu from the display of NINJA V+ Tapping on the Menu icon on the right side of the screen will bring up some icons that replicate the physical buttons on the top of the ZCAM. The operation of these buttons are the same as the physical buttons.
-
Page 104: Camera Output
Camera Output Choose to use Log/HDR, camera type, Gamma, Gamut or enable HDMI HDR auto if required. Your NINJA V+ will recognise most cameras when correctly attached via a com- patible HDMI cable. For the best image processing results it is essential to match the NINJA V+ settings to the camera/input settings. - Page 105 Legalize The legalize function allows you to convert a full range video signal into a legal range sig- nal to suit legal range NLE editing workflows. This setting is designed for use with inputs in SDR or REC.709 that are set to or are fixed in FULL range, but recording or monitoring is needed in ‘legal range’.
- Page 106 HDR Auto HDR is detected when there is a compatible input signal. It is important that this is OFF if the camera is not outputting HLG or PQ. It should not be used for regular Log. About Log/HDR A better understanding of Log and HDR will enhance your workflow and ultimately allow you to capture maximum amount of detail during recording, and save you time in post production.
-
Page 107: Cross Conversion
ATOMOS CONNECT. Where an SDI video signal is connected to your AtomX SDI Expansion module or ATOMOS CONNECT, you can output an HDMI signal over the HDMI Out connector on your NINJA V+. Whilst converting the signals listed above, you can use the Output Options in the Output menu to downscale and crop the signals. - Page 108 Cross conversion of SDI RAW video inputs is possible, once your NINJA V+ has been activated for RAW at my.atomos.com. For more information refer to the "SDI RAW" on page 118 section.
-
Page 109: Output Menu
Output Menu This menu displays the active video format being output over HDMI, or SDI when the AtomX SDI module is attached. A 4K to HD down conversion can be applied to the output, which allows you to send a 4K input signal to a HD device. When working in HDR a signal will be output with the HDR flag to activate the correct settings on a compatible HDR dis- play. - Page 110 OUTPUT OPTIONS 4K to 2K Output Allows you to scale 4K or UHD inputs for output. This will scale 4K to 2K and UHD will be scaled to HD 1080p. DCI Crop When enabled, this setting trims the 17:9 DCI input to 16:9 converting the signal to UHD. When 4K to 2K Output is On, the output will down scale to HD.
- Page 111 Gamut Allows you to select the Gamut of the signal that is output. Tap to cycle through Rec.709, BT.2020 and DCI-P3. LUT Out Allows you to loop out LUTs that are applied to your image, so that they are also applied to the Output signal.
-
Page 112: Output Via Atomx Sdi Expansion Module
Output via AtomX SDI Expansion Module SDI Output In the VIDEO OUT section of the Output menu page, the SDI module will automatically detect the resolution and frame rate of the SDI input when connected. The NINJA V+ detects the active input Channel Source and configures the other connector as an Output. SDI 3G Type Allows you to specify the ‘SDI 3G Type’... - Page 113 Some video devices use a slightly different version of the 12G standard, which can cause issues with their ability to detect a video signal that is output from an ATOMOS device. Enabling SDI Compatibility Mode will cause your NINJA V+ to send out a video signal in...
-
Page 114: Record Menu
Record Menu Space Remaining Indicates the expected recording time remaining on the inserted media at the current set- tings. Changing your recording settings may extend or decrease your available recording times. Pre-Roll (On/Off) Whilst enabled, the input is constantly being recorded, with approximately the last 8 seconds in HD and 2-3 seconds in 4K being cached into memory. - Page 115 After selecting a codec, you will be prompted to tap Confirm to switch to that codec. If you select an optional codec like Avid DNx, ProRes RAW or H.265, you will be prompted to activate the codec at my.atomos.com as these codecs must be activated before use.
- Page 116 422 & LT). Avid DNx Avid DNx requires free activation via my.atomos.com and includes DNxHD with four levels of compression (220x, 220, 145, 36) and DNxHR for 4K/UHD inputs with four levels of compression (HQX, HQ, SQ and LB). DNxHD 220x/DNxHR HQX are 10-bit, whilst all others variants are 8-bit and DNxHD36 is a proxy codec.
- Page 117 PULLDOWN Pulldown Format Tap to cycle through pulldown formats. For more information refer to "Pulldown" on page 120...
-
Page 118: Raw Over Hdmi
RAW over HDMI When connected to a supported camera via HDMI, you will be able to record RAW data over HDMI. When RAW over HDMI is enabled on a connected camera, your NINJA V+ will auto- matically detect the RAW signal and prompt you to select ProRes RAW as the recording codec. -
Page 119: Sdi Raw
After activating the feature on your NINJA V+, you can use the AtomX SDI Expansion module or ATOMOS CONNECT to record RAW over SDI from compatible cameras. Refer to the "Activation Menu" on page 225 section for more information on the activation pro- cess. -
Page 120: Sony Metadata Crop
Sony Metadata Crop To help with your video editing workflow, you can crop the RAW video captured from cer- tain cameras like the Sony Alpha A7sIII, Sony Alpha 1 and Sony FX3 when recording ProRes RAW. So for example, when recording 4.2K ProRes RAW video on the A7sIII the resolution is 4264 x 2408. -
Page 121: Pulldown
Pulldown Pulldown Format The record menu allows you to apply pulldown removal if recording from a source that applies pulldown to the output signal. Tap Pulldown Format to cycle between the options. For 3:2 Pulldown removal, movement in the frame may be required to accur- ately lock signal, simply wave your hand in front of the camera to achieve lock. - Page 122 If there is no input detected, then toggle the input by pressing the screen until you see the input you wish to record. ATOMOS is adding auto-detection support for more cameras, please check for firmware updates regularly at www.atomos.com 1080p23.98 or 1080p24...
- Page 123 If it is not automatically detected after 1 second, wave your hand from side to side in front of the lens, or wave the camera from side to side for a few seconds. The NINJA V+ will detect the pulldown cadence in the movement, and you will see a green tick along with the video displayed on the screen.
-
Page 124: Hevc)
H.265 as a recording codec on the "Record Menu" on page 113 page. Refer to the "Activation Menu" on page 225 section for more information on the activation process and using my.atomos.com. -
Page 125: Wi-Fi Menu
Wi-Fi Menu When the Atomos CONNECT accessory is attached to your NINJA V+ and the device is in Connect Mode, you can access settings on the Wi-Fi menu tab. This menu provides set- tings for connecting your device to a Wi-Fi network, so that you can connect to Atomos Cloud Services. - Page 126 The network name (SSID) of the available Wi-Fi networks will be displayed at Avail- able Networks, along with the signal strength for each network and a padlock icon where a password is required to join the network. Tap and drag the list to scroll through the listed networks.
- Page 127 A keyboard will appear so that you can enter the password for the selected network. Enter the password for the network and tap on Ok. Tap on the Eye icon in the pass- word field to toggle the visibility of the password on and off. You will now be connected to the chosen Wi-Fi network, and a green tick will appear next to the network name.
- Page 128 Now that you are connected to a network, the Connect Menu page will be updated with a green circle and the word 'Connected' at Network. Refer to the "Connect Menu" on page 133 section for information on connecting to the Atomos Cloud.
- Page 129 It may take up to 10 seconds for Wi-Fi connections to be re-established when switching between record and playback mode. When toggling Wi-Fi on and off, the On/Off toggle may not be immediately responsive. A dialogue message may suggest a system reboot to fix the issue.
-
Page 130: Ethernet Menu
Ethernet Menu When the Atomos CONNECT is attached to your NINJA V+ and the device is in Connect Mode, the Ethernet menu tab will appear in the menu system. This menu provides set- tings for connecting your device to a network via Ethernet, so that you can connect to Atomos Cloud Services. - Page 131 To use DHCP, your network needs to have DHCP enabled, so that it can automatically assign an IP address. If you prefer to manually configure the network, select Static at IP Configure. Tap in one of the empty fields and a keyboard will appear so that you can enter the IP address, Subnet Mask and Router.
- Page 132 The Connect Menu page will be updated with a green circle and the word 'Connected' at Network. Refer to the "Connect Menu" on page 133 section for information on con- necting to the Atomos Cloud.
- Page 133 It may take up to 10 seconds for Ethernet connections to be re-established when switching between record and playback mode.
-
Page 134: Connect Menu
Connect Menu The Connect Menu allows you to pair your NINJA V+ with Atomos Cloud Studio. It also dis- plays the details of services you have connected to. Networking and cloud features are only available when an Atomos CONNECT is attached to your NINJA V+, and the device is in Connect Mode. - Page 135 Once you are in Connect mode, the status of the network connection and the connection to Atomos Cloud are displayed. The Wi-Fi and Network Menu Page tabs will appear in the menu system and the Wi-Fi and Ethernet icons will appear in the information bar as well.
- Page 136 Atomos Cloud Studio on or off. Connecting to the Atomos Cloud Before connecting to the Atomos Cloud, your device must first be connected to a network. Refer to the "Wi-Fi Menu" on page 124 and "Ethernet Menu" on page 129 pages for fur- ther information on how to connect to a network.
- Page 137 Scan the QR code to connect to Atomos Cloud Studio on your mobile device, or nav- igate to atomos.cloud on a desktop browser . Enter your details and tap/click Next to sign up for an Atomos Cloud Studio Account. Tap/click on Sign In if you already have...
- Page 138 Follow the guidelines to create a suitable password.
- Page 139 Check your email inbox for an email from Atomos with a six digit verification code. It will be sent to the email address used to create your Atomos Cloud Studio Account. Make sure you check your Junk-mail folders as well. Enter the verification code on...
- Page 140 Device in the center of the screen. A window will appear with spaces to enter the three word code that was shown on your Atomos device. Enter the three words in the spaces provided and tap/click on Next. Give your device a nickname to help identify it.
- Page 141 The Connect Menu page of your NINJA V+ will also update to display Connected at Atomos Cloud with a green circle to indicate the status visually. The name used to cre- ate an Atomos Cloud Account will be displayed at Account, and the current device...
- Page 142 Stream mode. Destination lists the name of the project selected as a destination. Next you will need to configure the services for this device at atomos.cloud. Tap on the + symbol next to Add Destination in the device box to add a destination.
- Page 143 Adjusting settings for paired devices Tapping/clicking on the three dots in the upper right corner of the device image box dis- plays options to change the nickname or unpair the device.
- Page 144 Unpairing your device from the Atomos Cloud If you decide that you would like to unpair a device from your Atomos Cloud Account, select Unpair Device from the drop-down menu. A dialog box will ask you to confirm your decision.
-
Page 146: Connect Menu - Atomos Cloud Studio
Devices that connect Frame.io to the production set, by uploading video and audio from your camera on set to Frame.io between each take. When it is paired with ATOMOS CONNECT, your NINJA V+ becomes a Frame.io C2C Con- nected Device, that connects directly into the Frame.io C2C ecosystem. This allows any- one with a compatible camera or device with HDMI or SDI to use Frame.io Camera to... - Page 147 DSLR, USB cameras or even iOS devices. ATOMOS Stream is designed to make sharing live video to popular online platforms easier, by making the process of configuring the stream more straightforward and more...
-
Page 148: Connect Menu - Capture To Cloud
Cloud (C2C). Using Frame.io Camera to Cloud (C2C) When it is paired with an ATOMOS CONNECT, your NINJA V+ can become a Frame.io C2C Connected Device that connects directly into the Frame.io Camera to Cloud ecosystem. This ecosystem connects Frame.io to the production set, by uploading video and audio from your camera on set to Frame.io between each take. - Page 149 You can also enable C2C Connections on an existing project by clicking on the three dots in the top right corner and selecting Project Settings.
- Page 150 An Edit Project dialog box will open, where you can click to toggle the switch at C2C Connections to ON.
- Page 151 Cloud Studio. Setting Frame.io Camera to Cloud as a destination in Atomos Cloud Studio Follow the steps in "Connect Menu" on page 133 to pair your device to the Atomos Cloud. Once paired, click on Add Destination in the device box.
- Page 152 Select Frame.io from the options.
- Page 153 You will be prompted to log in to your Frame.io account. You will then be asked to allow your Atomos Cloud account to connect with Camera to Cloud enabled projects in your Frame.io account. Click on Allow to proceed.
- Page 154 You will then be returned to the Devices tab whilst your Atomos Cloud Studio account pairs with Frame.io. Once paired, you will be able to select a Frame.io project to be used as a media destination for your device. Your personal Frame.io projects will be displayed, along with any projects that you have been invited to work on.
- Page 155 Log into your Frame.io acount in a new browser window and navigate to the Frame.io project that you selected to be used as a media destination for your device.
- Page 156 Click on the C2C Connections tab to view the Frame.io Camera to Cloud C2C Con- nections. These are hardware devices and apps that connect directly into the Frame.io C2C ecosystem. Atomos connected devices will appear here, and will have a green dot on a device when the device is currently connected to Frame.io.
- Page 157 You may wish to use the same name that you used in Atomos Cloud Studio, so that the device has the same name on Frame.io. The other settings here allow you to pause, forget or set an expir- ation for the connection.
- Page 158 A green circle will also appear in the top left of your NINJA V+ display, to indicate that your device is currently connected to the cloud, and that the connection is idle. The text next to the icon will confirm the status of the connection and if there are any remaining files to be uploaded.
- Page 159 * This feature is coming soon To view the proxy file upload status queue, switch to playback mode and tap on the folder icon to browse recorded files. Then tap on the shortcut to the PROXY folder at the bottom of the screen to open the PROXY folder.
- Page 160 In the Proxy folder, the proxy files displayed will have an icon to the right of each file to indicate the status of the file. This icon indicates that the file has been successfully uploaded to your Frame.io project. This icon indicates that the clip is queued for upload to your Frame.io project.
- Page 161 If your device loses the connection with the network, the white circle icon is displayed with the text Device Offline. In the event that your device loses connection with the network whilst shooting, the proxy clips will continue to be generated and saved to the Proxy folder on inserted media.
- Page 162 Now that the files from your NINJA V+ have uploaded to Frame.io, they can be moved, copied, or shared like any other asset in your Frame.io project. For more information on Frame.io Camera to Cloud, refer to https://frame.io/c2c/ watch the Frame.io Training Series at https://frame.io/c2c-training/ Adjusting settings for a Frame.io destination Clicking on the three dots next to the Frame.io destination for the device, allows you to...
-
Page 163: Connect Menu - Atomos Stream
Atomos Cloud Studio account. In order to stream content from your Atomos Cloud Studio account to one of these plat- forms, first you will need what is called a Stream Key. This is a unique code generated by each platform, that provides information on where to send the video stream. - Page 164 For guidelines on setting a custom RTMP destination on the platforms we've tested and qualified as working, refer to our Custom RTMP Compatibility and Setup Guide article on our support page https://atomos.zendesk.com/hc/en-us/articles/5489116635791- Atomos-Cloud-Studio-Atomos-Stream-Custom-RTMP-Compatibility-and-Setup-Guide Live Streaming is unavailable if ProRes RAW or H.265 are selected as the record codec.
- Page 165 request the desktop version of the Facebook website from the mobile browser. Then you can follow the steps below. To create a live stream on Facebook: Go to facebook.com/live/producer In the Go Live box, click on Create Live Video. The main settings page will open.
- Page 166 In the left side of the screen under Create Live Video, click on the drop-down arrow at ‘Choose where to post’, to select where the video will be posted. Options here include posting on your timeline, posting to a page you manage and posting to a group.
- Page 167 Click on the drop-down arrow at ‘When are you going live?’, to select when you want to go live. Select Now to go live when you are finished adjusting the settings. If you select Later, you can enter the date and time that you want to go live. On the right side of the screen, you can add a title and description for the stream.
- Page 168 At Select a video source, select Streaming Software. Click on the Advanced Settings drop-down menu to view the advanced settings. Toggle the switch at ‘Persistent Stream Key’ to On, so that you can use this stream key every time you stream to Facebook Live from your NINJA V+.
- Page 169 Click the Copy button next to the Stream Key to copy it.
- Page 170 In your browser, log into atomos.cloud and click on the ‘+’ symbol at Add Destination for the NINJA V+ device you want to stream from.
- Page 171 Select Facebook Live in the popup box that appears.
- Page 172 Key field and select Paste, to paste the Facebook Live streaming key that you copied. Click on Done to save the destination settings. Facebook Live will now appear as a destination at the bottom of the device box in Atomos Cloud. Toggle the switch at Facebook Live to On.
- Page 173 Tap on the LIVE icon in the top left corner of your NINJA V+ display to start streaming from your device. You will be asked if you are ready to start live streaming. Tap on Confirm to proceed.
- Page 174 The LIVE icon will turn yellow to indicate that your device has begun to connect. The LIVE icon will turn red once the stream has been acknowledged by the server. This indicates that you are currently live streaming.
- Page 175 A preview screen will appear on the Facebook settings page with the image from your camera Click on the Go Live button, to start streaming to Facebook Live. Tap the red LIVE button on your NINJA V+ display when you want to stop live stream- ing to Facebook.
- Page 176 Streaming to YouTube Live When using your NINJA V+ with ATOMOS CONNECT to stream to YouTube Live, your CONNECT is viewed as an encoder, and must be set up in YouTube as such. How to create a YouTube live stream with ATOMOS CONNECT Navigate to youtube.com...
- Page 177 Click on the Create icon in the top right corner and select Go Live from the drop-down to open the YouTube Live Control Room. If you have not yet verified your YouTube channel, you will need to verify your chan- nel before proceeding NOTE: Before being able to live stream to YouTube, you need to enable live streaming.
- Page 178 Click the Copy button next to the Stream Key to copy it. In your browser, log into atomos.cloud and click on the ‘+’ symbol at Add Destination for the NINJA V+ device you want to stream from.
- Page 179 Select YouTube Live.
- Page 180 In the popup box that appears, add a description for the stream and click on the drop-down arrow at Server to select a server to use. Right click in the Streaming Key field and select Paste, to paste the YouTube Live streaming key that you copied. Click on Done to save the destination settings.
- Page 181 YouTube will now appear as a destination at the bottom of the device box in Atomos Cloud. Toggle the switch at YouTube Live to On. Tap on the LIVE icon on your NINJA V+ display. You will be asked if you are ready to start live streaming. Tap on Confirm to proceed.
- Page 182 The LIVE icon will turn red once the stream has been acknowledged by the server. This indicates that you are currently live streaming. A preview screen at the top of the YouTube Studio settings page will display the image from your camera. The words LIVE and the elapsed time of the stream will be displayed whilst you are live streaming to YouTube.
- Page 183 The Stream Settings tab below the preview screen allows you to adjust the stream latency and other settings for the stream. Tap the red LIVE icon on your NINJA V+ display to stop live streaming. You will be asked to confirm your decision. Tap Confirm to proceed.
- Page 184 Your device will stop streaming, and the LIVE button will turn white to indicate that you are no longer streaming. To end the live stream from within YouTube, click on End Stream in the top right hand corner of the screen. For more information and details on creating a YouTube live stream, refer to support.google.com/youtube/answer/2907883?hl=en...
- Page 185 Streaming to Twitch Create a Twitch account at twitch.tv or log into your existing Twitch account. Click on your profile picture icon in the top right corner of the screen and select Video Producer. The Video Producer interface will open.
Need help?
Do you have a question about the NINJA V+ and is the answer not in the manual?
Questions and answers