Table of Contents
Advertisement
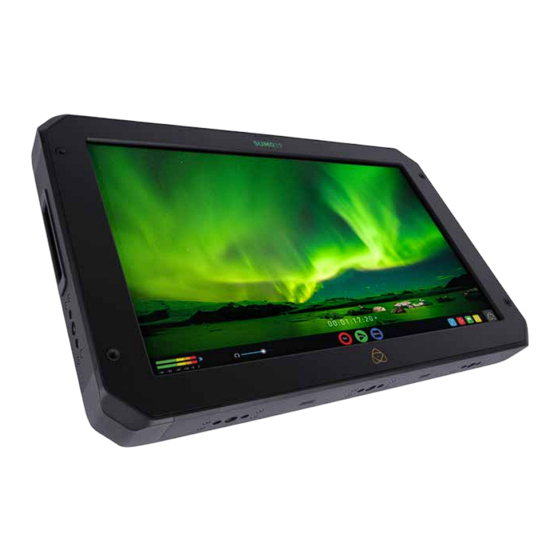
ATOMOS SUMO19
U S E R M A N U A L
E D I T I O N 1 : S E P T E M B E R 2 0 1 7
Have you registered your Sumo19 yet?
Upgrade to 3 year warranty now
Register now to receive communication on all future updates
Web: www.atomos.com Sales: sales@atomos.com Support: www.atomos.com/support
Atomos Sumo19 – User Manual Edition 1: September 2017
1
*Subject to change without notice
Advertisement
Table of Contents

Related Manuals for Atomos SUMO19


Summary of Contents for Atomos SUMO19
- Page 1 Have you registered your Sumo19 yet? Upgrade to 3 year warranty now Register now to receive communication on all future updates Web: www.atomos.com Sales: sales@atomos.com Support: www.atomos.com/support Atomos Sumo19 – User Manual Edition 1: September 2017 *Subject to change without notice...
-
Page 2: Table Of Contents
• Do not expose to strong electrical or magnetic fields. • Do not expose to or use near liquids, rain or moisture. 7. Using the Sumo19 • Do not dispose of the Sumo19 in municipal waste and do not incinerate it, Using the Sumo19 always follow local regulations for safe disposal. -
Page 3: Warranty & Conditions
Software and/or the Atomos • Improper or negligent acts or omissions; Sumo19 in whole or in part. Any failure to comply with the above or any • Repairs or attempted repairs; other terms and conditions contained herein will result in the automatic • Tampering with or modification of the goods;... -
Page 4: Introduction
Support section of the website: www.atomos.com/support Your Sumo19 comes with a standard 1 year warranty on all parts and accessories. You can upgrade to a 3 year warranty on the main Sumo19 unit alone (excluding IPS screen) by registering your Sumo19 online at www.atomos.com/registration... -
Page 5: What's Included
What’s Included The Sumo19 comes with a power supply and Master Caddy to get you Atomos does not sell storage and your package will not contain any going right out of the box - all you need to add is 2.5” SSD storage media spinning disks or SSDs. -
Page 6: What You Also Need
Which drives should you use? • Do not bang or jolt the Sumo19 while recording. There are so many drives available, and newer models appear all the • Do not use spinning drives (HDD) for recording 4K video time. -
Page 7: Backing Up And Archiving
File Recovery 4K SDI cables (not included) • Your Sumo19 is able to detect when the drive is under stress and it SDI cables are robust physically and electrically: you should rarely have will recover from any break in a recording by waiting until the drive is problems with signal transmission unless your cables are either damaged ready to continue, and then resuming from that point. -
Page 8: Mounting Disks In The Master Caddy
The Master Caddy can’t be inserted the wrong way round. Always make Master Caddy II drives are backwards compatible with previous sure that the disk connector faces the slot in the Sumo19. You have to be quite firm to push the Master Caddy II into place, but don’t push too hard, Atomos recorders, however Master Caddy 1 is not forward just in case something isn’t set up or aligned properly. -
Page 9: Connecting And Powering Up
DC IN Battery Options Continuous Power The Sumo19 can be powered by V-Lock / Anton Bauer batteries via the The Sumo19 features an Atomos technology called Continuous Power XLR terminal (optional mounting plates available). Like all batteries, you which uses battery looping technology for uninterrupted switching will need to take care of them. -
Page 10: Power On/Power Off
Momentarily press the circular button on the top right side of the Sumo19 as you look at the screen to power up the unit. After a couple of seconds you will see the Atomos logo, and then the Sumo19 Home Screen. -
Page 11: Sumo19 Connections
X-Rite i1Display Pro as well as legacy Atomos Spyder Calibrator. Both units utilize the optional USB to serial adaptor cable. The latest version of the Atomos Calibration software is available at www.atomos.com/support... - Page 12 HDMI and SDI active whilst receiving a RAW signal input Built in to the Sumo19 are are both SDI and HDMI conversion. This means that either input is able to be routed out of both the HDMI and SDI outputs 2.
-
Page 13: Master Caddy Ii, Screw Mounts And Sun Hood
Master Caddy II Slot Master Caddy II - 2 keyway system On the side of the unit is a 2.5mm HDD slot for Sumo19 Master Disk Caddy The Master Caddy II is hot-swappable, so you can do this at any time –... -
Page 14: Sun Hood
To assemble the sun hood please follow the following steps: Attach the base to the Sumo19 in the orientation shown above. This is a snug fit in order to minimize external light bleed. Push the sunhood in, align the top and bottom screw mounting holes and attach the retaining screws. -
Page 15: Using The Sumo19
The Main Controls of the unit are indicated by large round icons. To enable recording For instant playback and review To make settings changes See page 16 See page 16 See page 16 *Subject to change without notice Atomos Sumo19 – User Manual Edition 1: September 2017... -
Page 16: Home Screen / Menu Functions
7. Using the Sumo19 cont. Home screen and menu functions Sumo19 uses a unit name, scene, shot and take convention to name the Rec (Record) This is the icon you touch to begin a recording. Touch it again to stop clips. Select the clip you want to play by touching the file name and this... -
Page 17: File Naming / Date & Time / Display Options
Date & Time Allows you to adjust the date and time shown by the clock in the Sumo19. This will also change the time of day Timecode. Touching the Date & Time takes you into the Date and Time Screen. -
Page 18: Screen Lock / Timecode / Sumo19 Info
7. Using the Sumo19 cont. UNLOCKED Lock the Display Screen LOCKED You can lock the display of the Sumo19 so that no changes can be made by mistakenly touching the UNLOCKED LOCKED screen, to lock the Sumo19 simply short tap the power button. -
Page 19: Input Menu
These include audio record channel select, 3D LUT record, Codec selection A green tick on Source indicates the Sumo19 has locked signal on this and Drive naming. input, a red cross indicates a signal or lock issue with the attached device, double check your cable and camera output settings. -
Page 20: Storage Capacity Indicator / Formatting Hdd/Ssd / Unit Name
Please check the drive compatibility list prior to purchasing drives: http://www.atomos.com/drives The Sumo19 file system is exFAT. We recommend that you format each disk with the Sumo19 and not your computer to ensure the correct parameters are set with the file system. Unit Name The Batteries screen indicator is made up of three icons, two will display the batteries and the other for the DC input. -
Page 21: Audio Panel
For monitoring the audio, the Home Page Audio options Toggles the Each channel has a level meter assigned to Left & Right Channels; when orientation of the audio bars displayed on the Sumo19 home page in the there is active audio feed you will see the level indicator moving. -
Page 22: Monitoring And Recording
Setting up for recording Recording Checklist As soon as you connect a supported signal to the Sumo19 input and • Check there is a valid signal by checking the input menu ensuring all have inserted a formatted drive the following will happen;... -
Page 23: Smartcontrol / 6 Ways To Start Recording
The HDMI Camera trigger is available for supported cameras, There is a flag within the digital signal that lets the Sumo19 know the start/stop record has been pressed on the camera; in turn this will trigger the Sumo19 to start/ stop recording at the same time as the camera. *Subject to change without notice... -
Page 24: Waveform Monitoring
8. Monitoring and Recording cont. Waveform Monitoring Sumo has an improved AtomOS with improved Waveform Monitoring control panel which can be enabled with only a few button presses. 1. Waveform Monitoring Menu 6. Waveform Size (1/4, 1/3 and Full Screen view) 2. -
Page 25: Luma Overlay / Rgb Parade / Vectorscope
The Waveform Monitor will remain on screen when hiding the overlays ensuring the focus remains on calibrating your image. *Subject to change without notice Atomos Sumo19 – User Manual Edition 1: September 2017... -
Page 26: Monitor Assist
Monitor Assist AtomOS features Smart Monitor tools that help with making your shot picture perfect. Easily access Focus Peaking, Zebra, False Colour and Blue Only Exposure to check image is in focus, noise free and correctly exposed. Options for safe area/ title area markers along with aspect ratio markers and anamorphic desqueeze functions are also available. -
Page 27: Focus Assist / Zebra / False Color
Focus Assist Mono Focus Assist Outline To help you determine the exposure range with more accuracy, please use the scale on the left hand side of the display. *Subject to change without notice Atomos Sumo19 – User Manual Edition 1: September 2017... -
Page 28: Blue Only / Grid Lines / Focus Assist Settings
4K 2:1 shows 1/16 of the 4K UHD image. The Safe Area/Grid Lines will still be visible when tapping the center of the screen to hide the overlays. *Subject to change without notice Atomos Sumo19 – User Manual Edition 1: September 2017... -
Page 29: Smartlog
Recording Mode: Clip Marked As A Good Take can identify the region that has been selected. Removing tagged clips To clear all marking point clips, press on the Reset icon. Clear Tags RESET *Subject to change without notice Atomos Sumo19 – User Manual Edition 1: September 2017... -
Page 30: Exporting .Xml
Favorites. You can set this up by clicking on the Playlist option in the Playback file lister. Cycle through the options until favorites is selected. You can then play these out in either order recorded or reverse. See the playpack section for more details on Playlists on Page 41. *Subject to change without notice Atomos Sumo19 – User Manual Edition 1: September 2017... -
Page 31: Monitor Mode (Hdr / Log / Custom Looks)
8. Monitoring and Recording cont. Monitor Mode AtomOS features Monitor tools that help with making your shot picture perfect for on set and in post. The new AtomHDR mode provides a way to monitor HDR content on your Atomos recorder. - Page 32 You can tap the icon on the left of the menu to scroll Atomos HDR tech guide to familiarise your self with the key terms and through the options and adjustments are again made by moving the differences between the existing Rec.709 standard dynamic range (SDR)
- Page 33 10.2 stops. In Secondly ensure you are sending a Log signal into the Sumo19 so that terms of operation you want to adjust the slider so that the image on the you are recording the HDR Log information.
- Page 34 REC.709 or SDR. If you are working with 3D LUTs you can use color correction applications, as well as applications like Photoshop to create you own custom Looks that can then be imported to your Atomos device. They can provide a great base or primary grade that allow you to apply an instant look to your footage.
-
Page 35: Anti-Shock Technology
In the event of an interrupted recording, when you restart the Sumo19, or If a large enough shock occurs a break in the recording may occur. In... -
Page 36: Timecode
When enabled, pressing the camera Record Stop/Start Touching the Timecode display on the home screen, just above the three button will make the Sumo19 start and stop record simultaneously as the main controls (Rec, Play, Menu), will take you to the Timecode setup timecode starts and stops. -
Page 37: Ltc / Record Run / Auto Restart
This will continue for all clips that follow. This is also known as continuous Timecode. *Subject to change without notice Atomos Sumo19 – User Manual Edition 1: September 2017... -
Page 38: Hd Pulldown
Sumo19 to detect when pulldown has been applied to the Panasonic Advanced pulldown. The Sumo19 does NOT support this video, so you will have to set the correct mode of removal on the Sumo19 format, and it will not be detected. -
Page 39: Record Mode Options
The icon will be white when the option is lapse recoding mode and when an input is present the selected. record button will white have dashed lines around it like a clock face. *Subject to change without notice Atomos Sumo19 – User Manual Edition 1: September 2017... - Page 40 Touching the screen will then briefly turn it back on and to cancel the display off simply unlock the screen using the power button before reversing the above process. *Subject to change without notice Atomos Sumo19 – User Manual Edition 1: September 2017...
-
Page 41: Playback & Playout
2 x or 4x speeds both forward and in reverse. One of the key elements of the Sumo19 REC PLAY MONITOR EDIT is the ability to utilize the monitor recorder as a play back and play out device... - Page 42 Creates and saves the metadata tags in to XML in FCPX format. EXPORT Tapping reset will remove the all tags from the current clip. RESET *Subject to change without notice Atomos Sumo19 – User Manual Edition 1: September 2017...
-
Page 43: Connecting And Editing
Autodesk Smoke Avid DNxHD® / DNxHR® support requires online activation. If you have used a FAT32 formatted disk in the Sumo19 this will have a folder structure Scene, Shot, Take. This will mean you either transfer all the folders or utilize the Windows Search or MACs automate ExFAT compatibility program to transfer just the .mov files. -
Page 44: Importing / Import Into Final Cut Pro
EDIUS 6, Sony Vegas 10, Lightworks and Avid Media Composer 6 support imported files from your Sumo19 disk. Importing Sumo19 footage into Final Cut Pro You can import Sumo19 footage into Final Cut Pro (FCP) in just a few simple steps. First, connect the Sumo19 Docking Station to your Apple Mac using the USB 2.0 or USB 3.0 port. -
Page 45: Smartlog With Fcpx
• Select the drive (in this example it is EXCVIDEO) • Double-click the unitname.FCPXML file • This will open FCP X and import the .xml file • Select the Sumo19 drive under Devices (in this example it is called EXCVIDEO) • Choose the unitname.FCPXML, select Import FCP X will make a event of the disk name and reference all the footage in that event. -
Page 46: Software Upgrades
All you have to do is press and hold the on/off button for 10 seconds. If 4. Power down your Sumo19. you do this your Sumo19 will revert to its factory condition, and you will be 5. Insert the Master Caddy with the ATOMSUM.FW file. able to retry the firmware update later (taking due precautions to identify 6. -
Page 47: Technical Specifications
Video Signal Conversion 720p 50/60, 1080i 50/60, HDMI to SDI 1080p 24/25/30/50/60/100/120 2160p 24/25/30/50/60 720p 50/60, 1080i 50/60, SDI to HDMI 1080p 24/25/30/50/60/100/120 2160p 24/25/30/50/60 Specifications correct at time of printing E&OE *Subject to change without notice Atomos Sumo19 – User Manual Edition 1: September 2017... - Page 48 Construction note: Your Sumo19 is designed to operate in ambient temperatures up to 45°C/113°F. It features a heat pipe design with a silent fan to circulate air and remove excess heat from the rear vents . If you wish to extend the temperature of operation in high temperature conditions, you can choose an SSD drive, and set the TFT brightness to a minimum.
Need help?
Do you have a question about the SUMO19 and is the answer not in the manual?
Questions and answers