
Related Manuals for SellEton Scales OP-903


Summary of Contents for SellEton Scales OP-903
- Page 1 OP-903 INDICATOR USER’S MANUAL Portable Static Weighing Indicator www.selletonscales.com...
-
Page 2: Table Of Contents
TABLE OF CONTENTS Safety Precautions Preparations and Set Up Features Technical Parameters Specifications Power Supply Displays Display and Key Descriptions Operating Instructions Calibration Indicator Parameter Settings 9-11 Weighing/Printing Mode 12-13 Print Format Connectors Communication Settings Printer Troubleshooting Contact Us... -
Page 3: Safety Precautions
SAFETY PRECAUTIONS For safe operation of the weighing indicator, please follow these instructions: ● Calibration inspection and maintenance of the indicator are prohibited by non-pro- fessional staff ● Please ensure that the indicator rests on a stable surface ● The indicator is a piece of static sensitive equipment; Please cut off power during electrical connections ●... -
Page 4: Features
FEATURES ● Designed to work with static axle scales ● Gross weighing and accumulative weighing modes ● LCD display (size: 5.3in x 1.4in) ● Tare, Zero, Print, Save, Check, and Delete functions ● Kg and lb weighing units ● Built-in needle printer ●... -
Page 5: Specifications
SPECIFICATIONS FIGURE 1: INDICATOR MEASUREMENTS 11.75 in 5.5 in POWER SUPPLY Battery Your indicator comes with a rechargeable battery, please charge the internal battery fully before first time use. A 110 to 220V AC adapter should be provided with your indicator. -
Page 6: Displays
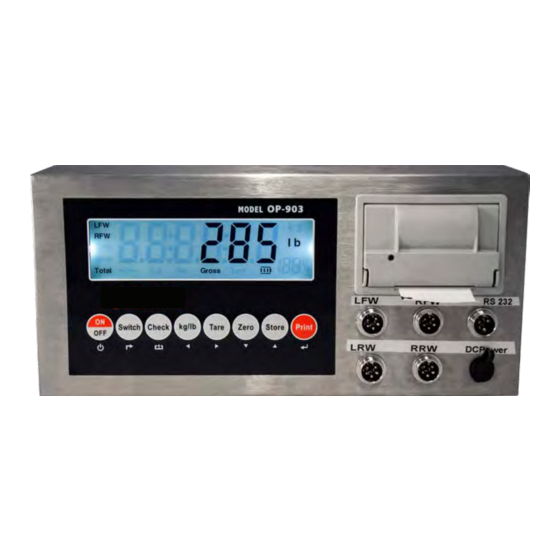
OP-903 DISPLAY... -
Page 7: Display And Key Descriptions
DISPLAY AND KEY DESCRIPTION ON/OFF Powers the Indicator On or Off if held for 2 seconds SWITCH Switch the weight between the pad weight and the total weight CHECK Check and read the saved weight data to print KG/LB Shifts between weighing units (kg/lb) TARE 1. -
Page 8: Operating Instructions
OPERATING INSTRUCTIONS Power On ● Turn on the power by pressing the power button for 2 seconds. Once on, the scale will flash the voltage and then begin to auto-check and count down from 0-9 sequentially before entering the weighing mode Note: Anything on the scale before powering on will automatically be tared out. - Page 9 Switch ● Switches the display between the total weight and each individual pad/scale weight ● Individual pad display shows the percentage of that pads load, of the total weight Print ● If the weight on the scale is stable press the PRINT key to print the current weight...
-
Page 10: Calibration
CALIBRATION PROCEDURE Turn on the scale by holding the ON/OFF key. (If the scale does not turn on, plug in the ac adapter because the battery may be low.) Once on hold SWITCH and PRINT key to enter the indicator settings mode The display will show [ ] to indicate F1 settings mode, use the STORE key to... -
Page 11: Indicator Parameter Settings
INDICATOR PARAMETER SETTINGS This indicator has 5 different setting modes, [F 1], [F 2], [F 3], [F 4] & [F Each mode changes different indicator parameters. To enter calibration/parameter settings, follow the procedure below: Press and hold the SWITCH and PRINT key at the same time for 2 seconds Navigate through the setting modes (F1 to F5) by using the arrow keys and return keys as labeled under each indicator button ( Press the PRINT... - Page 12 F 2 Menu Setting the Choosing a pad to calibrate, zero calibration, loading calibration, and saving Step Parameter Display Settings/Options Enter F2 Menu Pad Choice Choose a pad/scale to calibrate SCALE 1 Options: 1/2/3/4 Zero Calibration 0 = do not calibrate CAL--0 1 = calibrate Note: when 1 is selected the indicator will count down...
- Page 13 Step Parameter Display Settings/Options Automatic Power Off 00 = turn off auto power off OFF-00 10 = power off automatically if no change within 10 min 30 = power off automatically if no change within 30 min 60 = power off automatically if no change within 60 min Back Light 00 = Backlight on BL--00...
-
Page 14: Weighing/Printing Mode
WEIGHING/PRINTING MODES In the Parameters you can set to have your printer print automatically or manually, we recommend setting to manual (F3 [PM - 0]) for best results. Normal Weighing mode: ● In the F3 menu set the Printing Format to “1” PF - 1 ●... - Page 15 Accumulative weighing mode: ● In the F3 menu set the printing format to “2” PF - 2 ● In this mode you have the option of using 2 or 4 pads odE 2 ● The Print mode must be set to manual to function correctly [ ●...
-
Page 16: Print Format
PRINT FORMAT Normal Printing Format Single pad: Double pads: Three pads: Four pads: WEIGHTING REPORT WEIGHTING REPORT WEIGHTING REPORT WEIGHTING REPORT ------------------------ ------------------------ ------------------------ ------------------------ NO. : 0575 NO. : 0575 NO. : 0575 NO. : 0575 Date: 2013-11-02 Date: 2013-11-02 Date: 2013-11-02 Date: 2013-11-02 Time: 09:59:04... -
Page 17: Connectors
CONNECTORS Connecting load cells to the indicator ● OP-903 can connect with 4 weighing pads or 24 pcs of load cells of 350Ω at most QUICK DISCONNECT AS SHOWN BELOW: The number of weighing pads and load cells corresponds to the weighing modes. If the pads or load cells are not connected properly the indicator will not function properly. -
Page 18: Communication Settings
COMMUNICATION SETTINGS Format 1 [CP - 1] Workable with a PC RS232COM serial interface can receive simple ASCII command. RS232 parameter:9600Bit/S Baud rate,8 digits,no check point,1 stop. CR LF Data weight status, ST=standstill, US=not standstill, OL=overload weight mode, GS=gross mode, NT=net mode weight of positive and negative, “+”... -
Page 19: Printer
PRINTER Roll holder Roll holder Paper roll Feed button Pull tab Pull tab Paper slot Cartridge Cartridge To Remove lid: Remove lid by pressing on the lower corner tabs and squeezing while pulling outwards To Replace Ink: Remove lid, then squeeze and pull forward on the pull tabs to pull printer forward from indicator. -
Page 20: Troubleshooting
TROUBLESHOOTING Error Codes Error Reason Solution 1. Overload 1. Reduce the weight 2. Wrong connection with load cell 2. Check load cell connection UUUUUU 3. Load cell has quality problem 3. Inspect load cell; Check the input/output 4. See Q&A section 1. -
Page 21: Contact Us
CONTACT US Please e-mail info@selletonscales.com for any sales related questions or call 844-735-5386 Don’t forget to visit our website at: www.selletonscales.com...
Need help?
Do you have a question about the OP-903 and is the answer not in the manual?
Questions and answers