Amprobe AM-500 Replacement Instructions Manual
Hide thumbs
Also See for AM-500:
- User manual (67 pages) ,
- User manual (24 pages) ,
- User manual (134 pages)
Advertisement
Available languages
Available languages
Quick Links
English
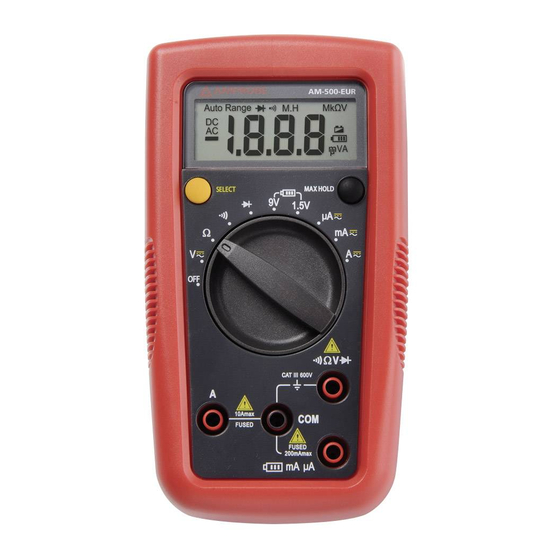
AM‐500 / AM‐510 Fuse Replacement Instructions (non‐EUR versions only)
1. Please refer to https://www.amprobe.com/amprobe‐am‐500‐am‐510‐safety‐notice/ for related
Important Voluntary Recall Information Regarding Amprobe AM‐500 / AM‐510.
2. Replace the highlighted fuse (supplied with the fuse replacement kit):
a. Disconnect the test probes from measuring terminals.
b. Turn the Meter to the OFF position and remove the holster (AM 500 only).
c. Remove the screw from the battery door and remove the battery door
d. Remove the two screws from the enclosure and open the enclosure.
e. Remove the fuse identified as "F2" below and replace with the new provided fuse
(10A H 660V fast‐fuse, 6.3x32mm)
f.
Reassembly is the reverse of disassembly.
g. Perform continuity test for A terminal – with product in function and test lead
installed in /V terminal, insert probe tip into A terminal.
Product should read low resistance (< 1 ).
Advertisement

Related Manuals for Amprobe AM-500


Summary of Contents for Amprobe AM-500
- Page 1 English AM‐500 / AM‐510 Fuse Replacement Instructions (non‐EUR versions only) 1. Please refer to https://www.amprobe.com/amprobe‐am‐500‐am‐510‐safety‐notice/ for related Important Voluntary Recall Information Regarding Amprobe AM‐500 / AM‐510. 2. Replace the highlighted fuse (supplied with the fuse replacement kit): a. Disconnect the test probes from measuring terminals. b. Turn the Meter to the OFF position and remove the holster (AM 500 only). c. Remove the screw from the battery door and remove the battery door d. Remove the two screws from the enclosure and open the enclosure. e. Remove the fuse identified as “F2” below and replace with the new provided fuse (10A H 660V fast‐fuse, 6.3x32mm) Reassembly is the reverse of disassembly. g. Perform continuity test for A terminal – with product in function and test lead installed in /V terminal, insert probe tip into A terminal. Product should read low resistance (< 1 ). ...
- Page 2 English AM‐500 / AM‐510 Fuse Replacement Instructions (non‐EUR versions only) 3. Apply Recall Correction Label to the shown location on the back of your AM‐500 / AM‐510: ...
- Page 3 Español Instrucciones de sustitución de fusibles del AM‐500 / AM‐510 (solo para las versiones no europeas) 1. Consulte en https://www.amprobe.com/amprobe‐am‐500‐am‐510‐safety‐notice/ la información relacionada con la retirada voluntaria de productos de Amprobe AM‐500 / AM‐510. 2. Sustituya el fusible resaltado (suministrado con el kit de sustitución de fusibles): a. Desconecte las puntas de prueba de los terminales de medición. b. Coloque el medidor en la posición OFF (Apagado) y retire la funda (solo en el AM 500). c. Retire el tornillo de la tapa de la batería y retire la tapa de la batería d. Retire los dos tornillos de la caja y abra la caja. e. Retire el fusible identificado como "F2" y sustitúyalo por el nuevo fusible suministrado (fusible rápido de 10A H 660V, de 6,3x32 mm) El proceso de montaje es inverso al desmontaje. g. Realice la prueba de continuidad del terminal A: con el producto en funcionamiento y el cable de prueba instalado en el terminal /V, inserte la punta de prueba en el terminal A. El producto debe indicar una resistencia baja (< 1 ). ...
- Page 4 Español Instrucciones de sustitución de fusibles del AM‐500 / AM‐510 (solo para las versiones no europeas) 3. Aplique la Etiqueta de Corrección de la Retirada en el lugar indicado en la parte posterior de su AM‐500 / AM‐510: ...
- Page 5 Français Canadien Consignes de remplacement des fusibles AM‐500 / AM‐510 (versions non‐EUR uniquement) Veuillez vous référer à https://www.amprobe.com/amprobe‐am‐500‐am‐510‐safety‐notice/ pour l'information relative au rappel volontaire important concernant l'Amprobe AM‐500 / AM‐510 2. Remplacez le fusible mis en évidence (fourni avec la trousse de remplacement des fusibles) : a. Débranchez les sondes de test des bornes de mesure. b. Mettez l'ampèremètre en position OFF et retirez l'étui (AM 500 uniquement). c. Retirez la vis du couvercle de la batterie et retirez le couvercle de la batterie d. Retirez les deux vis du boîtier et ouvrez le boîtier. e. Retirez le fusible identifié par « F2 » ci‐dessous et remplacez‐le par le nouveau fusible fourni (fusible rapide de 10 A H 660 V, 6,3x32 mm) Le remontage s'effectue en sens inverse du démontage. g. Effectuez un test de continuité pour la borne A : le produit étant en fonction et le fil d'essai étant installé dans la borne de /V, insérez la pointe de la sonde dans la borne A. Le produit doit indiquer une faible résistance (< 1 ). ...
- Page 6 Français Canadien Consignes de remplacement des fusibles AM‐500 / AM‐510 (versions non‐EUR uniquement) 3. Appliquez l'étiquette de correction du rappel à l'endroit indiqué à l'arrière de votre appareil AM‐500 / AM‐510: ...
- Page 7 Português brasileiro Instruções de substituição de fusíveis AM‐500 / AM‐510 (somente versão não europeia) 1. Consulte https://www.amprobe.com/amprobe‐am‐500‐am‐510‐safety‐notice/ para obter informações importantes do Recall voluntário em relação ao Amprobe AM‐500 / AM‐510. 2. Substitua o fusível destacado (fornecido com o kit de substituição do fusível): a. Desconecte as sondas de teste dos terminais de medição. b. Gire o medidor para a posição OFF e remova o estojo (somente AM 500). c. Remova o parafuso da porta da bateria e remova a porta da bateria d. Remova os dois parafusos do gabinete e abra‐o. e. Remova o fusível identificado como "F2" abaixo e substitua pelo fusível novo fornecido (fusível rápido 10A H 660V, 6,3x32 mm) A remontagem é realizada na ordem inversa da desmontagem. g. Execute o teste de continuidade para o terminal A – com produto em funcionamento e o cabo de teste instalado no terminal /V, insira a ponta da sonda no terminal A. O produto deve apresentar baixa resistência (< 1 ). ...
- Page 8 Português brasileiro Instruções de substituição de fusíveis AM‐500 / AM‐510 (somente versão não europeia) 3. Aplique a etiqueta de correção de Recall no local mostrado na parte de trás do seu AM‐500 / AM‐510: ...
- Page 9 AM-500 / AM-510 熔断器更换说明(仅适合非欧版) 1. 请访问 https://www.amprobe.com/amprobe-am-500-am-510-safety-notice/ ,了解有关 Amprobe AM-500 / AM-510 的重要主动召回信息。 2. 更换突出显示的熔断器(随熔断器更换套件提供): a. 断开测试探头与测量端子的连接。 b. 将万用表调到“OFF”位置,取下防护套(仅适合 AM 500)。 c. 取下电池盖的螺丝,将电池盖拆除 d. 取下外壳上的 2 颗螺丝,拆开外壳。 e. 拆下标记为“F2”的熔断器,更换为新熔断器(10A H 660V 快熔型,6.3x32mm) 重组与拆卸的顺序完全相反。 g. A 端子执行连续性测试——将产品的Ω功能和测试引线安装在Ω /V 端子,探头尖端 插入 A 端子。 产品读数应显示低电阻(< 1 Ω)。...
- Page 10 AM-500 / AM-510 熔断器更换说明(仅适合非欧版) 3. 将“召回纠正标签”贴到产品 AM-500 / AM-510 背面所示位置:...
- Page 11 AM-500/AM-510 保險絲更換說明 (僅限非歐洲版本) 1. 有關 Amprobe AM-500/AM-510 的主動回收相關重要資訊,請參閱 https://www.amprobe.com/amprobe-am-500-am-510-safety-notice/ 。 2. 更換標示處的保險絲 (更換用保險絲套件會隨附): a. 中斷測試探針與測量端子的連接。 b. 將量表轉至 OFF (關) 的位置,並取下皮套 (僅限 AM 500)。 c. 取下電池蓋的螺絲,並取下電池蓋 d. 取下機殼的兩支螺絲,並打開機殼。 e. 取出下方標示為「F2」的保險絲,並換成提供的新保險絲 (10A H 660V 快速型保險絲,6.3x32mm) 重新裝回拆除的零件。 g. 對 A 端子進行連續性測試-產品使用 Ω 功能且測試引線安裝於 Ω /V 端子,將探針...
- Page 12 AM-500/AM-510 保險絲更換說明 (僅限非歐洲版本) 3. 將回收修正標籤貼在 AM-500/AM-510 背面的所示位置:...
- Page 13 Dansk Vejledninger til skift af sikringen AM‐500 / AM‐510 (kun udgaver til brug uden for EU) 1. Du kan finde vigtige oplysninger om frivillig tilbagekaldelse af Amprobe AM‐500 / AM‐510 på https://www.amprobe.com/amprobe‐am‐500‐am‐510‐safety‐notice/ . 2. Skift den markerede sikring (som følger med reservesikringssættet): a. Afbryd testsonderne fra måleterminalerne. b. Sluk måleren og fjern hylsteret (kun på modellen AM 500). c. Fjern skruen på batteridækslet, og tag batteridækslet af d. Fjern de to skruer i kabinettet, og åbn kabinettet. e. Fjern sikringen, der er mærket ”F2” nedefor, og skift dem med den nye medfølgende sikring (10Z H 660V fast sikring/6,3x32mm) Produktet samles i omvendt rækkefølge af, hvordan det skilles ad. g. Lav en kontinuitetstest på terminal A ‐ med produktet sat på funktionen og testledningen sat i /V‐terminalen, og sæt spidsen af sonden i terminal A. Produktet skal aflæse en lav modstand (< 1). ...
- Page 14 Dansk Vejledninger til skift af sikringen AM‐500 / AM‐510 (kun udgaver til brug uden for EU) 3. Sæt rettelsesmærkatet på det viste sted på bagsiden af din AM‐500 / AM‐510: ...
- Page 15 Nederlands Instructies voor vervanging van AM‐500 / AM‐510‐zekering (alleen niet‐EUR‐versies) 1. Raadpleeg https://www.amprobe.com/amprobe‐am‐500‐am‐510‐safety‐notice/ voor gerelateerde Belangrijke informatie over vrijwillige terugroeping betreffende Amprobe AM‐500 / AM‐510. 2. Vervang de gemarkeerde zekering (geleverd met de set voor vervanging van zekering): a. Koppel de testsondes los van de meetaansluitingen. b. Zet de meter op UIT en verwijder de holster (alleen AM 500). c. Verwijder de schroef uit de batterijdeur en verwijder de batterijdeur d. Verwijder de twee schroeven uit de behuizing en open de behuizing. e. Verwijder de zekering geïdentificeerd als “F2” hieronder en vervang door de nieuwe geleverde zekering (10A H 660V snelle zekering, 6,3x32mm) Hermontage gebeurt in omgekeerde volgorde als demontage. g. Voer een continuïteitstest uit voor A‐aansluiting – met product in functie en test de draad geïnstalleerd in /V‐aansluiting, steek sondepunt in A‐ aansluiting. Het product zou een lage weerstand moeten aangeven (< 1 ). ...
- Page 16 Nederlands Instructies voor vervanging van AM‐500 / AM‐510‐zekering (alleen niet‐EUR‐versies) 3. Breng label van terugroeping voor correctie aan op de getoonde locatie op de achterkant van uw AM‐500 / AM‐510: ...
- Page 17 Suomi AM‐500 / AM‐510:n sulakkeenvaihto‐ohjeet (vain ei‐EUR‐versiot) 1. Katso osoitteesta https://www.amprobe.com/amprobe‐am‐500‐am‐510‐safety‐notice/ asiaan liittyvä Tärkeää tietoa Amprobe AM‐500 / AM‐510 ‐tuotteiden vapaaehtoisesta takaisinvedosta. 2. Vaihda korostettu sulake (toimitettu sulakkeen vaihtosarjapakkauksessa): a. Irrota testijohtoanturit mitattavista päätteistä. b. Kytke mittari POIS‐asentoon ja poista kotelo (vain AM 500). c. Irrota ruuvi akkukannesta ja irrota akkukansi d. Irrota kotelon kaksi ruuvia ja avaa kotelo. e. Irrota sulake, jossa on ”F2”‐merkintä kuten alla ja vaihda se uuteen toimitettuun sulakkeeseen (10 A H 660 V ‐pikasulake, 6,3x32 mm) Kokoa purkamisen käänteisessä järjestyksessä. g. Suorita A‐päätteelle jatkuvuustesti – tuotteen ollessa ‐toiminnossa ja testijohto liitettynä /V‐päätteeseen, liitä anturin kärki A‐ päätteeseen. Tuotteen tulisisi lukea matala vastus (< 1 ). ...
- Page 18 Suomi AM‐500 / AM‐510:n sulakkeenvaihto‐ohjeet (vain ei‐EUR‐versiot) 3. Kiinnitä takaisinvedon korjaustarra näytettyyn kohtaan AM‐500/AM‐510:n takana: ...
- Page 19 Français Instructions de remplacement du fusible des AM‐500 / AM‐510 (versions non EUR uniquement) 1. Veuillez vous référer à https://www.amprobe.com/amprobe‐am‐500‐am‐510‐safety‐notice/ afin d’obtenir des informations importantes sur le rappel volontaire concernant l'Amprobe AM‐500 / AM‐510. 2. Remplacez le fusible indiqué en surbrillance (fourni avec le kit de remplacement de fusible) : a. Débranchez les pointes de touche des bornes de mesure. b. Tournez pour placer le multimètre en position OFF (ARRÊT) et retirez l'étui (AM 500 uniquement). c. Retirez la vis de la trappe à pile et retirez la trappe à pile d. Retirez les deux vis du boîtier et ouvrez le boîtier. e. Retirez le fusible identifié « F2 » ci‐dessous et remplacez‐le par le nouveau fusible fourni (fusible rapide 10A H 660V, 6,3x32mm) Remontez dans l’ordre inverse du démontage. g. Effectuez un test de continuité pour la borne A – avec le produit sur la fonction et le cordon de test installé sur la borne /V. Insérez la pointe de la sonde dans la borne A. Le produit doit indiquer une faible résistance (< 1 ). ...
- Page 20 Français Instructions de remplacement du fusible des AM‐500 / AM‐510 (versions non EUR uniquement) 3. Apposez l'étiquette de correction de rappel à l'emplacement indiqué à l'arrière de votre AM‐500 / AM‐510 : ...
- Page 21 Deutsch AM‐500 / AM‐510 Anweisungen zur Auswechslung der Sicherung (nur Nicht‐EUR‐Versionen) 1. Bitte beachten Sie https://www.amprobe.com/amprobe‐am‐500‐am‐510‐safety‐notice/ für relevante wichtige Informationen zu freiwilligen Rückrufaktionen in Bezug auf Amprobe AM‐500 / AM‐510. 2. Ersetzen Sie die hervorgehobene Sicherung (mit dem Sicherungsauswechslungsset geliefert): a. Trennen Sie die Messspitzen von den gemessenen Anschlüssen. b. Schalten Sie das Messgerät aus (Aus‐Position) und nehmen Sie das Holster ab (nur AM 500). c. Lösen Sie die Schraube am Batteriefachdeckel und entfernen Sie den Batteriefachdeckel d. Entfernen Sie die beiden Schrauben vom Gehäuse und öffnen Sie das Gehäuse. e. Entfernen Sie die nachstehend als „F2“ identifizierte Sicherung und ersetzen Sie sie durch die neue bereitgestellte Sicherung (10A H 660 V schnelle Sicherung, 6,3x32mm) Befolgen Sie zur Montage die Schritte der Demontage in umgekehrter Reihenfolge. g. Führen Sie die Durchgangsprüfung für Anschluss A durch – stecken Sie die Messspitze in Anschluss A, während sich das Produkt in der Funktion befindet und die Messleitung im Anschluss /V installiert ist. Das Produkt sollte geringen Widerstand (< 1) messen. ...
- Page 22 Deutsch AM‐500 / AM‐510 Anweisungen zur Auswechslung der Sicherung (nur Nicht‐EUR‐Versionen) 3. Bringen Sie das Rückrufkorrekturetikett an der gezeigten Stelle an der Rückseite Ihres AM‐500 / AM‐510 an: ...
- Page 23 Italiano Istruzioni per la sostituzione del fusibile AM‐500 / AM‐510 (solo versioni non EUR) Fare riferimento al sito web https://www.amprobe.com/amprobe‐am‐500‐am‐510‐safety‐ notice/ per informazioni importanti sul ritiro volontario relative ad Amprobe AM‐500 / AM‐510. 2. Sostituire il fusibile evidenziato (fornito con il kit di sostituzione del fusibile): a. Scollegare le sonde di prova dai terminali di misurazione. b. Ruotare lo strumento in posizione OFF e rimuovere la custodia (solo AM 500). c. Rimuovere la vite dal coperchio del vano batterie e rimuovere il coperchio del vano batterie d. Rimuovere le due viti dall’alloggiamento e aprire l'alloggiamento. e. Rimuovere il fusibile identificato come "F2" di seguito e sostituirlo con il nuovo fusibile in dotazione (fusibile ad azione rapida 10A H 660 V, 6,3x32 mm) Il rimontaggio viene effettuato in modo inverso rispetto allo smontaggio. g. Eseguire il test di continuità per il terminale A – con il prodotto in funzione e il puntale installato nel terminale /V, inserire la punta della sonda nel terminale A. Sul prodotto si deve leggere bassa resistenza (< 1 ). ...
- Page 24 Italiano Istruzioni per la sostituzione del fusibile AM‐500 / AM‐510 (solo versioni non EUR) 3. Applicare l'etichetta di correzione del ritiro nella posizione mostrata sul retro di AM‐500 / AM‐510: ...
- Page 25 Norsk AM‐500 / AM‐510 Instruksjoner for bytte av sikringer (kun versjoner utenom EUR) 1. Se https://www.amprobe.com/amprobe‐am‐500‐am‐510‐safety‐notice/ for relaterte viktige opplysninger om frivillig tilbakekalling angående Amprobe AM‐500 / AM‐510. 2. Skift ut den uthevede sikringen (følger med sikringsbyttesettet): a. Koble prøvesondene fra målekontaktene. b. Sett måleren til OFF, og ta av hylsteret (kun AM 500). c. Ta skruen av batteridøren, og ta av batteridøren d. Ta de to skruene av kabinettet, og åpne det. e. Fjern sikringen identifisert som «F2» nedenfor, og bytt den ut med den nye, medfølgende sikringen (10 A H 660 V hurtigsikring, 6,3x32 mm) Sett sammen igjen i omvendt rekkefølge. g. Utfør kontinuitetstest for A‐kontakten: Sett produktet til ‐funksjonen og prøveledning i /V‐kontakten, og sett sondetuppen i A‐kontakten. Produktet skal vise lav motstand (< 1 ). ...
- Page 26 Norsk AM‐500 / AM‐510 Instruksjoner for bytte av sikringer (kun versjoner utenom EUR) 3. Klistre tilbakekallingskorrigeringsetiketten på stedet som vises på baksiden av AM‐500 / AM‐ 510: ...
- Page 27 Polski Instrukcje wymiany bezpiecznika AM‐500 / AM‐510 (dla wersji dla innych krajów niż EUROPA) 1. Sprawdź https://www.amprobe.com/amprobe‐am‐500‐am‐510‐safety‐notice/ w celu uzyskania powiązanych Ważnych informacji o dobrowolnym wycofaniu dotyczących Amprobe AM‐500 / AM‐510. 2. Wymień wyróżniony bezpiecznik (dostarczony z zestawem do wymiany bezpieczników): a. Odłącz sondy testowe od złączy pomiarowych. b. Przestaw miernik na pozycję OFF i zdejmij uchwyt (Wyłącznie AM 500). c. Odkręć wkręt z drzwi baterii i zdejmij drzwi baterii d. Odkręć dwa wkręty z obudowy i otwórz obudowę. e. Wyjmij bezpiecznik zidentyfikowany poniżej jako “F2” i wymień go na nowy, dostarczony bezpiecznik (Szybki bezpiecznik 10 A H 660 V, 6,3x32mm) Zamontuj ponownie w kolejności odwrotnej do demontażu. g. Wykonaj test ciągłości dla złącza A – z produktem w funkcji i przewodem testowym zainstalowanym w /złączu V, włóż koniec sondy do złącza A. Produkt powinien pokazywać odczyt niskiej rezystancji (< 1 ). ...
- Page 28 Polski Instrukcje wymiany bezpiecznika AM‐500 / AM‐510 (dla wersji dla innych krajów niż EUROPA) 3. Naklej etykietę korekcji wycofania we wskazanym miejscu z tyłu AM‐500 / AM‐510: ...
- Page 29 Português Instruções de substituição de fusíveis AM‐500 / AM‐510 (apenas versões não EUR) 1. Aceda a https://www.amprobe.com/amprobe‐am‐500‐am‐510‐safety‐notice/ para consultar informações importantes sobre recolha voluntária relacionada com o Amprobe AM‐500 / AM‐ 510. 2. Substitua o fusível assinalado (fornecido com o kit de substituição de fusíveis): a. Desligue as sondas de teste dos terminais de medição. b. Rode o seletor do multímetro para a posição OFF e remova o coldre (apenas AM 500). c. Remova o parafuso da tampa da bateria e retire a tampa d. Remova os dois parafusos e abra a caixa. e. Remova o fusível identificado abaixo como “F2” e substitua‐o pelo novo fusível fornecido (fusível rápido 10 A H 660 V, 6,3x32 mm) Volte a efetuar a montagem na ordem inversa. g. Execute o teste de continuidade do terminal A – com o produto na função e o cabo de teste ligado ao terminal /V, insira a ponta da sonda no terminal A. O produto deverá indicar baixa resistência (< 1 ). ...
- Page 30 Português Instruções de substituição de fusíveis AM‐500 / AM‐510 (apenas versões não EUR) 3. Cole a etiqueta de correção de recolha no local indicado na traseira do AM‐500 / AM‐510: ...
- Page 31 Romanian Instrucțiuni de înlocuire a siguranței AM‐500 / AM‐510 (numai pentru versiunile non‐EUR) 1. Consultați https://www.amprobe.com/amprobe‐am‐500‐am‐510‐safety‐notice/ pentru informații importante legate de rechemarea voluntară cu privire la Amprobe AM‐500 / AM‐510. 2. Înlocuiți siguranța evidențiată (furnizată împreună cu kitul de înlocuire a siguranței): a. Deconectați sondele de testare de la bornele de măsurare. b. Rotiți contorul în poziția OFF (dezactivat) și scoateți tocul (numai AM 500). c. Scoateți șurubul din ușa compartimentului bateriei și scoateți ușa bateriei d. Scoateți cele două șuruburi din incintă și deschideți incinta. e. Scoateți siguranța identificată ca „F2” mai jos și înlocuiți‐o cu noua siguranță furnizată (10A H 660V siguranță rapidă, 6,3x32 mm) Reasamblarea se face în ordine inversă dezasamblării. g. Efectuați testul de continuitate pentru o bornă ‐ cu produsul în funcțiune și firul de testare instalat în borna /V, introduceți vârful sondei în borna A. Produsul trebuie să măsoare o rezistență scăzută (< 1 ). ...
- Page 32 Romanian Instrucțiuni de înlocuire a siguranței AM‐500 / AM‐510 (numai pentru versiunile non‐EUR) 3. Aplicați eticheta de corecție prin rechemare în locația afișată pe spatele AM‐500 / AM‐510: ...
- Page 33 Russian AM‐500 / AM‐510 Инструкции по замене плавкого предохранителя (для версий, не предназначенных для Европы) 1. Важную информацию о добровольном отзыве изделий Amprobe AM‐500 / AM‐510 см. на веб‐сайте https://www.amprobe.com/amprobe‐am‐500‐am‐510‐safety‐notice/ . 2. Замените выделенный плавкий предохранитель (поставляемый с набором для замены плавких предохранителей): a. Отсоедините измерительные датчики от измерительных разъемов. b. Переведите измерительный прибор в положение OFF (ВЫКЛ.) и снимите чехол (только для модели AM 500). c. Извлеките винт из крышки батарейного отсека и снимите дверцу с батарейного отсека d. Извлеките два винта из корпуса и откройте корпус прибора. e. Извлеките показанный ниже плавкий предохранитель с меткой "F2" и установите новый плавкий предохранитель из комплекта (быстродействующий плавкий предохранитель 10 А Н 660 В, 6,3 х 32 мм) Для сборки выполните действия по разборке в обратном порядке. ...
- Page 34 Russian AM‐500 / AM‐510 Инструкции по замене плавкого предохранителя (для версий, не предназначенных для Европы) g. Выполните проверку целостности для разъема А ‐ изделие работает в режиме , лабораторный провод подключен к разъему /V, наконечник датчика вставлен в разъем А. Изделие должно показать низкое сопротивление (< 1 ). 3. Приклейте наклейку с поправками в указанном месте с обратной стороны устройства AM‐ 500 / AM‐510: ...
- Page 35 Español – Spain Instrucciones de sustitución del fusible de AM‐500 / AM‐510 (solo versiones no europeas) 1. Consulte https://www.amprobe.com/amprobe‐am‐500‐am‐510‐safety‐notice/ para obtener información importante relacionada sobre la retirada voluntaria del mercado de AM‐500 / AM‐ 510 de Amprobe. 2. Sustituya el fusible resaltado (suministrado con el kit de sustitución del fusible): a. Desconecte las sondas de prueba de los terminales de medición. b. Gire el multímetro a la posición OFF (APAGADO) y retire la funda (solo AM 500). c. Quite el tornillo de la puerta del compartimento de pilas y retírela d. Quite los dos tornillos del compartimento y ábralo. e. Retire el fusible etiquetado "F2" a continuación y sustitúyalo por el nuevo fusible provisto (fusible rápido 10A H 660 V, 6,3x32mm) El reensamblaje es lo contrario al desensamblaje. g. Realice una prueba de continuidad para la terminal A con el producto en función y el cable de prueba instalado en la terminal /V e inserte la punta de la sonda en la terminal A. El producto debe indicar baja resistencia (< 1 ). ...
- Page 36 Español – Spain Instrucciones de sustitución del fusible de AM‐500 / AM‐510 (solo versiones no europeas) 3. Aplique la etiqueta de corrección de recuperación en la ubicación que se muestra en la parte posterior de su AM‐500 / AM‐510: ...
- Page 37 Svenska Instruktioner för byte av säkring i AM‐500 / AM‐510 (endast icke‐EUR‐versioner) 1. Se https://www.amprobe.com/amprobe‐am‐500‐am‐510‐safety‐notice/ för relaterad viktig information om frivilligt återkallande av Amprobe AM‐500 / AM‐510. 2. Byt ut den markerade säkringen (medföljer säkringsbytessatsen): a. Koppla bort testproberna från mätterminalerna. b. Ställ mätaren på OFF och ta bort fodralet (endast AM 500). c. Ta bort skruven från batteriluckan och ta bort batteriluckan d. Ta bort de två skruvarna från höljet och öppna höljet. e. Ta bort säkringen som identifieras som "F2" nedan och ersätt den med den nya medföljande säkringen (10A H 660V snabbsäkring, 6,3 x 32 mm) Återmontera på omvänt sätt som när du demonterade. g. Utför ett kontinuitetstest för A‐terminalen ‐ med produkten i funktionen och testledningen installerad i /V‐terminalen, för in sondspetsen i A‐terminalen. Produkten ska visa ett lågt motstånd (< 1 ). ...
- Page 38 Svenska Instruktioner för byte av säkring i AM‐500 / AM‐510 (endast icke‐EUR‐versioner) 3. Fäst etiketten för återkallelsekorrigering på den angivna platsen på baksidan av AM‐500 / AM‐ 510: ...
- Page 39 Turkish AM‐500 / AM‐510 Sigorta Değiştirme Talimatları (yalnızca EUR dışı sürümler) 1. Amprobe AM‐500 / AM‐510 ile ilgili Önemli Gönüllü Geri Çağırma Bilgileri için lütfen https://www.amprobe.com/amprobe‐am‐500‐am‐510‐safety‐notice/ adresine bakın. 2. Vurgulanan sigortayı değiştirin (sigorta değiştirme kitiyle birlikte verilir): a. Test problarını ölçüm terminallerinden ayırın. b. Metreyi KAPALI konuma çevirin ve kılıfı çıkarın (yalnızca AM 500). c. Pil kapağındaki vidayı çıkarın ve pil kapağını çıkarın d. Muhafazadan iki vidayı çıkarın ve muhafazayı açın. e. Aşağıda "F2" olarak tanımlanan sigortayı çıkarın ve verilen yeni sigortayla değiştirin. (10A H 660V hızlı sigorta, 6.3x32mm) Yeniden montaj, demontajın tersidir. g. Ürün durumda ve test ucu /V terminaline takılı durumdayken, prob ucunu A terminaline takarak A terminali için süreklilik testi gerçekleştirin. Ürün düşük dirençte olmalıdır (< 1 ). ...
- Page 40 Turkish AM‐500 / AM‐510 Sigorta Değiştirme Talimatları (yalnızca EUR dışı sürümler) 3. AM‐500 / AM‐510'unuzun arkasında gösterilen yere Geri Çağırma Düzeltme Etiketi uygulayın: ...
Need help?
Do you have a question about the AM-500 and is the answer not in the manual?
Questions and answers