
Related Manuals for HAMOKI PG-SA

Summary of Contents for HAMOKI PG-SA
- Page 1 Contact Grill Instruction Manual Model: PG-SA/PG-SF/PG-SC/PG-MA/PG-MB/PG-MC/PG-2SA/PG-2SF/PG-2SC Please read this instruction manual carefully before operation...
- Page 2 Safety This device is designed in accordance with the presently applicable technological standards. However, the device can pose a danger if handled improperly and inappropriately. Keep out of reach of children. ▪ Never leave the device unattended when in use. ▪...
-
Page 3: Operation
Operation ▪ . 1. Before using, check whether the power supply installation is regular to make sure the supplied voltage is coordinated. 2. Put the plug in the socket and turn on the power. 3. Turn the temperature controller clockwise to the temperature needed. The yellow indicator will come on- this shows that the heating wire will begin to heat and the upper and lower griddle will begin to rise in temperature. -
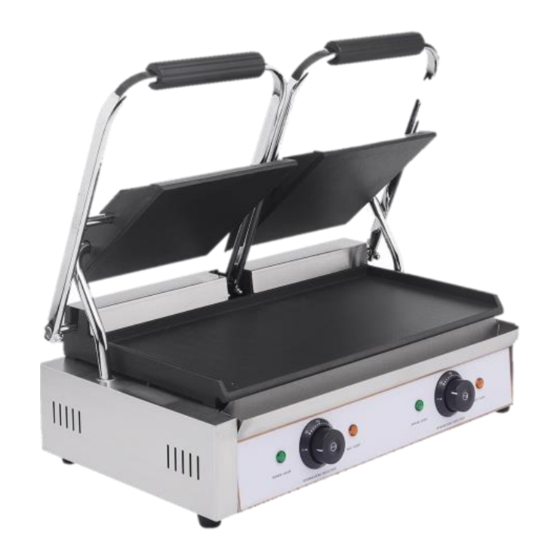
Page 4: Exterior Structure
Exterior Structure 1. HEATING INDICATOR 2. TEMPERATURE CONTROLLER 3. POWER INDICATOR 4. BOTTOM BOX 5. OIL TRAY 6. LOWER MODULE PLATE 7. FEED WIRE TUBE 8. UPPER MODULE PLATE 9. OPERATION HANDLE 10. POWER CORD 11. RUBBER FEET... -
Page 5: Circuit Diagram
Circuit Diagram 1. HL1, HL3: POWER INDICATOR 2. HL2, HL4: HEATING INDICATOR 3. SA, SA1, SA2: TEMPERATURE CONTROLLER 4. E: GROUND CONNECTION 5. SB, SB1, SB2: TEMPERATURE CONTROLLER 6. EH1, EH2, EH3, EH4: HEATING WIRE... - Page 6 The structures of PG-SA/PG-SF/PG-SC/PG-MA/PG-MB/PG-MC are different, the differences as follows: The upper and lower module plate of PG-SA and PG-MA are ribbed; the upper and lower module plate of PG-SF and PG-MB are smooth. The upper and lower module plate of PG-SC and PG-MC are upper ribbed and lower smooth.
- Page 7 Graph Parts Guide HEATING INDICATOR 2.TEMPERATURE 3.CROSS-HEADED CONTROLLER SCREW M4×6 4. POWER INDICATOR 5. BOTTOM HULL 6. INTERNAL HEXAGON SCREW M6×10 7. FLAT SPACER 8. INTERMAL HEXAGON SCREW 9. FLAT SPACER M5×25 10. WISTING SPRING 11. REAR ROTARY AXLE 12. FASTENTING STAND 13.
-
Page 8: Function And Structure
Function and Structure: 1. The upper and lower module plates are enamelled and are easily cleaned. 2. One-headed and double-headed grilling pans can be chosen freely. 3. The independent temperature control system is convenient to handle and energy efficient. 4. The Internal temperature protector is reliable and safe. 5. -
Page 9: Transportation And Storage
Basic Parameters- Single Contact Grill NAME Ribbed Smooth Upper Upper/Lower Upper/Lower Ribbed/Lower Ribbed Smooth Smooth Model PG-SA PG-SF PG-SC PG-MA PG-MB Voltage 220~240V 220~240V 220~240V 220~240V 220~240V 50/60Hz 50/60Hz 50/60Hz 50/60Hz 50/60Hz Power 1.8KW 1.8KW 1.8KW 2.2KW 2.2KW Temperature control... - Page 10 Basic Parameters: NAME Contact Grill double double double double Upper/lower Upper Upper Upper/lower smooth ribbed/lower smooth/lower ribbed smooth ribbed Model PG-2MA PG-2MB PG-2MC PG-2MD Voltage 220~240V 220~240V 220~240V 220~240V 50/60Hz 50/60Hz 50/60Hz 50/60Hz Power 4.4KW 4.4KW 4.4KW 4.4KW Temperature control number Temperature 50~300℃...
-
Page 11: Troubleshooting
Troubleshooting PROBLEM POSSIBLE CAUSES SOLUTION Module plates are 1. Temperature 1. Change NOT heating when the controller is broken. temperature power and heating 2. At least one of controller. indicator are both on. heating wires is burnt. 2. Change the burnt 3. -
Page 12: Warranty
Hamoki Ltd and upon proper installation and start-up in accordance with the instruction packet supplied with each unit) a one year parts warranty. Hamoki Ltd’s obligation under this warranty is limited to a period of one (1) year from the date of original installation. WARRANTY CLAIMS: All claims for parts must be made directly through the retailer in the first instance.
Need help?
Do you have a question about the PG-SA and is the answer not in the manual?
Questions and answers