Bird-X SUPER BirdXPeller PRO - Digital Bird Repeller Quick Start Guide
- Quick start manual (2 pages) ,
- Quick start manual (2 pages) ,
- Installation (2 pages)
Advertisement
- 1 PRIOR TO INSTALLATION
- 2 INSTALLATION
- 3 PROGRAMMING YOUR BIRDXPELLER
- 4 BIRD SETTING SWITCHES
- 5 MODE SETTING SWITCHES
- 6 DELAY SWITCHES
- 7 TIME OF OPERATION SWITCHES
- 8 RANDOM OPERATION SWITCH
- 9 SPEAKER OPERATION SWITCH
- 10 PROGRAMMING EXAMPLE
- 11 VOLUME CONTROL
- 12 POWER SWITCH
- 13 TROUBLESHOOTING
- 14 Documents / Resources
PRIOR TO INSTALLATION
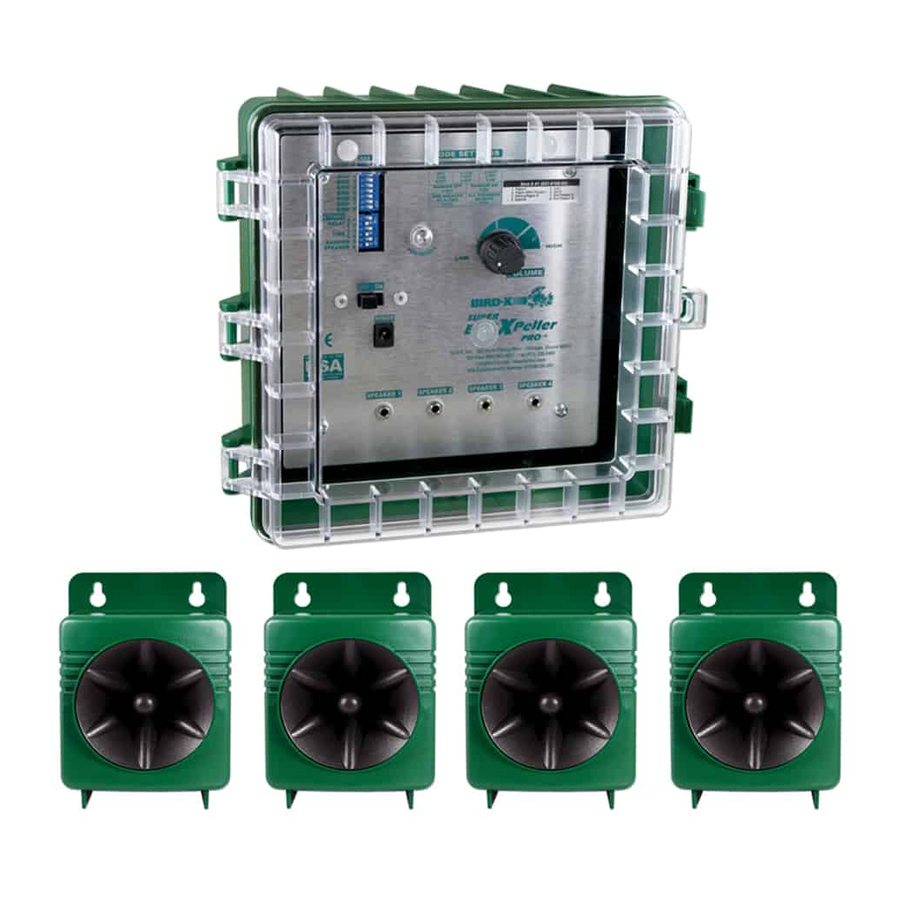
Your complete Super BirdXPeller PRO kit includes a control unit, power adapter, battery cable with clips and four speakers. Open the control unit by lifting the two latches on the side of the enclosure.

Prior to operation, route the speakers and power cables from their respective jacks on the control panel down through the slotted rubber grommet in the lower part of the enclosure, as shown in Figure 1.


Be certain that the power switch is in the OFF position and the volume control is set to the minimum (LOW) volume level (counterclockwise) as shown in Fig. 2 while plugging the speaker and power cords into the control unit.
INSTALLATION
Important safety-related information:
- Do not install the device during rain or snow conditions.
- Installation shall be made in such a way that a power supply and the internal part of the control unit never be subjected to water or snow.
- Note that a power supply powered from 230 VAC is intended for indoor use only.
- Use the mounting hardware (included) to mount the control unit box to a wall, post or other vertical surface.
- Plug the power adapter into an electrical outlet or attach the battery clip assembly to a 12V battery. The other end of the cable should already be plugged into the power jack located below POWER on the front panel of the control unit box. An optional battery cable may be used to connect the control unit to a 12-volt battery. If this is done, first connect the black battery clip to the negative terminal on the battery and then connect the red battery clip to the positive terminal. Both the connection to the electrical outlet (or battery) and the connection of the power cable inside the control unit must be protected from dripping or splashing water. Do not set an object filled with liquids on the control unit.
- It is recommended to mount the speaker(s) on a post or surface that is aimed directly and at the same level as the infested area.
- Set the recording switches, mode setting switches, time-off switches, time of operation switches and random operation switches to the desired settings. (See "PROGRAMMING YOUR BIRDXPELLER" for complete details on how to program your bird repeller).
- Make sure the volume setting is set to LOW (all the way counter-clockwise).
- Slide the power switch to the ON position. The unit may take a few seconds before starting.
- Adjust the volume to the desired level.
- Close the cover and latch shut. Ensure that the cover is properly latched closed and do not open the cover during rain or other conditions that would expose the inside of the control unit to water.
PROGRAMMING YOUR BIRDXPELLER

To program your BIRDXPELLER unit you will need a small screwdriver, toothpick, or other small, rigid object to move the switches in the switch array. The switch array is the switch bank located in the top left corner of the unit (under "PROGRAM"). A switch is ON if the switch is moved to the right-hand side. The switch is OFF if the switch is moves to the left'hand side.
BIRD SETTING SWITCHES

The Bird Setting Switches are the first eight switches in the switch array. Each switch has a recording number to the left 2 TIME 3 of it that corresponds with the bird descriptions listed on the foil label inside the unit.
Super BirdXPeller PRO is designed to play each selected sound at a different randomly selected frequency each time it plays that sound. This feature is designed to add to the effectiveness of the unit and is independent of the Random Operation Switch Setting.
MODE SETTING SWITCHES

The Mode Setting Switches set the various modes of operation: such as the amount of time between playing bird distress calls, when the unit will operate (day only, night only, or 24 hours), whether the unit will operate in the random mode or normal mode, and whether the speakers will operate in sequence or simultaneously.
| Switch | Mode or Function |
| 1 | Sets the Time-Off Period |
| 2 | Sets the Time-Off Period |
| 3 | Sets the Time the unit plays |
| 4 | Sets the Time the unit plays |
| 5 | Turns Random Mode On or Off |
| 6 | Sets Speaker operation sequence |
DELAY SWITCHES

The two "Delay" or Time Off Switches are located just below the Bird switches in the switch array. These switches control the number of seconds or minutes between recorded sounds. The SHORT setting is appropriate for testing, but is NOT recommended for long-term success. Please note that the unit will play, for 48 seconds total, all of the selected recordings (either sequentially or non-sequentially, depending on the Random Mode) then it will go into a delay. The time the unit stays off depends on the Delay and the Random Mode settings. If the unit is operating in Random Mode, the unit will delay anywhere from the minimum value to the maximum value for that Delay setting. If the unit is not in Random Mode, it will delay only the minimum value. To set the Delay period use the following settings on switches 1 and 2 in the Mode Function settings.
| Switch 1 | Switch 2 | Delay Period |
| ON | OFF | Short |
| OFF | ON | Medium |
| ON | ON | Long |
| OFF | OFF | Extra Long |
| Mode | Min | Max |
| Short | 17 sec | 50 sec |
| Medium | 1 min | 4:15 min |
| Long | 5:00 min | 10:00 min |
| XLong | 10 min | 30 min |
TIME OF OPERATION SWITCHES

The two "Time" switches are located just under the Delay switches in the switch array. 'Night Only' operates the unit at night and 'Day Only' operates the unit during the day. However, the photocell that senses the sunlight is susceptible to bright lights. Take care not to have bright lights shining towards the unit since this can prevent the unit from operating properly. In '24-Hour Mode', the unit will operate continuously, regardless of the time of day. To set the Time period for the unit to operate set switches 3 and 4 in the Mode Function settings to the following:
| Switch 3 | Switch 4 | Mode Settings |
| ON | OFF | Day Only |
| OFF | OFF | 24-Hour |
| OFF | ON | Night Only |
RANDOM OPERATION SWITCH

The "Random" switch is the fifth switch in the switch array. When the Random Mode is turned ON, the unit will randomly play the selected recordings in non-sequential order; the Time Off Interval will be a randomly selected period of time within the selected range (Short, Medium, Long, Extra Long); and the speakers will play one at a time in a random pattern (if the Speaker Operation switch is set to one speaker at a time - see below). When the unit is not operating in the Random Mode, it will play the selected recordings in their number order; the Time Off Interval will be the shortest time period within the selected range; and the speakers will play one at a time in a sequence from Speaker 1 to Speaker 4 (assuming the Speaker Operation Switch is set to one speaker at a time).
The Random Mode is recommended to keep birds from adapting to a preset pattern of sounds. To operate the unit in Random Mode, set Switch 5 in Mode Settings as follows:
| Switch 5 | Mode Settings |
| ON | Random mode ON |
| OFF | Random mode OFF |
NOTE: The unit will always play for approximately 48 seconds independent of the number of sounds that are selected.
SPEAKER OPERATION SWITCH
The Speaker Operation switch is the bottom switch in the Mode Settings switch array. When operating this switch, the unit will either broadcast sounds out of one speaker at a time OR out of all speakers at the same time. When selecting one speaker at a time, the unit will play all of the speakers, but one at a time. (If the Random Operation Switch is turned ON, then the speakers will play one at a time in a random order. If the Random Switch is OFF, they will play in a sequential order. To operate the unit for Speaker Operation, set Switch 6 in Mode Settings as follows:
| Switch 6 | Mode |
| OFF | One speaker at a time |
| ON | All speakers at one time |
PROGRAMMING EXAMPLE
Recording Switches: 1, 3, 5 and 6 to "ON" position
Results: Plays Sounds 1, 3, 5 & 6
Mode Switches:
| 1 = "OFF" position | Time Off Interval is set to Medium, every 1 to 4 minutes |
| 2 = "ON" position | |
| 3 = "ON" position | Operates during daylight hours only |
| 4 = "OFF" position | |
| 5 = "ON" position | Sounds in random, non-sequential order |
| 6 = "ON" position | All speakers broadcast simultaneously |
VOLUME CONTROL
The unit has a volume control dial on the front panel of the unit. Turning the dial toward low will result in reduced sound output and rotating the dial toward high will result in an increase in sound output.

Take care when turning the dial since the unit may be in an inactive state when the dial is rotated. It could then reactivate at a very high level of sound which could be painful to your ears.
POWER SWITCH
The power switch enables the unit to operate. Slide the switch to the ON position to start the unit. If you turn the unit OFF, be sure to leave it off for about 30 seconds before turning it back on to allow the electronics to properly reset. To fully disconnect the unit, unplug the power adapter from the electrical outlet or disconnect the battery cable from the 12-volt battery.
TROUBLESHOOTING
| PROBLEM | SOLUTION |
| Unit is on, but no sound is heard |
|
| Unit is on, but plays the same bird over and over, regardless of settings |
|
| Unit is not operating properly in the DAY or NIGHT mode |
|
| Unit does not function properly when connected to a 12 volt battery |
|
300 North Elizabeth Street
Chicago, IL 60607
ph. (312) 226-2473
fax (312) 226-2480
Toll Free US & Canada
800-662-5021
www.bird-x.com
sales@bird-x.com

Documents / Resources
References
Download manual
Here you can download full pdf version of manual, it may contain additional safety instructions, warranty information, FCC rules, etc.
Download Bird-X SUPER BirdXPeller PRO - Digital Bird Repeller Quick Start Guide
Advertisement


Need help?
Do you have a question about the SUPER BirdXPeller PRO and is the answer not in the manual?
Questions and answers