Bang & Olufsen BeoSound 5 - Sound System Manual
- Service manual (82 pages) ,
- User manual (30 pages) ,
- Manual (25 pages)
Advertisement
- 1 Close-up operation
- 2 How to use Beo5 or Beo6
- 3 Two-way communication with Beo6
- 4 How to use Beo4
- 5 Adjust sound settings
- 6 Change language and time zone
- 7 The maintenance menu
- 8 Service settings
- 9 Network setup
- 10 How to make music available
- 11 Create coloured lists and numbered favourites
- 12 MOTS
- 13 The Roles menu
- 14 Change start-up time
- 15 Documents / Resources
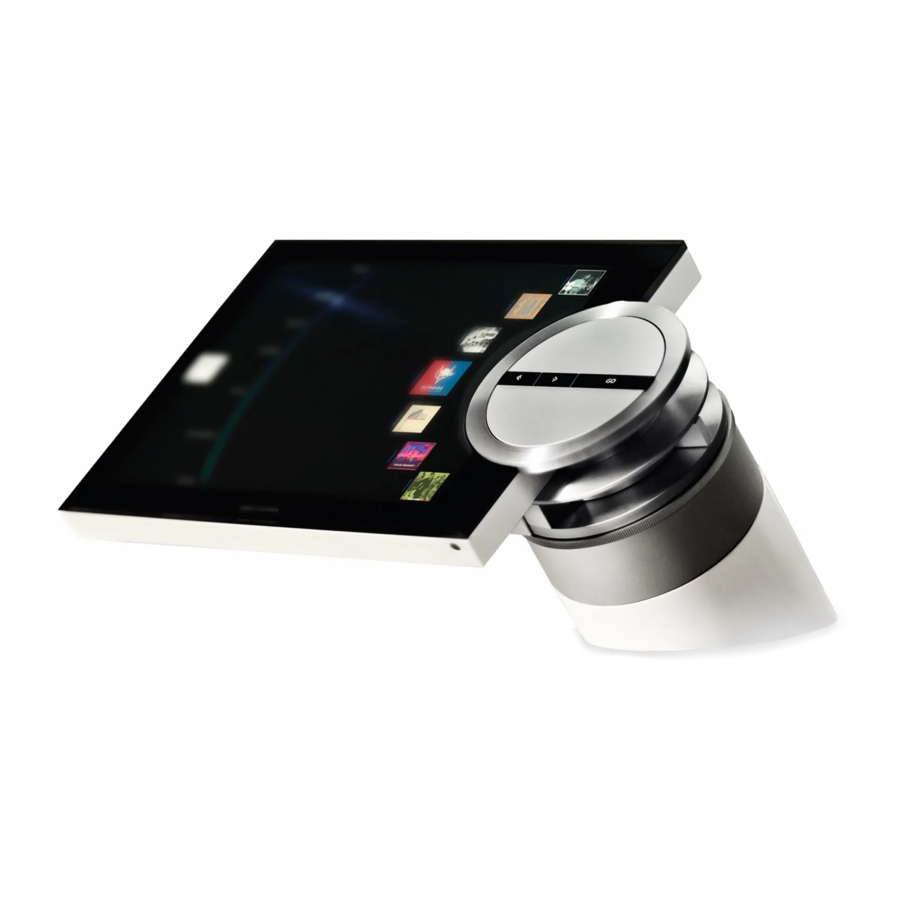
Close-up operation
The music system is designed for close-up operation. You can browse in music and stations and make selections.

Depending on which source you are using and which view you are in, you get different options when you press and hold GO while an item is highlighted.
N.MUSIC
REMOVE...
Remove album, artist or track from views and lists.
ADD TO...
Add item to favourites. If you do not want a specific track to be included in the playlist generated by MOTS, you must add it to the EXCLUDE LIST.
N.RADIO
REMOVE...
Remove station.
ADD TO...
Add station to favourites.
Coloured lists and numbered favourites
REMOVE...
Remove the album, artist, track or station from a list.
CLEAR LIST...
Remove everything from the list in question.
PLAY QUEUE
REMOVE...
Remove the track from the play queue.
CLEAR QUEUE...
Remove everything from the play queue.
ADD TO...
Add item to favourites. If you do not want a specific track to be included in the playlist generated by MOTS, you must add it to the EXCLUDE LIST.
EXCLUDE LIST
REMOVE...
Remove item from the exclude list to include it in MOTS again.
CLEAR LIST...
Remove everything from the exclude list.
RIPPING
While ripping a CD, the tracks appears individually in the ripping list. The ripped tracks can be selected for playback.
RECENTLY ADDED
This list contains all tracks recently added to the internal hard disk. The list is sorted in the order the albums have been added to the hard disk. Tracks added by means of the CD Ripping Device as well as tracks transferred from a connected computer are included in the list.
How to use Beo5 or Beo6
If you use Beo5 or Beo6, it must be configured for use with the music system. Contact your retailer.

| N.MUSIC | Soft button Touch screen to select available sources |
 | Seed playing item for MOTS |
 | Back up through Beo5/Beo6 displays |
 | Bring up scene buttons Press again to return |
| + | Bring up digits to select track or station Press again to return |
| STOP | Press to stop playback |
| PLAY | Start playback |
 | Select coloured list. Press volume wheel next to the colour |
| 1 – 99 | Select numbered favourite |
 | Turn to adjust volume To mute, turn quickly counter-clockwise |
 | Centre button used for selections in menus |
 | Navigation button used for menu operation |
 | Step through tracks or stations |
 | Step in albums |
 | Switch to standby |
Two-way communication with Beo6
When your Beo6 remote control is configured for two-way communication and connected to your wireless network, you can browse the music on your music system with the remote control. You can see what is currently playing and change tracks or add to your play queue.
Your music system must also be connected to your network.
For further information about connecting Beo6 to a wireless network, refer to its own Guide.
When you want to operate BeoSound 5 wirelessly with Beo6, you must wait for Beo6 to connect to the wireless network.
If you place Beo6 in the charger, the playing screen remains on. You can still operate BeoSound 5.
Browse N.MUSIC on Beo6
The cover of the track currently playing is shown on Beo6 and you can browse through your music collection to add tracks to the play queue or to make a new MOTS seed. When you make a new MOTS seed, playback of the track is interrupted as soon as the new MOTS queue is generated.
To browse music...
- Touch the button activating your music source (e.g. N.MUSIC).
To switch on the product, you must be within IR range.
- Choose the button for the sorting you wish to use; ALBUM or ARTIST.
- Choose a letter to bring up a list of Albums or Artist starting with this letter. Albums and Artists are sorted alphabetically.
- Slide your finger across the screen (from top to bottom or vice versa) to move from one screen to the next.
- Press shortly to select.
- Press and hold to bring up options for the chosen item.
To add to the play queue...
- Press and hold the item to bring up the option QUEUE.
- Press the QUEUE button to add the track to the play queue.
To use a track as MOTS seed...
- Press and hold the item to bring up the option MOTS.
- Press the MOTS symbol
![]() to use the track as a MOTS seed.
to use the track as a MOTS seed.
In all lists you can press and hold an item to bring up the screen with options for that item.

The cover from the most recently played track is shown to the left. The cover to the right serves as inspiration for new music.

Press a letter to see the list of Albums or Artists.

To return to the "letter keyboard", press a letter to the left on the screen.

Press the cover on the "Playing" screen to bring up the Play Queue.
How to use Beo4
The music system can also be operated with the Beo4 remote control.
The Beo4 display shows you the activated source or function

| N.MUSIC | Switch on N.MUSIC. Press LIST to bring up N.MUSIC in the display |
| N.RADIO | Switch on N.RADIO. Press LIST to bring up N.RADIO in the display |
| A.AUX | Switch on A.AUX source. Press LIST to bring up A.AUX in the display |
| MOTS | Seed playing item for MOTS. Press LIST to bring up MOTS in the display |
| RADIO | Switch on N.RADIO, if the N.Radio source is configured to this button |
| CD | Switch on N.MUSIC, if the N.Music source is configured to this button |
| A.MEM | Switch on N.MUSIC, if the N.Music source is configured to this button |
| 1 – 9 | Select a numbered favourite to play |
| LIST | Display extra "buttons" for functions or sources in the Beo4 display. Use  or or  to step in the list and press the centre button to accept to step in the list and press the centre button to accept |
 | Centre and navigation button; Accept selections or navigate in the LIST menu |
 | Step through tracks or stations |
 | Step in albums |
 | Select coloured music or radio list |
 | Adjust volume To mute, press the middle of the button |
| STOP | Press to stop playback |
| PLAY | Press to start playback. Press and hold to seed playing item for MOTS |
 | Switch to standby |
Adjust sound settings
Store your preferred sound settings. When you store a sound setting, your system starts playing at this level every time you switch it on.
Sound settings are preset from the factory to neutral values which suit most listening situations.
When you connect BeoLab 5 speakers to the music system, this must be set up in the SPEAKER TYPE menu.
The SOUND menu is not available when your music system is set to Option 0.
Adjust volume, bass or treble
You can preset levels for sound volume, bass, treble and balance. The loudness feature compensates for the human ear's lack of sensitivity to high and low frequencies. These frequencies are boosted at low volume levels so that low music becomes more dynamic.
Make sound settings...
- Use the pointer to highlight MODE.
- Turn the wheel to select SETTINGS and press GO.
- Use the pointer to highlight SOUND.
- Turn the wheel to select the sound element you wish to adjust; VOLUME, BALANCE, BASS, TREBLE, LOUDNESS or SPEAKER TYPE and press GO. The current value is the 'wheel focus' upon entry.
- Turn the wheel to adjust the sound setting and press GO to store.

While adjusting sound, the speakers react according to the adjustment.
Volume 0 mutes the sound. It is not possible to store volume level 0 or volume levels above 75.
If your music system is set to Option 0, the volume display on the music system always shows maximum volume.
Change language and time zone
You can change the display language of your music system at any time.
Once a language is chosen, all menus and display messages are shown in this language.
The music system may restart when you change language.
You must make sure the time zone is set correctly, if your BeoSound 5 is to be part of a Play Timer.
You can change the display language of your music system to your liking.
Change language...
- Use the pointer to highlight MODE.
- Turn the wheel to select SETTINGS and press GO. > Use the pointer to highlight SYSTEM SETTINGS.
- Turn the wheel to select LANGUAGE and press GO.
- Turn the wheel to select the language you want and press GO.
- Use the pointer to leave the menu.
Set the correct time zone...
- Use the pointer to highlight MODE.
- Turn the wheel to select SETTINGS, and press GO. > Use the pointer to highlight SYSTEM SETTINGS.
- Turn the wheel to select TIME ZONE, and press GO.
- Turn the wheel to select the correct time zone, and press GO.
- Use the pointer to leave the menu

You can select your preferred language in the SYSTEM SETTINGS menu. The current display language is shown upon entry, here; ENGLISH.
The maintenance menu
From the menu, you can activate the clean-up function to delete unwanted tracks from the internal hard disk. The clean-up function is only available when the internal hard disk is selected as music storage.
Note that even though you delete items from the internal hard disk, they re-appear if you transfer them to the hard disk again.
You can also update the product software and read about the latest software in your product.
The advanced menu SUBMIT LOGS TO BANG & OLUFSEN collects the products error logs and sends them compressed to Bang & Olufsen over the Internet. These can only be submitted successfully when requested by technician.
Clean-up function
You use the clean-up function to delete tracks, albums or artists permanently from the internal hard disk. To use the clean-up function, you must switch it on while N.Music is active.
Switch clean-up on...
- Use the pointer to highlight MODE.
- Turn the wheel to select SETTINGS, and press GO. > Use the pointer to highlight MAINTENANCE.
- Turn the wheel to select CLEAN-UP, and press GO.
- Turn the wheel to select ON, and press GO.
Now when you highlight an item in any list, for example Artist view for N.Music, you also get the option to delete items, when you press and hold the GO button.
Manual software update
You can choose to update software manually or set the system to update software automatically. The system restarts when you update software.
Update software manually...
- Use the pointer to highlight MODE.
- Turn the wheel to select SETTINGS and press GO. > Use the pointer to highlight MAINTENANCE. > Turn the wheel to select UPDATE SOFTWARE and press GO.
- The display shows the Bang & Olufsen logo and the message: 'Checking for new software - Press GO to cancel' appears.
- When the software update is completed, the message 'Download 100% complete' appears on the display. If no new software is available, the message 'No new software update available' appears on the display.
- Switch the system to standby for the software update to take effect.
NOTE! Updating software manually is a one time operation that does not affect the setting 'AUTOMATIC SOFTWARE UPDATE'.
NOTE! Playback is affected when updating software manually.
Automatic software update
We recommend that you leave the automatic software update setting on.
Automatic software update...
- Use the pointer to highlight MODE.
- Turn the wheel to select SETTINGS and press GO. > Use the pointer to highlight MAINTENANCE.
- Turn the wheel to select AUTOMATIC SOFTWARE UPDATE. Press GO,
- Select YES or NO and press GO to store. The setting is enabled from the factory.
- Use the pointer to leave the menu.
NOTE! We recommend that you do not change the setting 'AUTOMATIC SOFTWARE UPDATE –YES'. If the setting is disabled, the system does not automatically look for new software updates.
Eject disc

If your music system is equipped with the optional CD Ripping Device, you can use this function to eject a loaded disc. This may be useful if you have loaded a disc but decide not to rip it at present.
Eject a loaded disc...
- Use the pointer to highlight MODE.
- Turn the wheel to select SETTINGS, and press GO. > Use the pointer to highlight MAINTENANCE.
- Turn the wheel to select EJECT DISC, and press GO.
For information on how to make settings for the optional CD Ripping Device, see "Service settings".
Service settings
In the SERVICE SETTINGS menu, you can increase the internet radio buffer time and disable the MOTS function.
You can make setting for the optional CD-Rip to decide if ripping should take place automatically and if the CD being ripped should be played automatically while being ripped.
You can also bring up the "hidden" menus to select music storage.
N.RADIO buffer
If the sound seems to drop out when you listen to internet radio, you can optimise reception from a poor internet connection or a poor netradio stream by increasing the buffer time.
- Use the pointer to highlight MODE.
- Turn the wheel to select SETTINGS and press GO. > Use the pointer to highlight SERVICE SETTINGS.
- Turn the wheel to select N.RADIO BUFFER and press GO.
- Turn the wheel to select a buffer length in seconds and press GO.
Note that when the buffer length is increased, the radio start-up time may also increase.
Bang & Olufsen cannot vouch for the quality of net radio stations available from programme providers.
Disable MOTS
The MOTS function automatically uses the last track in your play queue to generate a series of similar tracks. MOTS is enabled from the factory. However, if you only want to listen to music you have actively selected, you can disable the MOTS function.
- Use the pointer to highlight MODE.
- Turn the wheel to select SETTINGS and press GO.
- Use the pointer to highlight SERVICE SETTINGS.
- Turn the wheel to select DISABLE MOTS and press GO.
- Turn the wheel to select YES and press GO.
When MOTS is disabled, music only plays when you have manually added it to the play queue. For more information about MOTS, see "MOTS".
CD Ripping Device start up
The CD Ripping Device is set to start up when you operate the BeoSound 5 close up, either by turning the wheel, moving the lever or pressing one of the buttons. You can change this setting so the CD Ripping Device is always switched on, when the BeoSound 5 is switched on.
- Use the pointer to highlight MODE.
- Turn the wheel to select SETTINGS and press GO.
- Use the pointer to highlight SERVICE SETTINGS.
- Turn the wheel to select CD RIPPING DEVICE and press GO.
- Turn the wheel to select ALWAYS ON and press GO.
With the factory setting 'MANUAL ON', the CD Ripping Device will not switch on if you operate BeoSound 5 with a remote control or from a link room. You must operate the BeoSound 5 close-up to switch the CD Ripping Device on.
Auto-rip
When the optional CD Ripping Device is connected, you can set it up to start ripping automatically when you load an audio CD. When a CD is ripped, meta data are transferred automatically, if available. If no meta data are available, these can be added manually and transferred via a connected computer.
- Use the pointer to highlight MODE.
- Turn the wheel to select SETTINGS and press GO.
- Use the pointer to highlight SERVICE SETTINGS.
- Turn the wheel to select AUTO-RIP and press GO.
- Turn the wheel to select ON and press GO.
If you select OFF, ripping will only start when you confirm it.
CDs are ripped in WMA Lossless format. Only standard CDs with uncompressed content can be ripped.
Auto-play
When you rip an audio CD, you can set the system up to play the CD as soon as it is ripped. The music system will start playing the first track on the CD as soon as it has been ripped.
- Use the pointer to highlight MODE.
- Turn the wheel to select SETTINGS and press GO.
- Use the pointer to highlight SERVICE SETTINGS.
- Turn the wheel to select AUTO-PLAY and press GO.
- Turn the wheel to select ON and press GO.
You can select a different source, album, artist or track at any time while ripping a CD. However, you cannot step in tracks on the CD you are ripping before each track is ripped.
Music storage
If you use a NAS as music storage, you must set up BeoSound 5 for it. From the factory BeoSound 5 is set up for use with the internal hard disk.
- Use the pointer to highlight MODE.
- Turn the wheel to select SETTINGS.
- Press
![]() twice and press GO.
twice and press GO. - Use the pointer to highlight SERVICE SETTINGS.
- Turn the wheel to select MUSIC STORAGE and press GO.
- Turn the wheel to select BeoMaster 5 (internal hard disk) or a connected server and press GO.
 twice and press GO.
 Bang & Olufsen recommends use of specific Network Attached Storage devices, contact your Bang & Olufsen retailer for further information.
Music server
In a setup with, for example, the BeoSound 5 Encore also, you can set the BeoSound 5 up to act as a music server, in order for other devices to access the contents.
- Use the pointer to highlight MODE.
- Turn the wheel to select SETTINGS.
- Press
![]() twice and press GO.
twice and press GO. - Use the pointer to highlight SERVICE SETTINGS.
- Turn the wheel to select MUSIC SERVER and press GO.
- Turn the wheel to select YES and press GO.
When the MUSIC SERVER function is activated, the system will not enter 'suspend' mode and the hard disk does not switch off.
Rebuild music server
This option is only available if the internal hard disk is used as music server. If for some reason the music stored on the internal hard disk does not appear for browsing, you can make a new scan of the music on the internal hard disk.
- Use the pointer to highlight MODE.
- Turn the wheel to select SETTINGS.
- Press
![]() twice and press GO.
twice and press GO. - Use the pointer to highlight SERVICE SETTINGS.
- Turn the wheel to select REBUILD MUSIC SERVER and press GO.
- Turn the wheel to select YES and press GO.
Network setup

The system can be set up in a network either with a wired or a wireless connection. For the most reliable network connection Bang & Olufsen recommends making a wired connection.
Bang & Olufsen also recommends the use of a separate router and access point – a Network Link router – to ensure the most reliable playback of digital music.
Installation and setting-up of the BeoSound should always be made by a Bang & Olufsen installer.
For more information about Bang & Olufsen network setup, contact your retailer.
Network Link router
The BeoSound 5 must be connected to the Network Link router. This can be a wired connected or a wireless connection. When using the internal hard disk we recommend a wired connection. A wireless solution requires a wireless USB network adaptor, which must be purchased separately. Once connected BeoSound 5 can play back music stored on a NAS also connected to the Network Link router.
When using a NAS, music must of course be available on the NAS.
See network information
You can see the settings made for your network connection in the NETWORK INFO menu.
- Use the pointer to highlight MODE on your music system.
- Turn the wheel to select SETTINGS and press GO.
- Use the pointer to highlight NETWORK INFO. You can now see the settings made for your network connection.
For information about changing host name or password, see the next page.
Host name, IP address and client password

In some cases you need information about the host name, IP address and client password of your BeoSound 5 setup, for example, if your router has been disconnected.
The information can be looked up in the NETWORK INFO menu, but if you want to change your password or host name, you must enter the 'advanced' menu; NETWORK SETTINGS. If you change the host name, the system restarts.
To change network settings...
- Use the pointer to highlight MODE.
- Turn the wheel to select SETTINGS.
- Press
![]() twice and press GO.
twice and press GO. - Turn the wheel to select NETWORK SETTINGS and press GO.
- Bring up the setting you wish to change and press GO.
- Follow the instructions on the screen and press GO to store your changes.
 twice and press GO.
 How to make music available

Before you start using your system, you must connect it to the internet and make the music sources you wish to use available. Your music system has multiple sources for your music experience – internet radio, music from a source connected to BeoMaster 5 via line-in (optional accessory required), your BeoMaster 5 or even a Network Attached Storage device (NAS).
Your retailer can help you set up the system and make sources available.
If the internal hard disk is used, music must be transferred to BeoMaster 5 in order to be played. This is done via a PC or MAC using the dedicated BeoConnect software, or via the optional CD Ripping Device.
BeoConnect software
The BeoConnect software must be installed on the computer connected to the BeoMaster 5. Connections and setting up should be made by an authorised Bang & Olufsen installer.
BeoConnect for Windows software can be downloaded here: www.bang-olufsen.com/softwaredownloads
The Guide for BeoConnect for Windows is included with the software but can also be downloaded here: www.bang-olufsen.com/guides
BeoConnect software for MAC can be downloaded here: www.bang-olufsen.com/softwaredownloads
The Guide for BeoConnect for MAC is included with the software but can also be downloaded from the website.
You can also use Windows Media Player to rip your CDs and transfer music to BeoMaster 5, and you can use Windows Explorer to organise, or use iTunes if you like, but BeoConnect must be installed on your computer as it serves as the 'link' to BeoMaster 5. See www.bang-olufsen.com/faq and look up BeoSound 5 for more information.
Play internet radio

To listen to radio, the music system must be connected to the internet and you must register through the BeoConnect software. Refer to the BeoConnect guide for more information.
Activate internet radio...
- Use the pointer to highlight MODE.
- Turn the wheel to select N.RADIO and press GO.
- Select the station you want to listen to and press GO to play.
* If you have renamed N.RADIO to RADIO for easy Beo4 navigation, you must select RADIO instead. For more information, see "Change source names".
There may be a slight delay before the sound appears. The time depends on the internet connection speed, the length of the N.Radio buffer and the performance of the radio station connected. For more information, see "N.Radio buffer".
You can add your favourite radio stations to a favourite list to allow for quick selection. For more information, see "Create coloured lists and numbered favourites".
Play music from N.MUSIC source
Your music system allows you to access your digital music storage on your network. The digital music storage can be either the internal hard disk or a selected range of standard NAS devices.
Your Bang & Olufsen retailer must make the installation for you.
If you switch off the music storage (NAS) you will not be able to play music from the storage. When the storage is switched on again, your music system will automatically reconnect to the music storage.
Activate N.MUSIC...
- Use the pointer to highlight MODE.
- Turn the wheel to select N.MUSIC and press GO*.
- Select the music you want to listen to and press GO to start playback.
* If you have renamed N.MUSIC to CD or A. MEM for easy Beo4 navigation, you must select CD or A.MEM instead. For more information, see "Change source names".
Music storage...
From the factory, your music system is set up to play music from the internal hard disk. However, you can change this to a NAS device, if available and if your system is set up for it. For more information, see "Music storage".
When connecting to a new music storage for the first time, the following applies:
- Your music system requires some time to index the music collection for browsing. For information about file formats, see www.bang-olufsen.com
- MOTS calculation of music on your digital music storage is performed when the music system is in standby. When connecting to a new storage allow for some standby time to do MOTS. The more music files that are stored in the music storage, the longer the calculation takes. The calculation progress can be seen in the QUEUE where the MOTS logo is shown and the completed percentage. Calculation of a large music collection takes days.
In order to access music on your NAS, you must enable UPnP/DLNA on the NAS device. See the guide enclosed with your NAS device.
Bang & Olufsen have tested and verified your music system on several high-end NAS devices. To obtain the best possible performance only the verified NAS devices are recommended. For more information contact your retailer.
Additional music from line-in connection

You can listen to music from an external device on the speakers of your music system.
An USB audio interface is required for the connection. This must be purchased separately. Using a Bluetooth device with BeoSound 5 also requires a Bluetooth receiver connected to the USB audio interface, this is also an optional accessory.
Further options are available for listening to music from external devices, contact your Bang & Olufsen retailer for more information.
This type of connection can only be used when BeoSound 5 AUDIO MASTER setting is YES.
Activate A.AUX source...
- Use the pointer to highlight MODE.
- Turn the wheel to select A.AUX and press GO.
- Now operate the connected device as usual.
Additional music from external device

You can listen to music from an external device, such as a smartphone or a computer, on the speakers of your music system.
The device must be connected to the same network as BeoSound 5 and an application on your device is required to communicate with BeoSound 5. Once communication is established, the 'control' over BeoSound 5 is taken by the external device. This means that if the external device selects BeoSound 5 as output source while you are listening to, for example, N.Radio, N.Radio is interrupted and music from the external device is played instead.
Contact your Bang & Olufsen retailer for more information.
This type of connection can only be used when BeoSound 5 AUDIO MASTER setting is YES.
The music device you connect appears as the source A.AUX on BeoSound 5. The source A.AUX interrupts any other source currently active on BeoSound 5 The source cannot be operated directly on the BeoSound or via remote control, nor can it be activated on BeoSound 5 or via remote control.
Activate A.AUX source...
- Establish 'communication' with BeoSound 5 from your device.
- Now operate the connected device as usual.
Create coloured lists and numbered favourites
You can make your personal playlists. The four colours red, green, yellow and blue are available for playlists. For example, you can let each family member make a list of their own favourite music or radio stations or create lists for specific occasions, for example, holidays or parties.
Assigning a number to a radio station gives you quick access by remote control.
Assigning a number to an N.Music item allows you to use the numbered item as a MOTS seed, not to select it for playback with the number buttons on the remote control.
Coloured lists and numbered favourites apply to the music storage you have selected. If you change the storage device, they are cleared.
Coloured lists
Each of the four coloured lists is a playlist which can contain several tracks, albums, artists or radio stations. When you add to a coloured list, the item is added.
To make a coloured list...
- Find the track, album or station you want to add to a coloured list, then press and hold GO.
- Turn the wheel to select a colour.
- Release GO.
- You can now select the coloured list in the FAVOURITES menu or by pressing the appropriate colour on your Bang & Olufsen remote control.
Four coloured lists are available for each source, i.e. red, green, yellow and blue for the radio source and music source respectively.
Numbered favourites
Each numbered favourite can contain either one radio station or one track. When you assign a new item to a number already in use, it will replace the previous item.
To make a numbered favourite...
- Find the item you want to give a number, then press and hold GO.
- Turn the wheel to select a number. > Release GO.
- You can now select the numbered favourite in the FAVOURITES menu or by pressing the appropriate number on your Bang & Olufsen remote control.
Selecting a numbered favourite for N.RADIO (RADIO) switches to the radio station assigned to this number.
Selecting a numbered favourite for N.MUSIC (A.MEM or CD) means that the track is used for MOTS seed, not that it is played immediately.
MOTS
MOTS allows you to continuously listen to similar music. The MOTS feature measures music similarity on many different parameters such as sound, dynamics and rhythmic aspects, to be able to generate a 'play queue' of similar tracks to be played.
MOTS makes it convenient to find music for a certain situation, or to just start playing. You only need to pick one song, and then MOTS automatically creates a list of similar music.
One source at the time
MOTS uses the music source currently selected to generate a play queue. MOTS uses only one source at the time.
Note MOTS play queues can only be generated from the internal hard disk or a connected NAS.
MOTS calculations
MOTS calculations are based on sound, dynamics, and rhythmic aspects and searches across parameters such as artist, album and genre. MOTS uses the last added track of a play queue to auto-generate a sequence of similar tracks, which is added to the already existing content of the play queue. MOTS is disabled if the only content of the play queue is a coloured list.
MOTS calculations are performed on the music storage while your music system is in standby. When you add a music storage either for the first time or after it has been deactivated, it will require some standby time to complete MOTS calculations.
For information on how to disable and enable the MOTS feature, see "Disable MOTS".

The MOTS logo.
MOTS analysis
When you have transferred all your music to the internal hard disk, the MOTS function needs time to analyse the music collection before it can generate a play queue. As a rule the analysis takes 15 seconds per track.
When a NAS server is used as music storage, the music on the NAS is also analysed.
Analysis only takes place while the system is in standby. Added tracks can therefore only be part of a MOTS queue when the product has been in standby long enough to analyse all tracks.
The Roles menu
You music system can take part in a Timer programmed on an audio or video master in your link setup.
This means that if you activate the function in your music system, the speakers connected to your music system will start playing at the programmed time.
In the ROLES menu, you can change which remote control button should activate the music and radio playback.
From the factory, the N.MUSIC button activates the music playback from BeoMaster 5 (or another music server you have chosen).
The N.RADIO button activates radio from the internet.
On Beo4 both buttons are found in the LIST menu. If you have a Beo4 and use the sources often, we recommend you to change the source names and have the CD or A.MEM button activate the N.MUSIC and the RADIO button activate the N.RADIO source instead.
Activate Play Timer
To use the speakers connected to your music system, you must activate the Play Timer in BeoSound 5. Once activated it remains active until switched off again.
- Use the pointer to highlight MODE.
- Turn the wheel to select SETTINGS and press GO.
- Use the pointer to highlight ROLES.
- Turn the wheel to select PLAY TIMER and press GO.
- Turn the wheel to select ON and press GO.
- Use the pointer to leave the menu.

Contents of the ROLES menu.
The sources available in your music system can also be used as sources of a programmed Timer.
If the Timer uses N.MUSIC as source, playback will start from the red favourite list. Therefore, if nothing is stored in the red list, nothing is played.
If the Timer uses N.RADIO as source, you can select a numbered favourite (channel), if nothing is stored on the selected channel number in your music system, nothing is played.
Remember that if you have changed the name of the BeoSound 5 sources, the new names are the ones to be selected when programming a Timer.
Audio master
The setting in the AUDIO MASTER menu determines if the BeoSound 5 acts as audio master in your setup. The setting affects the "role" the BeoSound 5 has in you setup and which menus are available. For example, you do not get the A.AUX option for a connected source, if the AUDIO MASTER menu is set to NO. Contact your Bang & Olufsen retailer for further information.
- Use the pointer to highlight MODE.
- Turn the wheel to select SETTINGS and press GO.
- Use the pointer to highlight ROLES.
- Turn the wheel to select AUDIO MASTER and press GO.
- Turn the wheel to select the appropriate setting for your setup and press GO to store.
AM Option
When BeoSound 5 is set up as the audio master, Option programming must be made as well
- Use the pointer to highlight MODE.
- Turn the wheel to select SETTINGS and press GO.
- Use the pointer to highlight ROLES.
- Turn the wheel to select AM OPTION and press GO.
- Turn the wheel to select the appropriate Option for your setup and press GO to store.
The music system has five different Option settings:

Option 0.
Used when your music system is connected to your video system and no speakers are connected directly to your music system.

Option 1.
Used when your music system is set up on its own or connected to a video system, when speakers are connected to your music system.

Option 2.
Used when your music system is set up in one room and connected to a video system set up in another room.

Option 5.
Used when your music system is set up in a link room which also comprises a Bang & Olufsen television.

Option 6.
Used when your music system is set up in a link room without a Bang & Olufsen television.
Change source names
For easier access to the N.MUSIC source by remote control, you can set the system to activate the N.MUSIC source via the CD button.
- Use the pointer to highlight MODE.
- Turn the wheel to select SETTINGS and press GO.
- Use the pointer to highlight ROLES. > Turn the wheel to select either CD, A.MEM or N.MUSIC and press GO.
- Make changes for the N.RADIO source as well, if you want.
- Press GO to store.
NOTE! When you change the source name to CD or A.MEM, it is also changed in the display of the music system, and you must replace N.MUSIC, when mentioned in the operation sequences, with CD or A.MEM. Also N.RADIO is replaced by RADIO, if you make a change for this source as well.
Delay
To ensure that a connected television is ready to play music from the music system, a delay can be set. This only applies when the music system is set for Option 0.
- Use the pointer to highlight MODE.
- Turn the wheel to select SETTINGS.
- Press
![]() twice and press GO.
twice and press GO. - Use the pointer to highlight ROLES.
- Turn the wheel to select DELAY and press GO.
- Make settings for the necessary delay.
- Press GO to store.
 twice and press GO.
Change start-up time
If you want to make your music system start up faster, you can shorten the start-up time, however this increases the standby power consumption of the system.
You can shorten the start-up time by changing the setting in the POWER SAVING menu to OFF.
Change default power consumption...
- Use the pointer to highlight MODE.
- Turn the wheel to select SETTINGS.
- Press
![]() twice and press GO.
twice and press GO. - Use the pointer to highlight SYSTEM SETTINGS and press GO.
- Turn the wheel to select POWER SAVING and press GO.
- Turn the wheel to select AUTOMATIC or OFF and press GO.
- Use the pointer to leave the menu.
 twice and press GO.
 The SYSTEM SETTINGS menu also contains a DEBUG LOGGING menu. The setting in this menu should only be changed when requested by a technician.

You can change the standby power consumption in the SYSTEM SETTINGS menu. The current setting is shown upon entry, here; AUTOMATIC.

Documents / Resources
References
Download manual
Here you can download full pdf version of manual, it may contain additional safety instructions, warranty information, FCC rules, etc.
Advertisement


Need help?
Do you have a question about the BeoSound 5 and is the answer not in the manual?
Questions and answers