Bang & Olufsen BeoLab 18 - Speakers Manual
- Important safety instructions manual (24 pages) ,
- Service manual (66 pages)
Advertisement
Important safety instructions


To reduce the risk of fire or electric shock, do not expose this appliance to rain or moisture.
The product can only be switched off completely by disconnecting it from the mains sockets. The mains sockets must always be accessible.
 The lightning flash with arrowhead symbol within an equilateral triangle, is intended to alert the user to the presence of un insulated "dangerous voltage" within the product's enclosure that may be of sufficient magnitude to constitute a risk of electric shock to persons.
 The exclamation point within an equilateral triangle is intended to alert the user to the presence of important operating and main tenance (servicing) instructions in the literature accompanying the product.

To prevent electric shock hazard, do not connect to mains power supply while grille is removed.
For the Chinese market only!
Read these instructions.
Keep these instructions.
Heed all warnings.
Follow all instructions.
Do not use this apparatus near water.
Clean only with dry cloth. Do not block any ventilation openings. Install in accordance with the manufacturer's instructions.
Do not install near any heat sources such as radiators, heat registers, stoves, or other apparatus (including amplifiers) that produce heat.
Do not defeat the safety purpose of the polarized or grounding-type plug. A polarized plug has two blades with one wider than the other. A grounding type plug has two blades and a third grounding prong. The wide blade or the third prong are provided for your safety. If the provided plug does not fit into your outlet, consult an electrician for replacement of the obsolete outlet.
Protect the power cord from being walked on or pinched particularly at plugs, convenience receptacles, and the point where they exit from the apparatus.

Only use attachments/accessories specified by the manufacturer.
Use only with the cart, stand, tripod, bracket, or table specified by the manufacturer, or sold with the apparatus. When a cart is used, use caution when moving the cart/apparatus combination to avoid injury from tip-over.
Unplug this apparatus during lightning storms or when unused for long periods of time.
Refer all servicing to qualified service personnel.
Servicing is required when the apparatus has been damaged in any way, such as power-supply cord or plug is damaged, liquid has been spilled or objects have fallen into the apparatus, the apparatus has been exposed to rain or moisture, does not operate normally, or has been dropped. www.bang-olufsen.com
Cautions
- No naked flame sources, such as lighted candles should be placed on the product.
![]()

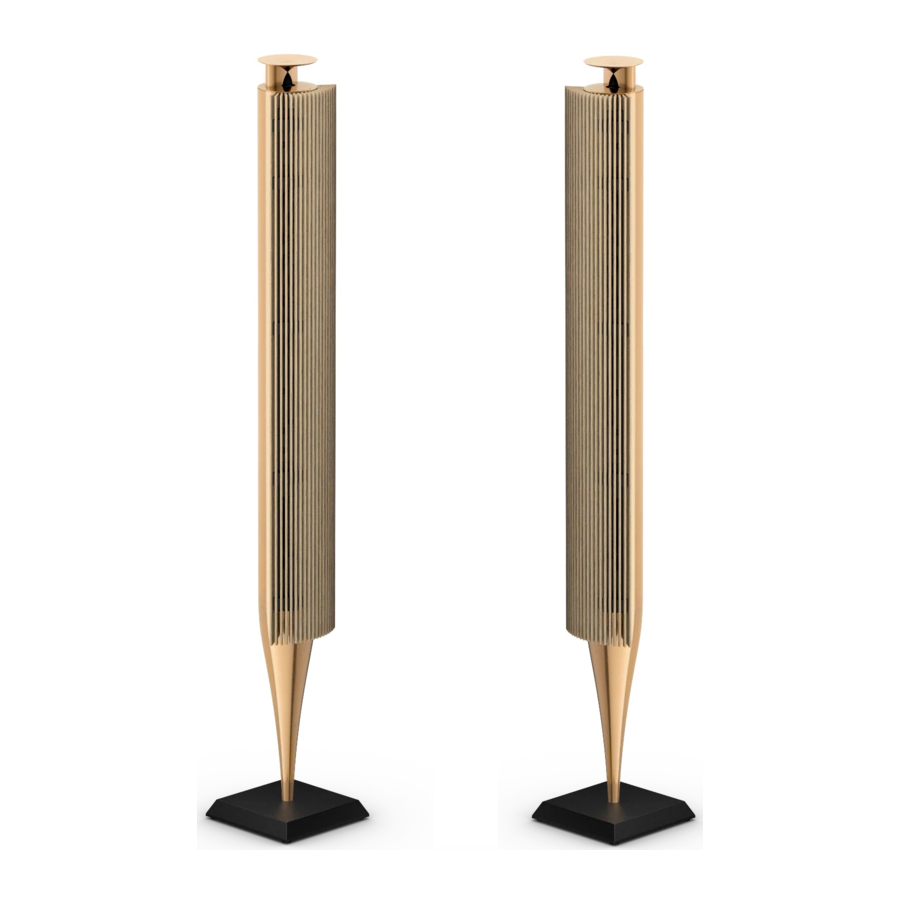
Set Up Your Device
Set up your BeoLab 18 speakers wirelessly or with cables. Ensure that the speakers are positioned, set up and connected in accordance with the instructions in this guide and the guides enclosed with any accessories. You may also contact your retailer regarding installation. Bases and brackets are available as optional accessories.
- When handling your speaker make sure to place it on a soft cloth or the like to avoid making marks on the speaker.

- To lift the speaker grip at the top and bottom of the aluminium back part, as illustrated.

- Cable(s) must be inserted from back of the speaker, as illustrated.

- Set up your audio/video product wirelessly with a pair of BeoLab 18 speakers or make a wireless surround sound system. See the guide enclosed with your wireless transmitter, for example BeoLab Transmitter 1, for information about how to connect the wireless transmitter, your audio/video product and your speakers.
RESET: Press and hold the button for two seconds to reset the wireless setting of a wireless speaker. The status indicator is solid red for 10 seconds, then it flashes green quickly. The speaker is now in associate mode and ready to be connected to the wireless transmitter. If you press and hold the button for 10 seconds the speaker is reset to factory settings.

- If you choose a cabled setup, you can use Power Link, Toslink TM or line cables for connection between your speakers and your audio/video product. If you use TosLink cables, you must make a daisy chain setup as illustrated. This is also possible with Power Link cables. Be aware that TosLink cables should not be bent more than a radius of 30 mm, since this can cause disturbances in the sound performance.


- Examples of connections. Run cables according to the instructions enclosed with your bases or brackets. Note that all inputs must be volume regulated.
The socket marked SERVICE is for service use only.


- Set the position switch (POS.) according to whether your speaker is placed close to a wall, a corner or in a free standing position. The wall position is measured 15 cm from the closest edge of the speaker to the wall.

- If you have a wired setup, set the role switch (ROLE) according to whether your speaker is placed to the left (L) or the right (R) of your audio/video product. If you have a wireless setup always set the role switch to wireless (WL).

- Place the connection cover and push the lower corners inside the connection panel to keep it in place (9a). Mount the front cover (9b) and fasten the two side covers (9c), when your speaker is mounted on the optional base or bracket.


- Product status and wireless indicator:
![]()


- Red (solid): The indicator is solid red for some seconds when the speaker is connected to the mains, switches off, or when it restarts after it has been reset.
- Green (solid): The indicator is solid green for some seconds when the speaker switches on, then it dims.
- Green (flashing): A software update is in progress, during which the speaker cannot play. Do not disconnect from the mains.
- Green (flashing quickly): If you have a wireless transmitter in your setup, the speaker is in associate mode and ready to be connected to the wireless transmitter.
- Orange (solid): The signal strength for a wireless connection is low.
- Orange (flashing slowly): The product is overheated and will shut down temporarily.
- Orange (flashing quickly): An error has occurred. Disconnect the speaker from the mains and reconnect it again. If the problem persists, contact your Bang & Olufsen retailer.
Cleaning
Wipe dust off the surfaces using a dry, soft cloth. If necessary, remove stains or dirt with a soft, damp cloth and a solution of water and mild detergent such as washing-up liquid.
Never use alcohol or other solvents to clean any part of the speaker!
![]()
Avoid placing the product in direct sunlight or direct artificial light, such as a spotlight.


Documents / Resources
References
Download manual
Here you can download full pdf version of manual, it may contain additional safety instructions, warranty information, FCC rules, etc.
Advertisement


Need help?
Do you have a question about the BeoLab 18 and is the answer not in the manual?
Questions and answers