Table of Contents
Advertisement
Quick Links
Advertisement
Table of Contents

Related Manuals for Electrolux LIT604


Summary of Contents for Electrolux LIT604
- Page 1 User Manual LIT604 electrolux.com/register...
-
Page 2: Table Of Contents
WE’RE THINKING OF YOU Thank you for purchasing an Electrolux appliance. You’ve chosen a product that brings with it decades of professional experience and innovation. Ingenious and stylish, it has been designed with you in mind. So whenever you use it, you can be safe in the knowledge that you’ll get great results every time. - Page 3 installation or usage. Always keep the instructions in a safe and accessible location for future reference. 1.1 Children and vulnerable people safety This appliance can be used by children aged from 8 years • and above and persons with reduced physical, sensory or mental capabilities or lack of experience and knowledge if they have been given supervision or instruction concerning the use of the appliance in a safe way and understand the...
- Page 4 WARNING: Unattended cooking on a hob with fat or oil can • be dangerous and may result in fire. Never use water to extinguish the cooking fire. Switch off • the appliance and cover flames with e.g. a fire blanket or lid. WARNING: The appliance must not be supplied through an •...
-
Page 5: Safety Instructions
2. SAFETY INSTRUCTIONS 2.1 Installation • Before carrying out any operation make sure that the appliance is disconnected from the power supply. WARNING! • Make sure that the parameters on the Only a qualified person must rating plate are compatible with the install this appliance. - Page 6 2.3 Use • Do not put a hot pan cover on the glass surface of the hob. • Do not let cookware boil dry. WARNING! • Be careful not to let objects or cookware Risk of injury, burns and electric fall on the appliance.
-
Page 7: Installation
• Disconnect the appliance from the mains • Cut off the mains electrical cable close to supply. the appliance and dispose of it. 3. INSTALLATION WARNING! Refer to Safety chapters. 3.1 Before the installation Before you install the hob, write down the information below from the rating plate. -
Page 8: Product Description
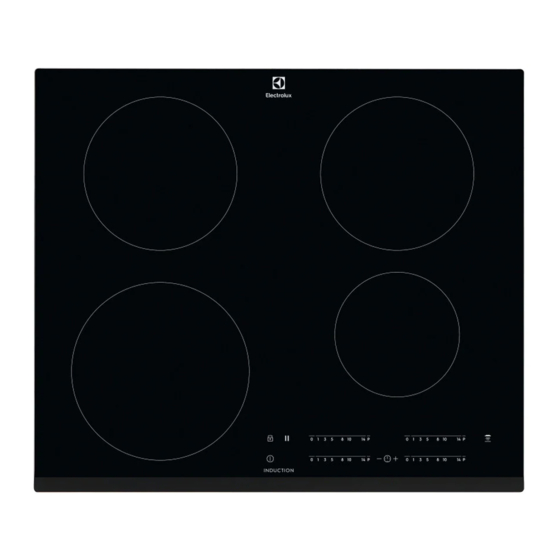
Combination with double oven A = min. 12 mm, for double ovens from other brands. Find the video tutorial "How to install your Electrolux Induction Hob - Worktop installation" by typing out the full name indicated in the graphic below. www.youtube.com/electrolux www.youtube.com/aeg... - Page 9 Sensor Function Comment field ON / OFF To activate and deactivate the hob. Lock / Child Safety Device To lock / unlock the control panel. Pause To activate and deactivate the function. Heat setting display To show the heat setting. Timer indicators of cooking zones To show for which zone you set the time.
-
Page 10: Daily Use
4.4 OptiHeat Control (3 step the residual heat for the cooking zones you are currently using. Residual heat indicator) The indicator may also appear: WARNING! • for the neighbouring cooking zones even if you are not using them, As long as the •... - Page 11 To deactivate the function: touch to set To activate the function the cooking zone must be cold. the cooking zone and then touch . The remaining time counts down to 00. The To activate the function for a cooking indicator of the cooking zone disappears. zone: touch comes on).
- Page 12 5.7 Pause operate the hob. When you deactivate the hob with the function operates again. This function sets all cooking zones that operate to the lowest heat setting. 5.10 OffSound Control When the function operates, all other (Deactivating and activating the symbols on the control panels are locked.
- Page 13 zone selected last. The cooking zones will continue operating with the reduced heat Automat‐ Boiling 1) Frying 2) setting. Change the heat settings of the ic light cooking zones manually, if necessary. Refer to the illustration for possible Mode H1 combinations in which power can be Mode Fan speed...
-
Page 14: Hints And Tips
function and allows you to change the fan Activating the light You can set the hob to activate the light speed manually. When you press automatically whenever you activate the hob. raise the fan speed by one. When you reach To do so set the automatic mode to H1 –... - Page 15 time depends on the heat setting level and linear. When you increase the heat setting, it the length of the cooking operation. is not proportional to the increase of the consumption of power. It means that a 6.4 Examples of cooking cooking zone with the medium heat setting applications uses less than a half of its power.
-
Page 16: Care And Cleaning
The Electrolux cooker hoods that Other remotely controlled work with this function must have the symbol appliances may block the signal. Do not use any such appliances near to the hob while Hob²Hood is on. Cooker hoods with the Hob²Hood function... - Page 17 Problem Possible cause Remedy You touched 2 or more sensor fields Touch only one sensor field. at the same time. Pause operates. Refer to "Daily use". There is water or fat stains on the Clean the control panel. control panel. An acoustic signal sounds and You put something on one or more Remove the object from the sensor...
-
Page 18: Technical Data
Centres are in the guarantee booklet. corner of the glass surface) and an error 9. TECHNICAL DATA 9.1 Rating plate Model LIT604 PNC 949 596 745 01 Typ 61 B4A 00 AA 220 - 240 V / 400 V 2N 50 - 60 Hz Induction 7.35 kW... -
Page 19: Energy Efficiency
10. ENERGY EFFICIENCY 10.1 Product Information Sheet according to UK Ecodesign Regulation Model identification LIT604 Type of hob Built-In Hob Number of cooking zones Heating technology Induction Diameter of circular cooking zones (Ø) Left front 21.0 cm Left rear 18.0 cm Right front 14.5 cm... - Page 20 electrolux.com...
Need help?
Do you have a question about the LIT604 and is the answer not in the manual?
Questions and answers