DIGOO DG-TH3330 - 3 Channels In&Out Hygro-Thermometer Quick Start Manual
- Quick start manual (2 pages)
Advertisement
- 1 Monitor Front
- 2 Monitor Back
- 3 Outdoor Sensor
- 4 Important Placement Guidelines
- 5 Care of the Device
- 6 Setup Procedure
- 7 Troubleshooting
- 8 Mounting
- 9 Calendar and Clock Setup
- 10 Setting Alarm Time
- 11 Maximum and Minimum Memory
- 12 °C/°F Switchable
- 13 Backlight
- 14 Product Specifications
- 15 Documents / Resources
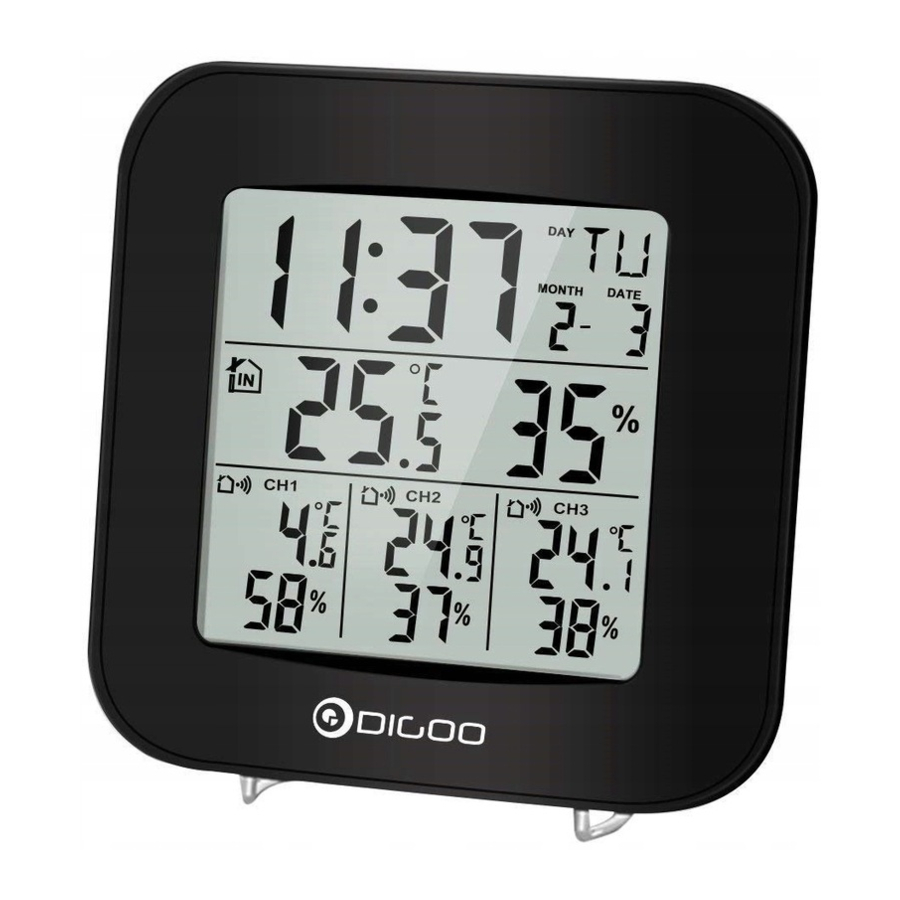
Monitor Front

- Time
- Indoor Temperature
- Channel 1 Outdoor Temperature and Humidity
- Channel 2 Outdoor Temperature and Humidity
- Channel 3 Outdoor Temperature and Humidity
- Indoor Relative Humidity
- Date
Monitor Back

- SET Button
- ALARM Button
- UP / MEM Button
- DOWN / CF Button
- CH Button
- SNZ/LIGHT Button
Outdoor Sensor

- TX Button
- Channel 1, 2, 3 Slide Switch
- Transmission Indication LED
Important Placement Guidelines
- To ensure accurate temperature measurement, place units out of direct sunlight and away from any heat sources or vents.
- Display unit and outdoor sensor must be within 99ft(30m) of each other.
- To maximize wireless range, place units away from large metallic items, thick walls, metal surfaces, or other objects that may limit wireless communication.
- To prevent wireless interference, place both units at least 3ft(.9 m) away from electronic devices(TV, computer, microwave, radio, etc.)


Care of the Device
- Avoid exposing units to extreme temperatures or severe shock.
- Avoid contact with any corrosive materials such as perfume, alcohol or cleaning agents.
- Do not subject the units to excessive force, shock, dust, temperature or humidity. Any of these conditions may shorten the life of the units.
- Do no tamper with any of the internal components of these units. This will invalidate the warranty and may cause damage.
- Damage caused by failure to comply with this instruction manual will invalidate any warranty. The manufacturer and supplier will not be held liable for any damages due to failure to comply with this instruction manual.
- In case of harm or damage to a person or property caused by improper handling or failure to comply with this instruction manual, the manufacturer and supplier cannot be held liable.
- This product is not to be used for medical purpose or for public information.
Correct Usage of Batteries
- Do not mix standard and rechargeable batteries.
- Do not mix new and old batteries.
- When the low battery symbol
![]() appears on the display replace all batteries with new ones.
appears on the display replace all batteries with new ones. - Do not leave discharged batteries in the device as these may corrode and release chemicals that may damage the unit.
 appears on the display replace all batteries with new ones.
Setup Procedure
- Remove the battery cover from the remote sensors.
- Remove the battery cover from the monitor and insert 2 x AAA batteries according to the correct polarity.
- Move the CH slide switch on the back of the remote sensor to the correct channel (1, 2 or 3). Next insert 2 x AA batteries into the sensor.
- The transmission indication LED will flash on the remote sensor indicating that the signal has been sent to the monitor. Once the signal is received, the dashes (--.-°C) on the monitor for channel 1, 2 or 3 will change to the current outdoor temperature.
- Once the monitor receives the signal from the first sensor, follow steps 3 and 4 above to connect the other 2 remote sensors with the monitor.
- If after 3 minutes the screen does not change to show the outdoor temperature, press the CH button on the monitor to select the channel you would like to reset, CH1, CH2 or CH3 will flash
- Press and hold the CH button to select it. The monitor will now attempt to search for the signal for another 3 minutes. Press the TX button on the back of the remote sensor to force the sensor to send out another transmission signal to the monitor.
- Place the monitor and remote sensors within effective transmission range, which in usual circumstances is 50 metres (164 feet). The range is affected by the building materials and where the monitor and remote sensor are positioned; try various locations for the best results.
NOTE: The remote sensors can be placed outdoors or inside your home in different rooms. The remote sensor should be placed in a shaded area for accurate readings.
Troubleshooting
If the outdoor temperature cannot be received, check:
- The distance between the monitor or remote sensor should be at least 1.2 metres (4 feet) away from any interfering sources such as computer monitors or TV sets.
- Avoid placing the monitor onto or in the immediate proximity of metal window frames
- Using other electrical products such as headphones or speakers operating on the same frequency (433MHz) may prevent correct signal transmission and reception.
- Neighbours using electrical devices operating on the 433MHz signal frequency can also cause interference.
- Signals from other household devices, such as door bells and home security systems, may temporarily interfere with the units and cause reception failure. The transmission and reception of temperature reading will resume once the interference has stopped.
The maximum transmission range is 50 metres (164 feet) from the remote sensor to the monitor (in open space). However, this depends on the surrounding environment and interference levels. The temperature signal travels in a straight line from the remote sensor to the monitor. The signal will not curve around an object. If no reception is possible despite the observation of these factors, all units will have to be reset.
Mounting

Great care must be taken when mounting the components. The manufacturer/ supplier cannot be held liable for personal or property damage when setting up the components. Please use caution when choosing a mounting point.
Prior to drilling mounting holes and permanently affixing any of the units, please ensure the following points are considered:
- Signal from the remote sensor can be received by the monitor at mounting point.
- Make sure the remote sensor is easily accessible. You will have to periodically replace batteries.
Monitor
The monitor can be placed on any flat surface.
Optimum Viewing Angle
You must always keep in mind that the LCD screen is constructed with an "optimum viewing angle". Your eye should be at a 45° angle to view the LCD screen clearly.

Installing the Remote Sensor
To prevent temperature interference, place the remote sensor away from direct sunlight, air conditioning, and heater vents. The remote sensor is designed to be splash proof; never immerse into water or expose to heavy rain.
NOTE: The temperature signal travels in a straight line from the remote sensor to the monitor. The signal will not curve around an object. Please take this into consideration when mounting the remote sensor.

The remote sensor can be placed on any surface or mounted on a wall.
Calendar and Clock Setup
- Press the SET button. The year digit will begin to flash
- Press the UP or DOWN button to toggle to the correct year.
- Press the SET button to confirm
- The month digit will begin to flash. Follow steps 2 and 3 to set the correct month, date, hour, minutes and 12/24 hour format.
Setting Alarm Time
- Press the ALARM button once to enter alarm mode.
![]() will be displayed between the hour and minute digits.
will be displayed between the hour and minute digits. - Press the ALARM button again to activate or deactivate the alarm. When the alarm is activated
![]() will be displayed between the hour and minute digits.
will be displayed between the hour and minute digits. - Press and hold the ALARM button. The hour digit will begin to flash
- Press the UP or DOWN button to set the hour.
- Press the ALARM button to confirm. The minute digits will begin to flash
- Press the UP or DOWN button to set the minutes.
- Press the ALARM button to confirm. The clock will automatically return to regular mode.
- When the alarm sounds press the SZN/LIGHT button, the alarm will sound again in approximately 5 minutes. To turn off the alarm firmly press any other button, when alarm sounds.
Maximum and Minimum Memory
- Press the UP/MEM button once to display the maximum readings. Press the UP/MEM button again to display the minimum readings.
- To clear the memory, press and hold the UP/MEM button when the max or min readings are displayed. This will reset the memory to the current temperature and humidity readings being displayed on the monitor.
NOTE: All the maximum and minimum readings will be reset automatically at 12:00am (0:00) everyday.
°C/°F Switchable
The default measurement for temperature is °C, press the DOWN/CF button to toggle between °C and °F.
Backlight
Press the SNZ/LIGHT button to turn the blue backlight on for a few seconds.
Product Specifications
| Temperature Measuring Range | |
| Monitor | 0°C to 50°C with 0.1°C resolution 32°F to 122°F with 0.2°F resolution |
| When temperature is above 50°C (122°F) monitor will display HI When temperature is below 0°C (32°F) monitor will display LO | |
| Remote Sensor | -40°C to 70°C with 0.1°C resolution -40°F to 158°F with 0.2°F resolution |
| When temperature is above 70°C (158°F) monitor will display HI When temperature is below -40°C (-40°F) monitor will display LO | |
| Accuracy | +/- 2°C (+/- 4°F) |
| Humidity Measuring Range | |
| Monitor | 20% - 95% RH |
| Remote Sensors | 20% - 95% RH |
| Accuracy | +/- 5% RH (at 25°C/77°F, between 30% RH and 80% RH) +/- 8% RH (at 25°C/77°F, between 20% RH and 29% RH, 80% RH and 95% RH) |
| Temperature & Humidity Checking Interval | |
| Monitor | 1 minute |
| Remote Sensor | 1 minute |
| Power Source | |
| Monitor | 2 x AAA batteries, 1.5V |
| Remote Sensors | 6 x AA batteries, 1.5V (using lithium batteries during the cold months is recommended) |
Documents / ResourcesDownload manual
Here you can download full pdf version of manual, it may contain additional safety instructions, warranty information, FCC rules, etc.
Download DIGOO DG-TH3330 - 3 Channels In&Out Hygro-Thermometer Quick Start Manual
Advertisement


Need help?
Do you have a question about the DG-TH3330 and is the answer not in the manual?
Questions and answers