Advertisement
Important Safety Instructions

Read all safety warnings, instructions, illustrations and specifications provided with this device.
General Safety


When using the device, basic safety precautions should always be followed. Failure to follow all instructions listed below may result in electric shock, fire and/or serious injury.
- Work area – Keep your work area clean and well lit.
- Device condition – Keep the device dry, clean and free from oil and grease.
- Explosion hazard – Do not operate the device in explosive atmospheres, such as in the presence of flammable liquids, gases or dust.
- Bystanders – All bystanders, children and pets should be kept a safe distance away from the work area.
- Stay alert – Remain alert at all time, use common sense and do not operate the device when tired, or under the influence of drugs or alcohol.
- Dress properly – Do not wear loose clothing or jewelry. They can get caught in moving parts. Non-slip footwear are recommended when working outdoors.
- Do not overreach – Keep proper footing and balance at all times.
- Usage – Do not use this device for any use case exept for which it was intended.
- ON/OFF – Do not attempt use the device if it fails to turn on or off
- Storage – When idle, store out of the reach of children and do not allow persons unfamiliar with the device or these instructions to operate it.
- Accessories – Use the device and any accessories in accordance with these instructions, taking into account the working conditions and the work to be performed
Electrical and Battery Safety
Do not expose the device to rain or wet conditions. Water entering the unit may damage the device and increase the risk of electric shock.

Recharge only with the charging cable specified by the manufacturer
- Do not abuse the cable – Never carry the device by the cable or yank the cable to disconnect it from the outlet. Keep the cable away from heat, oil, and sharp edges.
- Charging – Do not leave the device unattended when it is plugged into an electrical outlet. Turn off the device, and unplug it before leaving.

Under abusive conditions, liquid may be ejected from the battery; avoid contact. If contact accidentally occurs, flush with water. If liquid contacts eyes, seek additional medical help. Liquid ejected from the battery may cause irritation or burns.
Do not use the device if damaged or modified. A damaged or modified device may exhibit unpredictable behavior resulting in fire, explosion or risk of injury.
Do not expose the device to fire or excessive temperatures. Exposure to fire or high temperatures may cause an explosion.
NOTE: Follow all charging instructions and do not charge the device outside the temperature range of 41°F – 105ºF (5°C – 40.5°C). Do not charge the battery outside in freezing weather; charge it at room temperature.
Do not touch the inflator or its charging cords with wet hands.
To reduce the risk of burns, do not open, crush, heat above 122°F (50°C) or incinerate.
Safety Symbols
The following table depicts and describes safety symbols that may appear on this product. Read, understand, and follow all instructions on the machine before attempting to assemble and operate.
| Symbols | Descriptions | Symbols | Descriptions |
 | READ THE OPERATOR'S MANUAL Read, understand, and follow all instructions in the user manual before attempting to assemble and operate. |  | SAFETY ALERT – Indicates a precaution, a warning, or a danger. |
 | Do not expose the unit to rain or wet conditions. Keep dry. |  | RISK OF BURSTING – Do not operate inflator to result in output pressure greater than marked maximum pressure of attachment. Do not use at pressure greater than 140 PSI. |
 | Do not direct air stream at persons or pets. |  | Do not expose the unit to rain or wet conditions. Keep dry. |
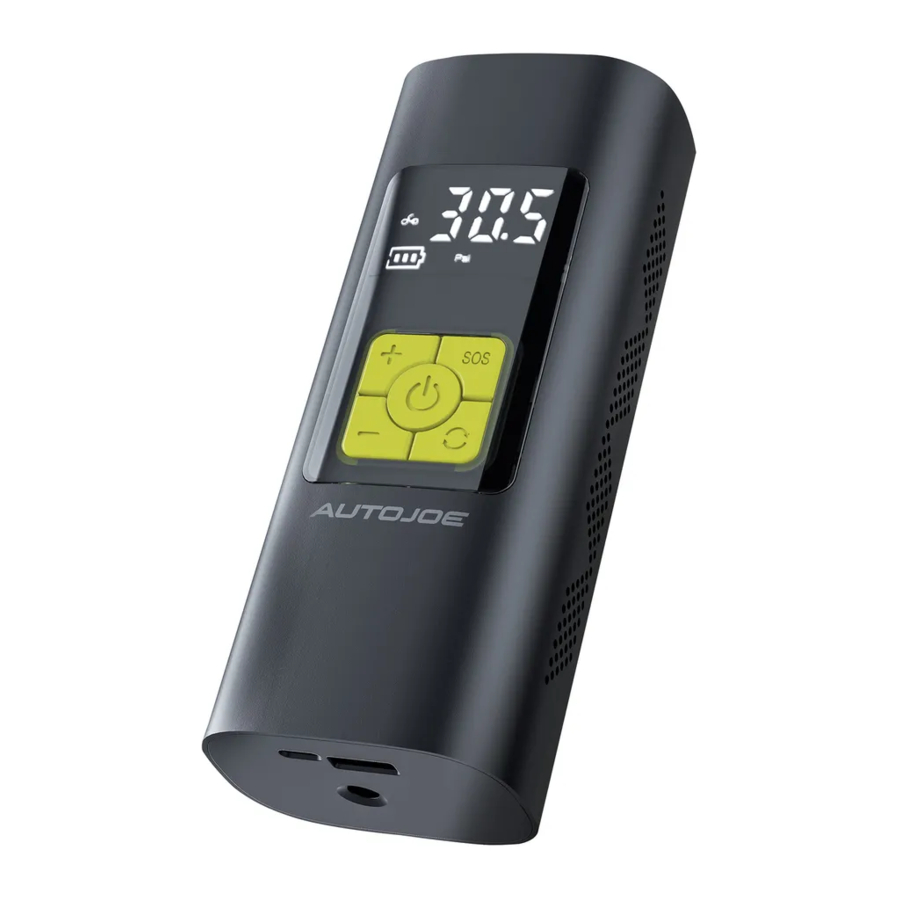
Know Your Device
Read the owner's manual and safety rules carefully before using your Cordless Digital Inflator.
Compare the illustration below to the actual unit in order to familiarize yourself with the location of the various controls and attachments. Save this manual for future reference.

- LED light
- Air outlet
- Barrel jack
- USB-C port
- USB-A port
- PSI volume buttons
- Tapered nozzle
- Short tapered nozzle
- Sports ball needle
- Presta valve adapter
- Barrel plug
- USB-C plug
- Air hose
- Air chuck
- USB-A plug
- 12V DC plug
- Mode button
- Power button
- LED button
- LCD display
- Inflator
- Storage bag
Technical Data
| Pump | 40 W | |
| Battery Capacity | 2000 mAh | |
| Input | 5V DC | 2A USB-C 12V DC plug | |
| Output | 5V DC | 2A | 4Ah USB-A | |
| Inflation Pressure Max.* | 140 PSI | |
| Working Pressure | 60 PSI | |
| Duty Cycleɫ | 10 min | |
| Inflation Rate | 0.4 CFM (10 L/min) | |
| Net Weight | 1.3 lbs (0.6 kg) | |
*The device will automatically turn off after 15 minutes due to overheating.
ɫDo not operate for more than 10 minutes at a time, after which it must be switched off and allowed to cool down for at least 15 minutes before restarting.
Unpacking
Carton Contents
- Inflator
- Air hose
- Tapered nozzle
- Short tapered nozzle
- Sports ball needle
- Presta valve adapter
- Storage bag
- 12V DC plug
- USB-A to USB-C cable
- Manual and registration card
- Carefully remove the inflator and check to see that all of the above items are supplied.
- Inspect the product carefully to make sure no breakage or damage occurred during shipping. If you find damaged or missing parts, DO NOT return the unit to the store. Please call the Snow Joe + Sun Joe customer service center at 1-866-SNOWJOE (1-866-766-9563).
NOTE: Do not discard the shipping carton and packaging material until you are ready to use your new cordless digital inflator. The packaging is made of recyclable materials. Properly dispose of these materials in accordance with local regulations.

The equipment and packaging material are not toys. Do not let children play with plastic bags, foils, or small parts. These items can be swallowed and pose a suffocation risk!
Charging over USB
NOTE: This power station should be fully charged before use or storage. Check the battery level indicator for the remaining charge in the battery.
Using the included USB-A to USB-C cable, plug the smaller USB-C connector into the corresponding USB-C port of inflator. Then plug the other end of the cable (USB-A) into a USB port on your vehicle, or alternatively into a USB adapter (not included) for charging at an electrical outlet (Fig. 1).

NOTE: To maximize charging speed, use a USB adapter rated at 10W or higher.
NOTE: You may also use other USB ports such as those on computers, wall outlets and power banks to charge your inflator.
Power over 12V DC
NOTE: The 12V DC auto power cable only provides working power to the device and does not charge the internal battery. To charge the battery use the USB-A to USB-C cable instead.
Using the included 12V DC auto power cable, plug the barrel plug into the barrel jack of the inflator. Then plug the 12V DC plug into the 12V DC socket of your vehicle (Fig. 2).

Battery Level Indicator
The battery level indicator can be found on the LCD display, which will illuminate and indicate the charge level when the unit is being used, and when the unit is being charged.
- The three bars on the indicator corresponds to low, medium and high.
- The three bars will cycle on from left to right while charging.
- Once the battery is fully charged, the three bars will remain static at which point unplug the USB-A to USB-C cable from the inflator.
NOTE: Timely recharging of the tool will help prolong its battery life.
The chargers do not automatically turn off when the battery is fully charged. Please take care not to leave the inflator plugged in. Unplug the charging cables when charging is complete.
Never allow the tool to become fully discharged as this will degrade the battery life over time.
Continued and excessive overuse of the ON/OFF button can permanently damage the lithium-ion battery.
- During the charging procedure, the inflator will feel slightly warm to the touch. This is normal.
- When no further use is planned for an extended period of time, disconnect the charging cable from the unit and the electrical outlet/12V DC socket.
- Do not use the device while charging.
Battery Charging Tips
To obtain the longest possible battery life, we suggest the following:
- Store and charge your inflator in a cool area. Temperatures above or below normal room temperature will shorten battery life.
- Never store the inflator with the battery in a discharged condition. Recharge the unit immediately after it is discharged.
- All batteries gradually lose their charge. The higher the temperature is, the faster they lose their charge. If you store your inflator for long periods of time without using it, recharge the battery every 6 months. This will extend its battery life.
NOTE: The inflator has been shipped in a low charge condition and should be fully charged before use.
Operation
- To turn on the inflator, long press the power button
![]() until the LCD display illuminates (Fig. 3).
until the LCD display illuminates (Fig. 3).
NOTE: The LCD display will automatically turn off when not in use for 150 seconds or more.

- Press the mode button
![]() to cycle between 4 different modes: ball, bicycle, motorcycle and car (Fig. 4).
to cycle between 4 different modes: ball, bicycle, motorcycle and car (Fig. 4).

- The + and – buttons allow you to manually adjust the inflation pressure. This determines the pressure at which the inflator will pump up to. Press either the + or – buttons to increase or decrease pressure by increments of 0.5 PSI, or long press to quickly cycle the psi value up or down (Fig 5).

- Once the desired PSI has been set, short press the power button
![]() to initiate inflation (Fig. 3).
to initiate inflation (Fig. 3).

 to cycle between 4 different modes: ball, bicycle, motorcycle and car (Fig. 4).

NOTE: Should the pump fail to reach the desired pressure setting within 15 minutes, the pump will automatically shut off.
Inflating with the Air Hose
Schrader valves (cars, motorcycles and mountain bikes) can be attached directly to the air chuck without any additional attachments.
- Screw the air hose clockwise into the air outlet of the inflator (Fig. 6).

- Unscrew the valve cap from the valve stem (Schrader) of your tire (Fig. 7).

- Place the air chuck onto the threaded valve stem (Schrader), then press down on the air chuck clamp to secure the chuck onto the valve (Fig. 8).

- Set the appropriate PSI according to the label on the driver's side door or the vehicle's user manual. Then short press the power button
![]() to initiate inflation (Fig. 3).
to initiate inflation (Fig. 3).


Inflating with Adapters
The air hose can be used with the provided adapters to inflate a variety of items. To use the adapters lift up the air chuck clamp, insert your adapter of choice into the air chuck, then press down on the air chuck clamp to secure the adapter in place (Fig 9).

Presta Valve Adapter
Presta valves are commonly used on road bikes and some mountain bikes. To inflate a bicycle tire, you will need to use the Presta valve adapter
- Loosen the Presta valve locking nut on your bike's valve stem (Fig. 10).

- Thread the female end of the Presta valve adapter onto valve stem of the bicycle tire.
- Clamp the end of the air chuck down onto the Presta valve adapter by pressing the air chuck clamp down until it locks into place (Fig. 11).

- Set the appropriate PSI according to the bicycle's tire wall. Then short press the power button
![]() to initiate inflation (Fig. 3).
to initiate inflation (Fig. 3). - After inflation, remove the air chuck and tighten the locking nut (Fig. 10).


Sports Ball Needle

Inflate all kinds of sports balls with the Sports ball needle (Fig. 12).
Tapered Nozzles

Inflate small plastic or rubber inflatables such as pool rings, beach balls, air mattresses, travel pillows and more with either of the two provided tapered nozzles (Fig. 13).
USB Power Bank
The Cordless Digital Inflator may also be used as a portable battery bank for remote, on-thego charging of smartphones, tablets, speakers and more. Devices may be charged through the USB-A port (Fig. 14). Charging will start automatically upon connection.

LED Light
The LED button (labelled ) controls the LED light on the top of the inflator (Fig. 15). Follow the table below to activate the three different modes.

| LED Button | LED |
| 1st press | Solid white |
| 2nd press | Slow red blinking |
| 3rd press | Fast red blinking |
| 4th press | OFF |
Care and Maintenance
Use the included storage bag to protect the digital inflator when not in use.
Store the inflator away from hot surfaces or under direct sunlight to reduce the risk of a short circuit.
Have your device serviced by a qualified repair person using only identical replacement parts.
Do not allow brake fluids, gasoline, petroleum-based products, solvents, etc., come in contact with plastic parts. Chemicals can damage, weaken or destroy plastic, which could result in personal injury.
Disposal
Recycling the tool
- Do not dispose of electrical devices as unsorted municipal waste. Use separate collection facilities.
- Contact your local government agency for information regarding the collection systems available.
- If electrical devices are disposed of in landfills or dumps, hazardous substances can leak into the groundwater and get into the food chain, damaging your health and well-being.
Recycling and Disposal
The product comes in a package that protects it against damage during shipping. Keep the package until you are sure that all parts have been delivered and the product is functioning properly. Recycle the package afterwards or keep it for long-term storage.
WEEE symbol. Waste electrical products should not be disposed of with household waste. Please recycle where facilities exist. Check with your local authority or local store for recycling regulations.

Service and Support
If your Auto Joe ATJ-CA100 Cordless Digital Inflator requires service or maintenance, please call Snow Joe + Sun Joe customer service at 1-866-SNOWJOE (1-866-766-9563) for assistance.
Model and Serial Numbers
When contacting the company or arranging service from an authorized dealer, you will need to provide the model and serial numbers, which can be found on the registration card. Copy these numbers into the space provided below.


Documents / ResourcesDownload manual
Here you can download full pdf version of manual, it may contain additional safety instructions, warranty information, FCC rules, etc.
Download AutoJoe ATJ-CA100 - Cordless Digital Inflator Manual
Advertisement


Need help?
Do you have a question about the ATJ-CA100 and is the answer not in the manual?
Questions and answers