Table of Contents
Advertisement
Available languages
Available languages
Quick Links
Advertisement
Chapters
Table of Contents

Subscribe to Our Youtube Channel
Related Manuals for Blumfeldt Savage 2.0 Wide


Summary of Contents for Blumfeldt Savage 2.0 Wide
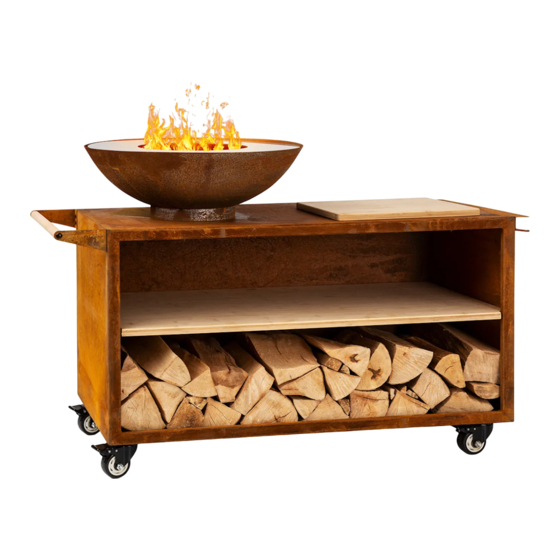
- Page 1 Savage 2.0 Wide Feuerschale Fire Bowl Brasero Braséro Braciere 10036089 10036090...
-
Page 3: Table Of Contents
Sehr geehrter Kunde, wir gratulieren Ihnen zum Erwerb Ihres Gerätes. Lesen Sie die folgenden Hinweise sorgfältig durch und befolgen Sie diese, um möglichen Schäden vorzubeugen. Für Schäden, die durch Missachtung der Hinweise und unsachgemäßen Gebrauch entstehen, übernehmen wir keine Haftung. Scannen Sie den folgenden QR-Code, um Zugriff auf die aktuellste Bedienungsanleitung und weitere Informationen rund um das Produkt zu erhalten: INHALTSVERZEICHNIS... -
Page 4: Sicherheitshinweise
SICHERHEITSHINWEISE WARNUNG Erstickungsgefahr! Die Feuerschale ist nur zur Nutzung im Freien bestimmt. Sie darf nicht in Gebäuden, Garagen oder anderen geschlossenen Bereichen verwendet werden. Es können sich giftige Dämpfe bilden, die zum Ersticken führen. • Die Feuerschale ist nicht für gewerbliche Zwecke geeignet. •... - Page 5 VORSICHT! VERWENDEN SIE KEINEN ALKOHOL ODER BENZIN ZUM ANZÜNDEN ODER WIEDERANZÜNDEN! Besondere Hinweise zu Grillgeräten • Legen Sie das Grillgut erst auf, wenn der Brennstoff mit einer Ascheschicht bedeckt ist! • Das Gerät wird sehr heiß und darf während des Betriebes nicht bewegt werden.
-
Page 6: Einzelteile
EINZELTEILE Menge Bezeichnung Abbildung Basis Feuerschale Grillring Bambus-Schneidebrett Mittleres Bambusbrett Haken... - Page 7 Menge Bezeichnung Abbildung Räder Griff Schrauben M8 Muttern M8 Schrauben M6 Muttern M6...
-
Page 8: Zusammenbau
ZUSAMMENBAU Befestigen Sie die 4 Räder (G) an der Basis (A) Legen Sie das mittlere Bambusbrett (E) in die mit Schrauben M8 (I) und Muttern M8 (J). Basis (A). Befestigen Sie den Griff (H) an der Basis (A) Befestigen Sie den Haken (F) an der Basis (A) mit 2 Schrauben M6 (K) und 2 Muttern M6 (L). - Page 9 Befestigen Sie die Feuerschale (B) auf der Legen Sie den Grillring (C) auf die Basis (A) mit 3 Schrauben. Feuerschale (B). Legen Sie das Bambus-Schneidebrett (D) auf Die Feuerschale mit Grill ist nun fertig den Tisch. montiert und einsatzbereit.
-
Page 10: Benutzung
BENUTZUNG Feuer entzünden 1. Stellen Sie sicher, dass die Feuerschale auf einem festen, flachen, ebenen und hitzebeständigen Untergrund, entfernt von brennbaren Gegenständen, aufgestellt ist. 2. Legen Sie Papier oder trockenes Brennholz in die Mitte des Feuerschalenbodens. Hinweis: Legen Sie Brennmaterial nicht direkt in die Feuerschale, sondern immer auf das Papier bzw. -
Page 11: Reinigung Und Pflege
REINIGUNG UND PFLEGE VORSICHT Verbrennungsgefahr! Lassen Sie die Feuerschale vollständig abkühlen, bevor Sie sie auf Schäden untersuchen oder reinigen. Die Feuerschale auf Schäden untersuchen Überprüfen Sie die Feuerschale regelmäßig auf Schäden, um die Produktsicherheit und eine längere Lebensdauer zu gewährleisten. 1. - Page 13 Dear Customer, Congratulations on purchasing this device. Please read the following instructions carefully and follow them to prevent possible damages. We assume no liability for damage caused by disregard of the instructions and improper use. Scan the QR code to get access to the latest user manual and more product information.
-
Page 14: Safety Instructions
SAFETY INSTRUCTIONS WARNING Risk of suffocation! This fi re bowl is for outdoor use only and shall not be used in a building, garage or any other enclosed area. Toxic carbon monoxide fumes can accumulate and cause asphyxiation. • This fi re bowl is not for commercial use. •... - Page 15 CAUTION! DO NOT USE SPIRIT OR PETROL FOR LIGHTING OR RE-LIGHTING! Special Instructions for Grills • Do not place the food on the grill until the fuel is covered with a layer of ash! • The appliance becomes very hot and must not be moved during operation. •...
-
Page 16: Individual Parts
INDIVIDUAL PARTS Quantity Description Picture Base Fire bowl Grill ring Bamboo cutting board Middle bamboo board Hook... - Page 17 Quantity Description Picture Wheels Handle Screws M8 Nuts M8 Screws M6 Nuts M6...
-
Page 18: Assembly
ASSEMBLY Connect the 4 wheels (G) and the base (A) with Put the middle bamboo board (E) on the base screws M8 (I) and nuts M8 (J). (A). Connect the handle (H) and the base (A) with Connect the hook (F) and the base (A) with 2 screws M6 (K) and 2 nuts M6 (L). - Page 19 Connect the fire bowl (B) on the base (A) with Put the grill ring (C) on the fire bowl (B). 3 screws. Put the bamboo cutting board (D) on the table. The fire bowl with grill is now fully assembled and ready for use.
-
Page 20: Operation
OPERATION Ignite Fire 1. Make sure that the fire bowl is placed on a firm, flat, level and heat- resistant surface away from flammable objects. 2. Place paper or dry firewood in the middle of the fire tray base. Note: Do not place fuel directly in the fire bowl but always on the paper or the firewood. -
Page 21: Cleaning And Care
CLEANING AND CARE CAUTION Danger of burns! Allow the fi re bowl to cool completely before inspecting or cleaning it for damage. Inspect the Fire Bowl for Damage Check the fi re bowl regularly for damage to ensure product safety and a longer service life. - Page 23 Chère cliente, cher client, Toutes nos félicitations pour l’acquisition de ce nouvel appareil. Veuillez lire attentivement et respecter les instructions de ce mode d’emploi afin d’éviter d’éventuels dommages. Nous ne saurions être tenus pour responsables des dommages dus au non-respect des consignes et à...
-
Page 24: Consignes De Sécurité
CONSIGNES DE SÉCURITÉ MISE EN GARDE Risque d‘étouffement ! Le braséro est destiné à un usage extérieur seulement. Il ne doit pas être utilisé dans des bâtiments, garages ou autres espaces clos. Il peut former des fumées toxiques qui provoquent la suffocation. •... - Page 25 ATTENTION ! NE PAS UTILISER D'ALCOOL OU D'ESSENCE POUR ALLUMER OU RALLUMER ! Consignes particulières concernant les barbecues • Ne mettez les aliments sur le gril que lorsque le combustible est recouvert d‘une couche de cendres ! • L‘appareil devient très chaud et ne doit pas être déplacé pendant le fonctionnement.
-
Page 26: Pièces Détachées
PIÈCES DÉTACHÉES N° Quantité Description Figure Base Braséro Grille de cuisson ronde Planche à découper en bambou Planche de bambou centrale Crochet... - Page 27 N° Quantité Description Figure Roues Poignée Vis M8 Écrous M8 Vis M6 Écrous M6...
-
Page 28: Assemblage
ASSEMBLAGE Fixez les 4 roues (G) sur la base (A) avec des vis Posez la planche de bambou centrale (E) sur la M8 (I) et des écrous M8 (J). base (A). Fixez la poignée (H) sur la base (A) avec 2 vis Fixez le crochet (F) sur la base (A) avec 2 vis M6 (K) et 2 écrous M6 (L). - Page 29 Fixez le braséro (B) sur la base (A) avec 3 vis. Posez la grille de cuisson ronde (C) sur le braséro (B). Posez la planche à découper en bambou (D) Le braséro avec grille de cuisson est sur la table. maintenant assemblé...
-
Page 30: Utilisation
UTILISATION Pour allumer le feu 1. Assurez-vous que le braséro est placé sur une surface ferme, lisse, de niveau et résistante à la chaleur, loin des objets inflammables. 2. Placez du papier ou du bois de chauffage sec au centre du fond du braséro. Remarque : Ne mettez pas de combustible directement dans le foyer mais toujours sur le papier ou le bois de chauffage. -
Page 31: Nettoyage Et Entretien
NETTOYAGE ET ENTRETIEN ATTENTION Risque de brûlure ! Laissez le braséro refroidir complètement avant de l‘inspecter ou de le nettoyer. Inspection du braséro Vérifi ez régulièrement que le braséro n‘est pas endommagé pour assurer la sécurité du produit et prolonger sa durée de vie. 1. - Page 33 Estimado cliente: Le felicitamos por la adquisición de este producto. Lea atentamente las siguientes instrucciones y sígalas para evitar posibles daños. No asumimos ninguna responsabilidad por los daños causados por el incumplimiento de las instrucciones y el uso inadecuado. Escanee el siguiente código QR para obtener acceso a la última guía del usuario y más información sobre el producto.
- Page 34 INSTRUCCIONES DE SEGURIDAD ADVERTENCIA ¡Peligro de asfi xia! El cuenco de fuego está destinado a ser usado sólo en el exterior. No debe ser usado en edifi cios, garajes u otras áreas cerradas. Pueden formarse vapores tóxicos que pueden causar asfi xia. •...
- Page 35 ¡Atención! ¡NO UTILICE ALCOHOL O GASOLINA PARA ENCEDER LA CHIMENEA! Notas especiales sobre las parrillas • No coloque la comida en la parrilla hasta que el combustible esté cubierto con una capa de cenizas! • El aparato se calienta mucho y no debe ser movido durante la operación. •...
- Page 36 PIEZAS Núm. Cantidad Descripción Imagen Base Recipiente para el fuego Rejilla de la barbacoa Tabla de cortar de bambú Tabla intermedia de bambú Ganchos...
- Page 37 Núm. Cantidad Descripción Imagen Ruedas Tornillos M8 Tuercas M8 Tornillos M6 Tuercas M6...
- Page 38 MONTAJE Fije las 4 ruedas (G) a la base (A) con tornillos Coloque la tabla de bambú central (E) en la M8 (I) y tuercas M8 (J). base (A). Fije el asa (H) a la base (A) con 2 tornillos M6 Fije el gancho (F) a la base (A) con 2 tornillos (K) y 2 tuercas M6 (L).
- Page 39 Fije el recipiente del fuego (B) a la base (A) con Coloque el anillo de la parrilla (C) en el 3 tornillos. recipiente del fuego (B). Coloque la tabla de cortar de bambú (D) sobre El cuenco de fuego con parrilla está ahora la mesa.
- Page 40 Encender el fuego 1. Asegúrese de que el cuenco de fuego se coloca sobre una superficie firme, plana, uniforme y resistente al calor, lejos de objetos inflamables. 2. Coloque papel o leña seca en el centro de la base del cuenco de fuego. Nota: No coloque el combustible directamente en el recipiente del fuego, sino siempre sobre el papel o la leña.
- Page 41 LIMPIEZA Y CUIDADO ATENCIÓN ¡Peligro de quemaduras! Deje que el cuenco de fuego se enfríe completamente antes de inspeccionarlo o limpiarlo para ver si está dañado. Revise el cuenco de fuego para ver si está dañado Revise el recipiente para el fuego regularmente para asegurar la seguridad del producto y una vida útil más larga.
- Page 43 Gentile cliente, La ringraziamo per aver acquistato il dispositivo. La preghiamo di leggere attentamente le seguenti istruzioni per l’uso e di seguirle per evitare possibili danni. Non ci assumiamo alcuna responsabilità per danni scaturiti da una mancata osservazione delle avvertenze di sicurezza e da un uso improprio del dispositivo.
- Page 44 AVVERTENZE DI SICUREZZA AVVERTENZA Pericolo di soffocamento! Il braciere è destinato esclusivamente all’uso all’aperto. Non va utilizzato in edifi ci, garage o altri luoghi chiusi. Si potrebbero formare vapori nocivi che portano al soffocamento. • Il braciere non è inteso per fi ni commerciali. •...
- Page 45 ATTENZIONE! NON UTILIZZARE ALCOOL O BENZINA PER ACCENDERE O RIACCENDERE IL BRACIERE! Avvertenze particolari inerenti i barbecue • Posare i prodotti da grigliare sul barbecue solo quando il combustibile è coperto da uno strato di cenere! • Il dispositivo diventa bollente e non può essere spostato durante il suo utilizzo.
- Page 46 SINGOLE PARTI Quantità Denominazione Figura Base Braciere Anello grill Tagliere in bambù Ripiano centrale in bambù Gancio...
- Page 47 Quantità Denominazione Figura Ruote Manico Viti M8 Dadi M8 Viti M6 Dadi M6...
- Page 48 MONTAGGIO Fissare le 4 ruote (G) alla base (A) con le viti Collocare il ripiano centrale in bambù (E) sulla M8 (I) e i dadi M8 (J). base (A). Fissare il manico (H) alla base (A) con le 2 viti Fissare il gancio (F) alla base (A) con le 2 viti M6 (K) e i 2 dadi M6 (L).
- Page 49 Fissare il braciere (B) alla base (A) con 3 viti. Sistemare l'anello grill (C) sul braciere (B). Posizionare il tagliere in bambù (D) sul tavolo. Il braciere con graticola è ora montato e pronto per l'uso.
- Page 50 UTILIZZO Accendere il fuoco 1. Assicurarsi di collocare il braciere su un suolo stabile, piatto, in piano, resistente al calore e lontano da oggetti infiammabili. 2. Sistemare della carta o della legna asciutta in mezzo al fondo del braciere. Nota: non inserire il combustibile direttamente nel braciere, ma metterlo prima sulla carta o sulla legna.
- Page 51 PULIZIA E MANUTENZIONE ATTENZIONE Pericolo di ustioni! Lasciare che il braciere si raffreddi completamente prima di verifi care se ha subito danni o di pulirlo. Verifi care se il braciere è danneggiato Verifi care regolarmente se il braciere è danneggiato per garantire la sicurezza del prodotto e una durata più...
Need help?
Do you have a question about the Savage 2.0 Wide and is the answer not in the manual?
Questions and answers