
Subscribe to Our Youtube Channel
Related Manuals for Euromaid EO610ATB


Summary of Contents for Euromaid EO610ATB
- Page 1 USER MANUAL EO610ATB 60cm Built-in Oven PLEASE READ THE USER MANUAL CAREFULLY BEFORE USING THE UNIT...
- Page 2 Dear Customer, Congratulations on the purchase of your new product from Euromaid. We recommend you please take some time to read the instruction manual thoroughly to familiarise yourself with the functionality and operations to ensure optimum performance of your new appliance.
-
Page 3: Table Of Contents
CONTENTS Safety Information ........................4 - 7 Warnings ............................Environment Protection ........................Product Overview ........................8 - 13 Controls ............................. Oven and Accessories ........................Cooking Modes ..........................Installation ..........................14 - 16 Cabinet Details ..........................Daily Use ..........................17 - 23 Positioning the Oven Trays &... -
Page 4: Safety Information
SAFETY INFORMATION We recommend that you read the instructions in this owner’s manual carefully before use for the best performance and to extend the life of your appliance. It will provide you with all the information you need to ensure its safe installation, use and maintenance. - Page 5 SAFETY INFORMATION Packaging items such as plastic bags, polystyrene, nails, etc. are potentially dangerous, and therefore appropriate measures must be taken to prevent children and the disabled from coming into contact with them. Avoid the following: • Touching the appliance with wet parts of the body. •...
-
Page 6: Warnings
SAFETY INFORMATION Warnings Warning! Do not steam clean the oven. Warning! Do not use harsh abrasive cleaners or sharp metal scrapers to clean the oven door glass since they can scratch the surface, which may result inshattering of the glass. Warning! Do notinstall the appliance behind a decorative door in order to avoid overheating. -
Page 7: Environment Protection
Icon Type Meaning WARNING: Type Meaning WARNING Serious injury or death ris WARNING Serious injury or death risk SAFETY INFORMATION WARNING: RISK OF ELECTRIC SHOCK Dangerous voltage risk 1.4 During Cleaning and Maintenance RISK OF ELECTRIC SHOCK Dangerous voltage risk SYMBOL ISO 7010 W021 WARNING: Environment Protection... -
Page 8: Product Overview
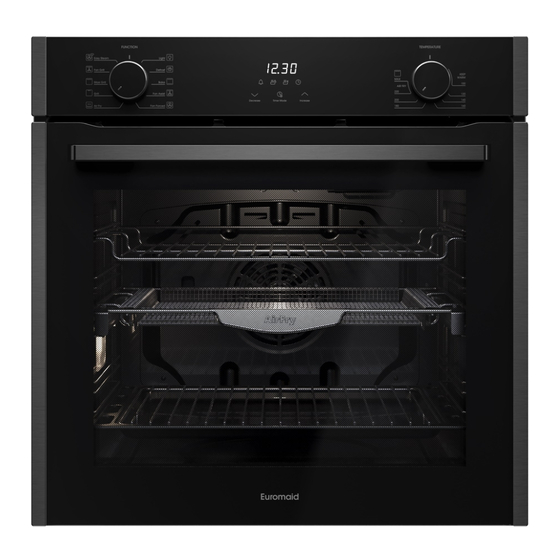
PRODUCT OVERVIEW Top panel Air fry basket Control panel Telescopic rails Side panel Baking tray Element Grill insert Fan and element cover Door seal Side racks Oven door Chrome wire shelf Oven door handle Note: Above picture is for reference only. The actual appliance maybe slightly different. -
Page 9: Controls
PRODUCT OVERVIEW Controls Cooking mode selection knob Electronic clock / timer Cooking temperature selection knob... -
Page 10: Oven And Accessories
PRODUCT OVERVIEW Oven and Accessories There are five shelf positions in the oven. The oven is supplied with: 2x chrome wire shelf supports 1x air fry basket 1x baking tray 1x set telescopic rails 1x grill insert Note: The oven comes with a soft close door feature which will only operate correctly when sufficient initial force is applied when closing. -
Page 11: Cooking Modes
PRODUCT OVERVIEW Cooking Modes Grill Directs radiant heat from the powerful upper element onto the food. grill function is best suited for cooking different cuts of meat such as steak, chops, sausages and fish, or for making toasted sandwiches and other quick-cooking foods. - Page 12 Air Fry from the upper element helps to achieve the crispiest results. The function combined with the Euromaid Air Fry basket are ideal for oven frying your favourite frozen foods such as chips, wedges or chicken nuggets without any oil. Defrost Uses the fan to circulate room temperature air around the cavity.
- Page 13 Steam helps to bring out the natural flavours of food, cooking it more evenly and retaining more nutrients and goodness. Steam assisting cooking functions, such as Euromaid easy steam, consistently produce juicy, succulent interiors with crispy, golden finishes.
-
Page 14: Installation
INSTALLATION Important! Installation, assembly and electrical connections must be carried out by authorised personnel. Cabinet Details In order to ensure that the built-in appliance functions properly, the cabinet containing it must be appropriate. The figure below gives the dimensions of the cut-out for installation under the counter or in a wall cabinet unit. - Page 15 INSTALLATION The panels of the adjacent cabinets must be made of heat resistant material. In particular, cabinets with a veneer exterior must be assembled with glues which can withstand temperatures of up to 75°C. In compliance with current safety standards, contact with the electrical parts of the oven must not be possible once it has been installed.
- Page 16 INSTALLATION Before making the connection • Check that the switch, wiring and electrical system can support the appliance load (see data plate); • Check the power supply system has an efficient earthing connection which complies with the provisions of current regulations; •...
-
Page 17: Daily Use
DAILY USE Positioning the Oven Trays & Shelves • The Grill Tray or Oven Shelf can be located in any of the five height positions in the oven. Refer to the cooking guide table for the recommended shelf position. When fitting the trays or shelves, ensure they are fitted between the two wires that are closest together as shown below. -
Page 18: Telescopic Rails
DAILY USE Telescopic Tails The oven may also include a set of telescopic rails which can be positioned on different levelsand allow the oven racks or trays to slide in and out effortlessly. To un-clip the telescopic rail for cleaning or repositioning purposes you must apply outwardpressure on the underside of the telescopic rail to release. -
Page 19: How To Use Your Oven
DAILY USE How to Use Your Oven This fan forced oven is an extremely versatile appliance that allows you to choose easily and safely between different cooking modes. The various cooking modes are selected by means of a cooking mode selection knob, located on the control panel. To operate the oven •... -
Page 20: Touch Control Digital Timer
DAILY USE Touch Control Digital Timer Button functions Decrease time Increase time Timer mode Timer Set cooking time (amount of time to cook) End cooking time (end time for cooking) Set the time This model has a digital display, 24hr clock with 3 control buttons. When the power is connected, the screen displays 12:00 and the bar above the... - Page 21 DAILY USE Automatic setting • Automatic setting of the oven allows you to select the end time, cooking time, temperature and cooking mode. The oven will switch on, cook according to the selected cooking mode and temperature and then switch o automatically. Press the function button repeatedly until the bar above flashes, then press...
- Page 22 DAILY USE Semi-automatic setting There are two methods of semi-automatic cooking: Start cooking now and set cooking time This semi-automatic setting of the oven allows you to start cooking immediately, set the cooking time (up to 10 hours), select the temperature and cooking mode. The oven will cook according to the selected cooking mode and temperature and then switch o automatically once the cooking time has elapsed.
- Page 23 DAILY USE Timer • The digital countdown timer can be set up to 23 hours and 59 minutes maximum. • To set the timer, press the function button repeatedly until the bar above flashes. Then press button to set the countdown timer. After 5 seconds, the time will be set and begin to count down.
-
Page 24: Hints & Tips
HINTS & TIPS Cooking Advice The oven offers a range of settings which allow you to cook any type of food in the best possible way. With time you will learn to make the best use of this versatile cooking appliance and the following directions are only a guideline which may be varied according to your own personal experience. - Page 25 HINTS & TIPS Using fan grill • fan grill mode with the oven door closed. This mode is very useful for grilling foods rapidly, as the distribution of heat by the fan makes it possible not only to brown the surface, but also to cook the bottom of the food. •...
- Page 26 HINTS & TIPS Cooking pizza • For best results when cooking pizza, use the fan forced mode • Preheat the oven for at least 10 minutes. • Use a light aluminum pizza pan, placing it on the shelf supplied with the oven.
-
Page 27: Cooking Guide
HINTS & TIPS Cooking Guide Cooking Preheat Temp. Cooking Weight Foods position* time setting time min) min) Defrost All frozen food Grill Maxi grill Soles & cuttlefish 8 - 10 Squid & prawn 6 - 8 kebabs Cod fish Grill vegtables 10 - 15 Veal steak 15 - 20... - Page 28 HINTS & TIPS Cooking Preheat Temp. Cooking Weight Foods position* time setting time min) min) Fan grill (continued) Cream puffs 2 - 4 20 - 25 (on 2 racks) Biscuits 2 - 4 10 - 15 (on 2 racks) Sponge cake 15 - 20 (1 cake) Sponge cake...
- Page 29 HINTS & TIPS Cooking Preheat Temp. Cooking Weight Foods position* time setting time min) min) Bake Duck 65 - 75 Roast veal or beef 70 - 75 Pork roast 70 - 80 Biscuits 15 - 20 (short pastry) Tarts 30 - 35 Fan assist Frozen food Pizza...
- Page 30 HINTS & TIPS Cooking Preheat Temp. Cooking Weight Foods position* time setting time min) min) Air Fry Scotch fillet steak (seared first) Frozen chips Chicken drumettes / wingettes (with dry rub) Fresh barramundi fillet (with crumb) Potatoes (cut into wedges) Frozen food Chicken nuggets / crumbed fish...
-
Page 31: Cleaning & Maintenance
CLEANING & MAINTENANCE • Before cleaning your oven or performing maintenance, make sure that the cooking mode selection knob is set to and the cooking temperature selection knob is set to off. To extend the life of your oven, it must be cleaned frequently. •... -
Page 32: How To Remove The Oven Door
CLEANING & MAINTENANCE How to Remove the Oven Door You can remove the oven door for better access to the oven when cleaning. Proceed as follows to remove the door: Open the door fully. Lift up and turn the latch situated on each of the two hinges. -
Page 33: How To Dismantle The Oven Door For Cleaning
CLEANING & MAINTENANCE How to Dismantle the Oven Door for Cleaning You can remove the inner door glass for better cleaning. Proceed as follows to remove the inner door glass: Remove the cap on top of the door by unscrewing the 2 screws on the left and right sides. Gently slide out the inner pane of glass. -
Page 34: Replacing The Oven Lamps
CLEANING & MAINTENANCE Replacing the Oven Lamps Warning! Ensure that the appliance is switched off before replacing the lamp to avoid the possibility of electric shock. Remove the glass cover of the lamp-holder. Remove the lamp and replace with a lamp resistant to high temperatures (300°C) with the following characteristics: •... -
Page 35: Product Information
PRODUCT INFORMATION EO610ATB (Dark stainless steel) Model number(s): Voltage & frequency: 220 - 240V ~ / 50 - 60Hz Usable volume: Total volume: Output power: 2900 - 3400W Net weight (kg): 32.0 36.5 Gross weight (kg): 594 (w) x 595 (h) x 554 (d) -
Page 36: Manufacturer Gurantee
New Zealand by Glen (Phone number 09 274 8265) Dimplex New Zealand Limited NZBN 9429000069823 in respect of the Euromaid product. 1. Euromaid Express Warranty Subject to the exclusions below, we warrant that the product will not have any electrical or mechanical breakdowns within:... - Page 37 MANUFACTURER GUARANTEE 2. Warranty Exclusions This express warranty does not apply where: The product has been installed, used or operated otherwise than in accordance with the product manual or other similar documentation provided to you with the product; The product requires repairs due to damage resulting from accident, misuse, incorrect installation, insect or vermin infestation, improper liquid spillage, cleaning or maintenance, unauthorised modification, use on an incorrect voltage, power surges and dips, voltage supply problems, tampering or unauthorised repairs by any persons,...
- Page 38 MANUFACTURER GUARANTEE 4. How to Make a Claim You may make a claim under this warranty through our website, contacting our customer care line or via email. Contact details for Glen Dimplex Australia and New Zealand can be found at the end of this document. To make a valid claim under this warranty, you must: Lodge the claim with us as soon as possible and no later than 14 days after you first become aware of the breakdown;...
- Page 39 READ THE INSTRUCTION BOOKLET BEFORE INSTALLING & USING THE APPLIANCE. The manufacturer will not be responsible for any damage to property or to persons caused by incorrect installation or improper use of the appliance. The manufacturer is not responsible for any inaccuracies, due to printing or transcription errors, contained in this manual.
- Page 40 | euromaid.co.nz...
Need help?
Do you have a question about the EO610ATB and is the answer not in the manual?
Questions and answers