Table of Contents

Related Manuals for MINIMEX Richie Pro A1


Summary of Contents for MINIMEX Richie Pro A1
- Page 1 P R O F E S S I O N A L คู ‹ ม ื อ การใชŒ ง าน เคร� ่ อ งชงกาแฟเอสเพรสโซ‹ Minimex รุ ‹ น Richie Pro A1 Instruction Manual Minimex Espresso Machine Model : MR Pro A1 220V., ~50Hz., 2,700W.
- Page 2 คำแนะนำเพื ่ อ ความปลอดภั ย : ก่ อ นเริ ่ ม ต้ น ใช้ ง านเราขอแนะนำให้ ท ่ า นอ่ า นคู ่ ม ื อ เล่ ม นี ้ อ ย่ า งละเอี ย ด เพื ่ อ ให้ ท ่ า นสามารถใช้ ง านได้ อย่ า งถู ก ต้ อ ง เต็...
- Page 3 ส ว นประกอบ จั บ ฝาปิ ด แท็ ง ก์ น ้ ำ ขาเครื ่ อ ง (ปรั บ ได้ ) ปุ ่ ม กดกาแฟอั ต โนมั ต ิ (1ช็ อ ต) ฝาปิ ด แท็ ง ก์ น ้ ำ ปุ...
- Page 4 การใช ง านครั ้ ง แรก เครื ่ อ งชงกาแฟ MiNiMEX Richie Pro A1 เป็ น เครื ่ อ งชงกาแฟระดั บ อาชี พ แต่ อ อกแบบให้ ผ ู ้ ใ ช้ ส ามารถ ใช้ ไ ด้ ด้ ว ยตนเอง โดยไม่ ต ้ อ งอาศั ย ช่ า งติ ด ตั ้ ง ระบบน้ ำ เข้ า ระบบน้ ำ ทิ ้ ง ใดๆ เพี ย งมี เ ต้ า เสี ย บไฟบ้ า นที ่ ต ิ ด ตั ้ ง สายดิ น และ...
- Page 5 (รู ป ที ่ 1) (รู ป ที ่ 2) น้ ำ ที ่ ใ ช ใ นการชงกาแฟ น้ ำ ที ่ เ หมาะสมสำหรั บ เติ ม ลงในเครื ่ อ งชงกาแฟ ควรเป็ น น้ ำ ดื ่ ม ที ่ ใ สสะอาดรสชาติ ด ี มี ค ่ า ความกระด้ า งต่ ำ (Hardness) อยู...
- Page 6 เมื ่ อ เป ด เคร� ่ อ ง ก่ อ นเสี ย บปลั ๊ ก ไฟเข้ า กั บ เต้ า เสี ย บไฟบ้ า น ควรตรวจสอบให้ ม ั ่ น ใจว่ า : - เต้ า เสี ย บติ ด ตั ้ ง สายดิ น อย่ า งถู ก ต้ อ งแล้ ว - เต้...
- Page 7 การทำกาแฟ ESPRESSO 1. บดกาแฟให้ ม ี ค วามละเอี ย ดเหมาะสมกั บ เครื ่ อ งชงกาแฟ ตั ก ผงกาแฟลงในกรองจนเต็ ม ประมาณ 16-18 กรั ม (ใช้ น ิ ้ ว หรื อ ก้ า นช้ อ นปาดให้ ผ งกาแฟระนาบกั บ ขอบกรอง แล้ ว กดให้ แ น่ น ด้ ว ยแทมเปอร์ (Tamper) ) (รู ป ที ่ 4) 2.
- Page 8 อั ต ราการใช ก าแฟ เครื ่ อ งชงกาแฟ MiNiMEX Richie Pro A1 มาพร้ อ มกั บ ด้ า นชง 1 ด้ า ม, ถ้ ว ยกรอง 1 ช็ อ ต 1 ชิ ้ น , ถ้ ว ยกรอง 2 ช็ อ ต 1 ชิ ้ น...
- Page 9 การทำน้ ำ ร อ น 1. ใช ้ แ ก ้ ว รองบร ิ เ วณห ั ว จ ่ า ย น ํ ้ า ร ้ อ น 2. กดป ุ ่ ม น ํ ้ า ร ้ อ น น ํ ้ า ร ้ อ นจะถ ู ก จ ่ า ยออกมาท ั น ท ี และหย ุ ด เองโดยอ ั ต โนม ั ต ิ (ต...
- Page 10 การป ด เคร� ่ อ ง 1. เมื ่ อ ปิ ด สวิ ต ช์ ห ลั ก (14) ทุ ก ระบบในตั ว เครื ่ อ งจะถู ก ปิ ด ทั ้ ง หมด 2. เมื ่ อ สิ ้ น สุ ด การใช้ ง านแล้ ว ควรถอดปลั ๊ ก ออกจากเต้ า เสี ย บไฟบ้ า น หรื อ โยกเบรกเกอร์ ล ง 3.
- Page 11 3. ท่ า นสามารถทำการ Reset คุ ณ สมบั ต ิ เ หล่ า นี ้ ใ ห้ เ ป็ น ค่ า ตั ้ ง ต้ น จากโรงงานได้ โดยกดปุ ่ ม อั ต โนมั ต ิ 1 ช็ อ ต และ...
- Page 12 MiniMex บรรจ ุ ซ องละ 50 กร ั ม ผสมก ั บ น ํ ้ า เปล ่ า 1 ล ิ ต ร จะได ้ น ํ ้ า ยาล ้ า งตะกร ั น 1ล ิ ต ร หากต...
- Page 13 การถ า ยน้ ำ ออกจากหม อ ต ม ไอน้ ำ การถ่ า ยน้ ำ ออกจากหม้ อ ต้ ม ไอน้ ำ ต้ อ งดำเนิ น การก่ อ นและหลั ง การล้ า งตะกรั น ในหม้ อ ต้ ม ท่ า นสามารถถ่ า ยน้ ำ ออกจากหม้...
- Page 14 การรั บ ประกั น เครื ่ อ งชงกาแฟเอสเพรสโซ Minimex รุ น MR Pro A1 ระยะเวลารั บ ประกั น 1 ป เงื ่ อ นไขการรั บ ประกั น การรั บ ประกั น ครอบคลุ ม ถึ ง คุ ณ ภาพของสิ น ค า และฝ ม ื อ การประกอบโดยสิ น ค า ต อ งใช ใ น ครั ว เรื อ นเท า นั ้ น...
- Page 15 ช ว ยกั น รั ก ษาสิ ่ ง แวดล อ ม เราขอชี ้ ช วนให้ ท ่ า นร่ ว มรั ก ษาสภาพแวดล้ อ ม ด้ ว ยการทิ ้ ง เศษอุ ป กรณ์ ท ี ่ เ ลิ ก ใช้ แ ล้ ว ณ สถานที ่ เหมาะสม - 15 / ไทย...
- Page 16 P R O F E S S I O N A L Instruction Manual ESSPRESSO MACHINE Minimex Model : Richie Pro A1 Instruction Manual Minimex Espresso Machine Model : MR Pro A1 220V., ~50Hz., 2,700W. English...
-
Page 17: Important Safeguards
Important Safeguards: Before using machine always carefully read and comply with all these instructions. We cannot accept any responsibility for the consequences of improper use. 1. Check voltage to be sure that the voltage indicated on the name plate agrees with your voltage. 2. -
Page 18: Know Your Coffee Machine
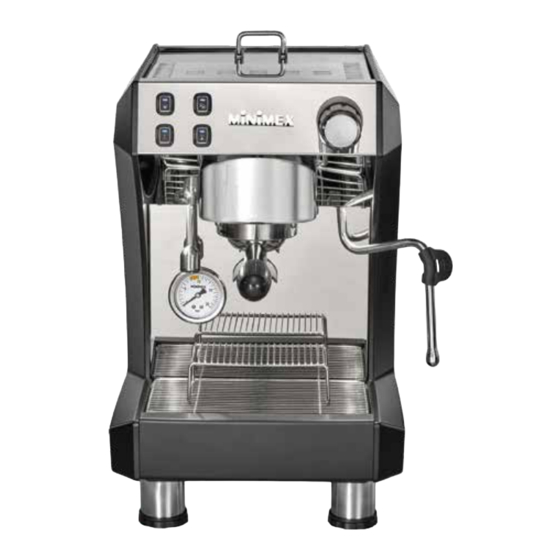
KNOW YOUR COFFEE MACHINE Decorative Strip Foot Coffee Button ( Single Cup ) Water Tank Cover Coffee Button ( Double Cup ) Steam Knob Hot Water Button Steam Pipe Manual Coffee Button Coffee Barometer Hot Water Pipe Drip Piece Drip Tray Power Switch - 3 / Eng -... - Page 19 STANDARD ACESSORIES MiniMex Espresso Machine Richie Pro A1 comes with a standard acessories Porta filter 2 Cup steel mesh 1 Cup steel mesh Rack Stainless steel tamper FOR THE FIRST USE 1. Remove the coffee machine from package, and check all accessories according to the list.
-
Page 20: Water Quality
(Image 1) (Image 2) NOTE : In order to guarantee the service life of coffee machine, please use softening treatment water. Do not use pure water or distilled water. WATER QUALITY Water is an essential ingredient and its role in Espresso brewing must be taken into due consideration. - Page 21 TURN ON MACHINE 1. Open the lid, take out water tank, and pour appropriate water into tank. Do not exceed the MAX capacity. NOTE : In order to guarantee the service life of coffee machine, please use softening treatment water. Do not use pure water or distilled water. 2.
-
Page 22: Troubleshooting
TROUBLE SHOOTING Problem Cause/Result Solution Water tank is empty Pour water into water tank Make sure the voltage and The input voltage or frequency is frequency is consistent with No water comes out inconsistent with nameplate the nameplate Please contact with the Machine malfunctions authorized service Steam nozzle is blocked... - Page 23 MAKE ESPRESSO COFFEE 1. Manual making coffee: a) Put the coffee powder into porta filter holder and press it tight (Image 4); b) Put the porta filter holder into the machine, and rotate right to lock the filter holder (Image 5); c) Put the cup to under porta filter mouth (Image 6);...
-
Page 24: How To Make A Good Cup Of Coffee
NOTE : If coffee powder is too fine will cause brewing speed is very low or no coffee comes out; too much coffee powder will cause the leakage from the porta filter. And do not touch boiler part to avoid scald. porta filter holder (Image 4) - Page 25 INDICATOR TIPS Manual Auto Coffee Auto Coffee Hot water Machine State Coffee Button Button (Double) Button (Single) Button Power on/ Lights on Lights on Lights on Lights on Preheating finished Making coffee Lights on Lights off Lights off Lights off (Manual) Making coffee Lights off...
-
Page 26: Pressure Gauge
MAKE ESPRESSO COFFEE (Continue) 4. Put back the water tank into the machine; 5. Connected power, turn on main power button, machine will automatic pumping water and preheating; 6. Machine will enter ‘Stand by’ mode after preheating finished; 7. Making the coffee according to step of ‘MAKING COFFEE’ (no need use coffee powder) 8. - Page 27 NOTE : Do not touch the hot water immediately after making hot water. Be careful not to be scald. MAKING STEAM/ FROTHING MILK 1. Prepare a cup of espresso first according to part B. “MAKE ESPRESSO COFFE’’; 2. Use whole, fresh cold milk out of fridge (8-10 C), and pour 1/3 milk in the cup; NOTE : Use a stainless steel cup, and cup diameter should not less than 70 ±...
- Page 28 TURN OFF MACHINE 1. At any time turn off power switch to turn off the machine; 2. Please turn off external power supply when you don’t use the machine; 3. Please pour out the water from water tank if the machine will not use for long time or need to transport.
- Page 29 ANTIFREEZE STEPS Note: in order to prevent the water in the boiler get freezing and causing the boiler to crack, when using the coffee machine where the room temperature will be lower than the freezing point temperature, the following anti freezing steps must be followed before shutting down the coffee machine every day.
-
Page 30: Clean And Maintenance
CLEAN AND MAINTENANCE 1. The machine has to be switched off and cooled down for about 2hours before cleaning. 2. Clean housing with damp cloth or neutral detergent. 3. Clockwise rotation to remove porta filter holder, pour out coffee grounds, and dismantle the filter on the group head, use washing fluid to clean them, and the last use water to clean them again. -
Page 31: Warranty
Customers must present proof of purchase to return the product at the store of purchase only. Service Center If customer need service or information, customer can contact our Minimex Service Center Service Center : Tel. 0-2817-8999, 02-493-6565 Fax : 0-2464-1600 E-mail : SERVICE_minimex@penk.co.th... - Page 32 ENVIROMENT FRIENDLY DISPOSAL Please dispose of old machines in an environmentally neutral way. Old machines contain valuable materials which should be salvaged for recycling. Please therefore dispose of old machines via your regional collection system - 17 / Eng -...
- Page 33 P R O F E S S I O N A L DISTRIBUTOR...
Need help?
Do you have a question about the Richie Pro A1 and is the answer not in the manual?
Questions and answers