
Related Manuals for MINIMEX MDC3


Summary of Contents for MINIMEX MDC3
- Page 1 C O F F E E M A K E R คู ‹ ม ื อ การใชŒ ง าน เคร� ่ อ งชงกาแฟ Minimex รุ ‹ น MDC3 Instruction Manual Minimex Coffee Maker Model : MDC3 220V., ~50Hz., 900W. ไทย / English...
- Page 2 23. ห้ า มเด็ ก เล่ น เครื ่ อ ง หรื อ ใช้ ง าน เพราะอาจเกิ ด อั น ตรายได้ 24. เครื ่ อ งชง MDC3 ถู ก ออกแบบมาใช้ ง านภายในบ้ า น ในอาคารที ่ ร ่ ม 25. ควรเก็ บ คู ่ ม ื อ เล่ ม นี ้ ไ ว้ เพื ่ อ ใช้ ศ ึ ก ษาข้ อ มู ล ในอนาคต...
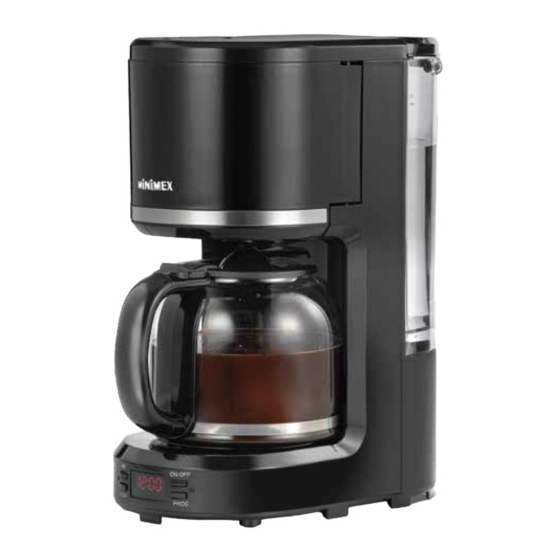
- Page 3 ส ว นประกอบ กรอง แผงควบคุ ม กรวย ฐานเครื ่ อ ง(อุ ่ น โถ) ฝาปิ ด โถ ฐานกรอง ด้ า มจั บ โถ ด้ า มจั บ แท็ ง ก์ น ้ ำ โถกาแฟ แท็ ง ก์ น ้ ำ - 3 / ไทย...
- Page 4 ส ว นประกอบแผงควบคุ ม ปุ ่ ม เปิ ด /ปิ ด PROG ปุ ่ ม ตั ้ ง โปรแกรม จอไฟ LCD ก‹ ‹ อ นการใชŒ ง าน ควรตรวจสอบให้ ม ั ่ น ใจว่ า อุ ป กรณ์ ท ี ่ บ รรจุ ใ นกล่ อ งครบถ้ ว ยตามที ่ ร ะบุ ใ นคู ่ ม ื อ เทน้ ำ ลงในแท็ ง ก์ จ นดึ ง ระดั บ สู ง สุ ด เอาโถวางบนฐานให้...
- Page 5 การชงกาแฟ 1. เปิ ด ฝาครอบแท็ ง ก์ แ ล้ ว เติ ม น้ ำ ดื ่ ม สะอาดลงในแท็ ง ก์ น ้ ำ จนถึ ง ระดั บ สู ง สุ ด (MAX) 2. ใส่ แ ละประกอบอุ ป กรณ์ เ ข้ า กั บ เครื ่ อ ง ทั ้ ง โถแก้ ว กรวย และกรอง 3.
- Page 6 การตั ้ ง เวลาทำงาน ท่ า นสามารถตั ้ ง เวลาเครื ่ อ งชงกาแฟได้ โดยทำตามวิ ธ ี ด ั ง ต่ อ ไปนี ้ (โปรดเตรี ย มขั ้ น ตอนการชงกาแฟข้ อ 1-5 ก่ อ น) 1. ตั ้ ง เวลาปั จ จุ บ ั น (ตามข้ อ 6-7 ในการชงกาแฟ) หมายเหต...
- Page 7 การขจั ด คราบตะกรั น หลั ง จากการใช้ ง านได้ ส ั ก ระยะอาจมี ค ราบตะกรั น บริ เ วณกรวย กรอง โถแก้ ว และแท็ ง ก์ น ้ ำ ซึ ่ ง แสดงถึ ง คุ ณ ภาพ น้ ำ ที ่ ท ่ า นใช้ ท่ า นควรเลื อ กใช้ น ้ ำ ดื ่ ม ที ่ ส ะอาดบริ ส ุ ท ธิ ์ แ ละมี ค วามกระด้ า งต่ พ การขจั ด คราบตะกรั น ทำได้ ด ั ง นี ้ 1.
- Page 8 การรั บ ประกั น เครื ่ อ งเตรี ย มอาหาร Minimex Coffee Maker รุ น MDC3 ระยะเวลารั บ ประกั น 1 ป เงื ่ อ นไขการรั บ ประกั น การรั บ ประกั น ครอบคลุ ม ถึ ง คุ ณ ภาพของสิ น ค า และฝ ม ื อ การประกอบโดยสิ น ค า ต อ งใช ใ น ครั ว เรื อ นเท า นั ้ น...
- Page 9 ช ว ยกั น รั ก ษาสิ ่ ง แวดล อ ม เราขอชี ้ ช วนให้ ท ่ า นร่ ว มรั ก ษาสภาพแวดล้ อ ม ด้ ว ยการทิ ้ ง เศษอุ ป กรณ์ ท ี ่ เ ลิ ก ใช้ แ ล้ ว ณ สถานที ่ เหมาะสม - 9 / ไทย...
-
Page 10: Coffee Maker
C O F F E E M A K E R Instruction Manual COFFEE MAKER Minimex Model : MDC3 Instruction Manual Minimex Coffee Maker Model : MDC3 220V., ~50Hz., 900W. English... -
Page 11: Important Safeguards
IMPORTANT SAFEGUARDS : When using electrical appliance. Basic safety precautions should always be followed including the following: 1. Read all instructions. 2. Make sure that your outlet voltage corresponds to the voltage stated on the rating label of the coffee maker. 3. - Page 12 22. This appliance can be used by children aged from 8 years and above and persons with reduced physical, sensory or mental capabilities or lack of experience and knowledge if they have been given supervision or instruction concerning use of the appliance in a safe way and understand the hazards involved.
-
Page 13: Know Your Coffee Maker
KNOW YOUR COFFEE MAKER Control panel Filter Warmer plate Funnel Funnel Support Carafe lid Tank handle Carafe handle Tank Carafe - 4 / Eng -... -
Page 14: Control Panel
CONTROL PANEL The ON/OFF indicator The PROG indicator LCD Display BEFORE FIRST USE Check that all accessories are complete and the unit is not damaged. Fill water into water tank to the MAX level and brew water for several times without coffee powder, then discard the water. Clean and dry all detachable parts thoroughly according to the section “CLEANING AND MAINTENANCE”... -
Page 15: Using Your Coffee Maker
USING YOUR COFFEE MAKER 1. Open the top cover and fill the water tank with drinking water. The water level should not exceed MAX level as indicated on the water level gauge. 2. Place the funnel into the funnel support, make sure it is assembled correctly, otherwise the top cover cannot be closed. -
Page 16: Delay Function
NOTE : Pay attention to pour the coffee out, otherwise you may be hurt as the temperature of coffee just finished is high. DELAY FUNCTION f you do not want the coffee maker to start operation immediately, for example now it is 8:00, you hope that the coffee maker will automatically start working at 13:00, first follow steps 1 to 5 of “USING YOUR COFFEE MAKER”, and then you can set the automatic start function as follows:... -
Page 17: Cleaning And Maintainance
CLEANING AND MAINTAINANCE CAUTION : Be sure to unplug this appliance before cleaning. To protect against electrical shock, do not immerse cord, plug or unit in water or liquid. After each use, always make sure plug is first removed from wall outlet. 1. -
Page 18: Hints For Great-Tasting Coffee
HINTS FOR GREAT-TASTING COFFEE 1. A clean coffee maker is essential for making great-tasting coffee. Regularly clean the coffee maker as specified in the “CLEANING AND MAINTENANCE” section. Always use fresh, cold water in the coffee maker. 2. Store unused coffee powder in a cool, dry place. After opening a package of coffee powder, reseal it tightly and store it in a refrigerator to maintain its freshness. - Page 19 Customers must present proof of purchase to return the product at the store of purchase only. Service Center If customer need service or information, customer can contact our Minimex Service Center Service Center : Tel. 0-2817-8999, 02-493-6565 Fax : 0-2464-1600 E-mail : SERVICE_minimex@penk.co.th...
- Page 20 ENVIROMENT FRIENDLY DISPOSAL Please dispose of old machines in an environmentally neutral way. Old machines contain valuable materials which should be salvaged for recycling. Please therefore dispose of old machines via your regional collection system - 11 / Eng -...
- Page 21 C O F F E E M A K E R DISTRIBUTOR...
Need help?
Do you have a question about the MDC3 and is the answer not in the manual?
Questions and answers