Advertisement
Electric Standing Desk Instruction Manual
Thank you for choosing this Totnz product! At Totnz, we strive to provide
you with the best quality products and services in the industry. Should
you have any issues, please don't hesitate to contact us.
support@totnz.com
Model:
TZESD6B / TZESD6V / TZESD6N
TZESD7B / TZESD7V / TZESD7N
TZESD8B / TZESD8V / TZESD8N
Rev00(A)
Advertisement
Table of Contents

Related Manuals for Totnz TZESD6B


Summary of Contents for Totnz TZESD6B
- Page 1 TZESD7B / TZESD7V / TZESD7N TZESD8B / TZESD8V / TZESD8N Thank you for choosing this Totnz product! At Totnz, we strive to provide you with the best quality products and services in the industry. Should you have any issues, please don't hesitate to contact us.
-
Page 2: Specifications
Specifications Height Adjustment Range: RATED 27.5” - 46.7” (70cm-118cm) Power Input Max. Speed Operating Noise Load Capacity 100V-240V 25mm/s <50dB 176 lbs / 80 kg Tools Needed (Not lncluded) Drill Phillips Screwdriver Supplied Parts and Hardware for Step 1 M6 x 25 M6 x 16 5/32”... - Page 3 Supplied Parts and Hardware for Step 2 NOTE: Six wood dowel pins will be provided for 55" long desk. 40” / 48” Desktop Panel 55” ST5 x 16 Desktop Panel Connector Wood Dowel Pin Screw Supplied Parts and Hardware for Step 3 ST5 x 16 Holder for AC Adapter AC Adapter...
-
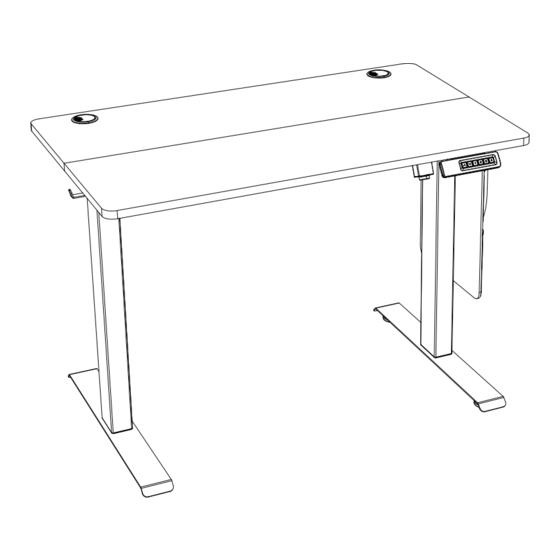
Page 4: Step 1 Assembling The Frame
Step 1 Assembling the Frame Align holes on the crossbar with holes on the desk legs, and insert four bolts. Then fully tighten the bolts one by one, making sure the legs fit into the grooves of the crossbar. - Page 5 While attaching the hook to the groove on the crossbar by hand, attach the side plate outside the hook, and use the bolts to secure them. Then install another side plate. Slide the rod coupler into the end of the short transmission rod on the right leg. NOTE: Make sure the holes for set screws face out.
- Page 6 Fig 1 Adjust uneven desk legs: Before attaching the transmission rod, Fig 2 measure the heights of the two desk legs to see if they are set at the same level. If not, insert the transmission rod into the hole in the left leg. Turn the rod by wrench to adjust the left leg so it's level with the right leg.
- Page 7 Tighten the two set screws on the rod coupler. Before attaching the frame to the desktop, please check whether the rubber pads are fixed on the frame. If they have fallen off, please re-install or use the spare rubber pads to install.
- Page 8 Step 2 Assembling the Desktop For 40" / 48" long desk, use five wood dowel pins to joint. For 55" long desk, use six wood dowel pins to joint.
- Page 9 Secure the desktop panels with the connectors. Phillips Drill Screwdriver (Not Included) (Not Included) You can use a Phillips screwdriver or a drill. If you use a drill, select the proper torque and speed.
- Page 10 Step 3 Attaching the Desktop Attach the frame to the desktop. Phillips Drill Screwdriver (Not Included) (Not Included) You can use a Phillips screwdriver or a drill. If you use a drill, select the proper torque and speed. Put the adapter into the holder.
-
Page 11: Step 4 Connecting The Cables
Attach the controller and adapter with holder to the desktop. You can use a Phillips screwdriver or a drill. If you use a drill, select the proper torque and speed. Step 4 Connecting the Cables Motor Motor Cable Cable Motor Cable Motor Cable... -
Page 12: Step 6 Using The Controller
Step 5 Attaching the Side Pocket Thread the screws through holes in the side pocket and the side plate from the outside, while holding the nuts from the inside of the side plate by hand. Step 6 Using the Controller Note: Please make sure that there are no obstacles when using the desk, that the desktop is not next to the wall, and that all the cables are long enough to move the desk up and... -
Page 13: Lock / Unlock
Raise the Desk Press the button to raise the desk continuously until it reaches the highest position of 46.7” (118cm) or the button is released. Lower the Desk Press the button to lower the desk continuously until it reaches the lowest position of 27.5”... -
Page 14: Troubleshooting
1. The factory default height unit of the desk is set to metric. Change Display 2. Press and hold buttons together for 3 seconds to Height Units switch the digital display unit. When the original digital display unit is metric, it will be switched to the imperial unit, and vice versa. 1. - Page 15 Thank you again choosing this Totnz product! All of us do appreciate your product purchase. We hope that you are as happy with your product as we are designing and manufacturing it for you. We strive to provide you with the best quality products and services in the industry.
Need help?
Do you have a question about the TZESD6B and is the answer not in the manual?
Questions and answers