Table of Contents
Advertisement
Available languages
Available languages
Quick Links
BTI Handwerker-Center Deutschland
HWC Berlin
HWC Leipzig
Lilienthalstraße 6
Pittlerstraße 33
12529 Schönefeld
04159 Leipzig (Wahren)
(Waltersdorf)
Telefon 03 41 / 4 61 23 24
Telefon 0 30 / 6 33 11-5 02
Telefax 03 41 / 4 61 23 26
Telefax 0 30 / 6 33 11-3 27
HWC München
HWC Essen
Schleißheimer Straße 92
Krablerstraße 127
85748 Garching
45326 Essen (Altenessen)
(Hochbrück)
Telefon 02 01 / 33 31 62
Telefon 0 89 / 32 70 80-0
Telefax 02 01 / 36 76 59
Telefax 0 89 / 32 70 80-10
HWC Frankfurt a. M.
HWC Niedernhall
Otto-Hahn-Straße 35
Salzstraße 33
63303 Dreieich
74676 Niedernhall
(Sprendlingen)
Telefon 0 79 40 / 1 41-6 30
Telefon 0 61 03 / 31 15 01
Telefax 0 79 40 / 5 81 58
Telefax 0 61 03 / 31 12 35
BTI Deutschland
BTI Befestigungstechnik GmbH & Co. KG
Salzstraße 51
74653 Ingelfingen, GERMANY
Telefon +49 (0) 79 40 / 1 41-1 41
Telefax +49 (0) 79 40 / 1 41-91 41
info@bti.de • www.bti.de
www.bti-arbeitskleidung.de
www.bti-betriebsausstatttung.de
www.bti-group.com
1 619 P12 704
(2015.03) T / 37
HWC Nürnberg
Brettergartenstraße 16
90427 Nürnberg
(Schniegling)
Telefon 09 11 / 3 23 89-0
Telefax 09 11 / 3 23 89-10
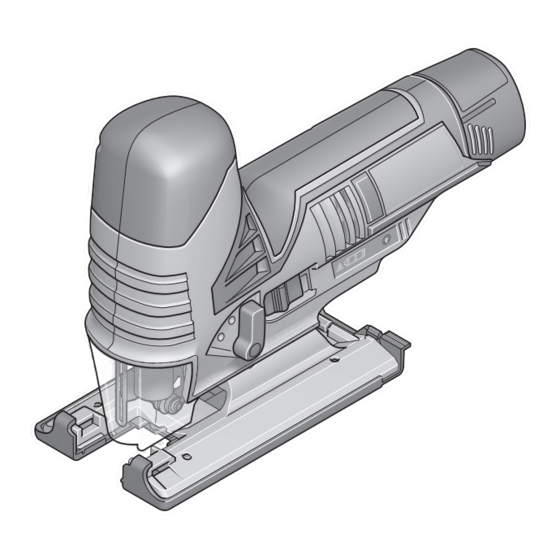
A-ST 10,8 V
Originalbetriebsanleitung
Manual original
Manual original
Original instructions
Präzisionssäge
Sierra de precisión
Serra de precisão
Precision Saw
Advertisement
Table of Contents

Related Manuals for BTI A-ST 10,8 V


Summary of Contents for BTI A-ST 10,8 V
- Page 1 Telefon 0 61 03 / 31 15 01 Telefax 0 79 40 / 5 81 58 Telefax 0 61 03 / 31 12 35 BTI Deutschland BTI Befestigungstechnik GmbH & Co. KG Salzstraße 51 74653 Ingelfingen, GERMANY Telefon +49 (0) 79 40 / 1 41-1 41 Telefax +49 (0) 79 40 / 1 41-91 41 info@bti.de •...
- Page 2 Deutsch......Seite 6 Español ......Página 14 Português .
- Page 3 1 619 P12 704 • 5.3.15...
- Page 4 1 619 P12 704 • 5.3.15...
- Page 5 26 28 1 619 P12 704 • 5.3.15...
-
Page 6: Allgemeine Sicherheitshinweise Für Elektrowerkzeuge
Sicherheitshinweise geeigneten Verlängerungskabels verringert das Risiko eines elektrischen Schlages. Wenn der Betrieb des Elektrowerkzeuges in Allgemeine Sicherheitshinweise für feuchter Umgebung nicht vermeidbar ist, ver- Elektrowerkzeuge wenden Sie einen Fehlerstromschutzschalter. Der Einsatz eines Fehlerstromschutzschalters ver- Lesen Sie alle Sicherheitshinwei- WARNUNG mindert das Risiko eines elektrischen Schlages. - Page 7 arbeiten Sie besser und sicherer im angegebe- Bei falscher Anwendung kann Flüssigkeit aus nen Leistungsbereich. dem Akku austreten. Vermeiden Sie den Kon- takt damit. Bei zufälligem Kontakt mit Wasser Benutzen Sie kein Elektrowerkzeug, dessen abspülen. Wenn die Flüssigkeit in die Augen Schalter defekt ist.
-
Page 8: Bestimmungsgemäßer Gebrauch
Atemwege reizen. 13 Führung für den Parallelanschlag Verwenden Sie den Akku nur in Verbindung 14 Sägeblatt* mit Ihrem BTI Elektrowerkzeug. Nur so wird der 15 Absaughaube Akku vor gefährlicher Überlastung geschützt. 16 Lampe „PowerLight“ Durch spitze Gegenstände wie z.B. Nagel oder 17 Handgriff (isolierte Grifffläche) -
Page 9: Montage
Änderungen entspricht und mit fol- genden Normen übereinstimmt: EN 60745-1, Geräusch-/Vibrationsinformation EN 60745-2-11. Technische Unterlagen (2006/42/EG) bei: A-ST 10,8 V BTI Befestigungstechnik GmbH & Co. KG, Geräuschemissionswerte ermittelt 74653 Ingelfingen, GERMANY entsprechend EN 60745-2-11. Der A-bewertete Geräuschpegel ppa. Stephan Uder ppa. -
Page 10: Sägeblatt Einsetzen/Wechseln
Akku-Ladezustandsanzeige oder Einatmen der Stäube können allergische Reaktionen und/oder Atemwegserkrankungen Die drei grünen LEDs der Akku-Ladezustandsan- des Benutzers oder in der Nähe befindlicher Per- zeige 5 zeigen den Ladezustand des Akkus 1 an. sonen hervorrufen. Die Ladezustandsanzeige leuchtet nur 5 Sekunden Bestimmte Stäube wie Eichen- oder Buchen- nach Inbetriebnahme. -
Page 11: Betrieb
Bei Verwendung des Kunststoffgleitschuhs 12 wird Inbetriebnahme der Spanreißschutz 22 nicht in die Fußplatte 9, son- dern in den Gleitschuh eingesetzt. Akku entnehmen (siehe Bild K) Zur Entnahme des Akkus 1 drücken Sie die Entrie- gelungstasten 2 und ziehen den Akku nach unten Betrieb aus dem Elektrowerkzeug. -
Page 12: Wartung Und Service
Sägeblatt 14 das Werkstück berührt, und Ist sie abgenutzt, muss sie von einer autorisierten schalten Sie es ein. Wählen Sie bei Elektrowerk- BTI-Kundendienststelle ersetzt werden. zeugen mit Hubzahlsteuerung die maximale Hub- Der Kunststoffgleitschuh 12 sollte ersetzt werden, zahl. Drücken Sie das Elektrowerkzeug fest gegen wenn er abgenutzt ist. - Page 13 Elektrowerkzeuges angeben. Nur für EU-Länder: Gemäß der europäischen Richtlinie Service und Kundenberater 2012/19/EU müssen nicht mehr gebrauchsfähige Elektrowerkzeuge BTI Befestigungstechnik GmbH & Co. KG und gemäß der europäischen Richt- Salzstraße 51 linie 2006/66/EG müssen defekte 74653 Ingelfingen, GERMANY oder verbrauchte Akkus/Batterien...
-
Page 14: Instrucciones De Seguridad
Instrucciones de seguridad Mantenga el cable de red alejado del calor, aceite, esquinas cortantes o piezas móviles. Los cables de red dañados o enredados pueden provocar una descarga eléctrica. Advertencias de peligro generales Al trabajar con la herramienta eléctrica a la in- para herramientas eléctricas temperie utilice solamente cables de prolon- gación apropiados para su uso en exteriores. - Page 15 Siempre que sea posible utilizar unos equipos Solamente emplee los acumuladores previs- de aspiración o captación de polvo, asegúrese tos para la herramienta eléctrica. El uso de otro que éstos estén montados y que sean utiliza- tipo de acumuladores puede provocar daños e dos correctamente.
-
Page 16: Descripción Y Prestaciones Del Producto
13 Guía para el tope paralelo Únicamente utilice el acumulador en combina- 14 Hoja de sierra* ción con su herramienta eléctrica BTI. Sola- 15 Caperuza de aspiración mente así queda protegido el acumulador contra una sobrecarga peligrosa. -
Page 17: Datos Técnicos
El nivel de presión sonora típico del siguientes normas: EN 60745-1, EN 60745-2-11. aparato, determinado con un Expediente técnico (2006/42/CE) en: filtro A, asciende a BTI Befestigungstechnik GmbH & Co. KG, Nivel de presión sonora dB(A) 74653 Ingelfingen, GERMANY Nivel de potencia acústica dB(A) ppa. -
Page 18: Carga Del Acumulador
Inserte la hoja de sierra 14 en el émbolo portaútiles Carga del acumulador 11 hasta encalvarla en el mismo. La palanca SDS 18 retrocede automáticamente y la hoja de sierra Utilice únicamente los cargadores que se enu- queda retenida. No fuerce hacia atrás la palanca meran en los datos técnicos. -
Page 19: Modos De Operación
El aspirador debe ser adecuado para el material a Movimiento pendular Sin movimiento trabajar. desconectado (nivel 0): pendular Para aspirar polvo especialmente nocivo para la sa- Movimiento pendular, Movimiento lud, cancerígeno, o polvo seco utilice un aspirador nivel I: pendular pequeño especial. -
Page 20: Instrucciones Para La Operación
Regulación del número de carreras Conexión del LED de iluminación La rueda 4 le permite preseleccionar el nº de carre- Con la tecla 3 puede conectar la luz de trabajo de ras incluso durante la operación del aparato. LED. La luz de trabajo está desconectada en forma estándar. -
Page 21: Mantenimiento Y Servicio
Controle periódicamente el rodillo guía 10. Si estu- viese excesivamente desgastado es necesario ha- Reservado el derecho de modificación. cerlo sustituir por un servicio técnico BTI autorizado. El patín de plástico 12 debería sustituirse, si está desgastado. Si a pesar de los esmerados procesos de fabrica- ción y control, la herramienta eléctrica llegase a... -
Page 22: Indicações De Segurança
Indicações de segurança Se trabalhar com uma ferramenta eléctrica ao ar livre, só deverá utilizar cabos de extensão apropriados para áreas exteriores. A utilização de um cabo de extensão apropriado para áreas Indicações gerais de advertência para exteriores reduz o risco de um choque eléctrico. ferramentas eléctricas ... - Page 23 Utilização e manuseio cuidadoso de ferramentas cos que possam causar um curto-circuito dos eléctricas contactos. Um curto-circuito entre os contactos do acumulador pode ter como consequência Não sobrecarregue o aparelho. Utilize a ferra- queimaduras ou fogo. menta eléctrica apropriada para o seu traba- lho.
-
Page 24: Utilização Conforme As Disposições
7 Interruptor de ligar-desligar Só utilizar o acumulador junto com a sua ferra- menta eléctrica BTI. Só assim é que o seu acu- 8 Alavanca para ajuste do movimento pendular mulador é protegido contra perigosa sobrecarga. 9 Placa de base ... -
Page 25: Dados Técnicos
Os valores de emissão de ruído normas: EN 60745-1, EN 60745-2-11. determinados de acordo com Processo técnico (2006/42/CE) em: EN 60745-2-11. BTI Befestigungstechnik GmbH & Co. KG, O nível de ruído avaliado como A do 74653 Ingelfingen, GERMANY aparelho é tipicamente ppa. Stephan Uder ppa. -
Page 26: Carregar O Acumulador
Introduzir a lâmina de serra (veja figura A) Carregar o acumulador Limpar o encabadouro da lâmina de serra an- tes de introduzí-la. Um encabadouro sujo não Utilize apenas os carregadores listados nos pode ser fixo de forma correcta. dados técnicos. -
Page 27: Tipos De Funcionamento
Para uma aspiração optimizada deverá de prefe- Com a alavanca de ajuste 8 é possível ajustar o mo- rência colocar a protecção contra formação de vimento pendular necessário durante o funciona- aparas 22. mento. O aspirador de pó deve ser apropriado para o ma- Movimento pendular nenhum movimento terial a ser trabalhado. -
Page 28: Indicações De Trabalho
Para poupar energia só deverá ligar a ferramenta estiver descarregado. A ferramenta de trabalho eléctrica quando ela for utilizada. não se movimenta mais. Comandar o n° de cursos Ligar a luz de trabalho LED Com a tecla 3 pode ligar a luz de trabalho LED. Por Com a roda de ajuste para pré-selecção do n°... -
Page 29: Manutenção E Serviço
Se a ferramenta eléctrica falhar apesar de cuidado- sos processos de fabricação e de teste, a repara- ção deverá ser executada por uma oficina de servi- ço autorizada para ferramentas eléctricas BTI. Português | 29 1 619 P12 704 • 5.3.15... -
Page 30: Safety Notes
Safety Notes Use personal protective equipment. Always wear eye protection. Protective equipment such as dust mask, non-skid safety shoes, hard hat, or hearing protection used for appropriate General Power Tool Safety Warnings conditions will reduce personal injuries. Read all safety warnings and all ... -
Page 31: Safety Warnings For Jigsaws
Safety Warnings for Jigsaws Use the battery only in conjunction with your BTI power tool. This measure alone protects the Hold power tool by insulated gripping surfac- battery against dangerous overload. es, when performing an operation where the cutting accessory may contact hidden wiring. -
Page 32: Product Features
Intended Use Technical Data The machine is intended for making separating Cordless Jigsaw A-ST 10,8 V cuts and cut-outs in wood, plastic, metal, ceramic Art. No. 9 078 317 plates and rubber while resting firmly on the work- Rated voltage 10.8... -
Page 33: Declaration Of Conformity
Flashing light 3 x green Empty Technical file (2006/42/EC) at: When no LED lights up after switching on, then the BTI Befestigungstechnik GmbH & Co. KG, battery is defective and must be replaced. 74653 Ingelfingen, GERMANY ppa. Stephan Uder ppa. Christian Hasenest... -
Page 34: Operation
Dust/Chip Extraction Sliding Shoe (see figure F) Dusts from materials such as lead-containing When working with sensitive surfaces, use the plas- coatings, some wood types, minerals and metal tic sliding shoe 12. can be harmful to one’s health. Touching or To put on the plastic sliding shoe 12, place the breathing-in the dusts can cause allergic reac- front edge of the base plate 9 under the nose of the... -
Page 35: Starting Operation
For adjustment of precise mitre angles, swivel the When the LED indicator 6 continuously lights up base plate 9 to the desired position according to red, the temperature of the battery is too high and the scale 25. Every angle can be adjusted to 45 ° the machine switches off automatically. -
Page 36: Maintenance And Service
Lubricate the guide roller 10 occasionally with a drop of oil. Subject to change without notice. Check the guide roller 10 regularly. If worn, it must be replaced through an authorised BTI after-sales service agent. 36 | English 1 619 P12 704 • 5.3.15...
Need help?
Do you have a question about the A-ST 10,8 V and is the answer not in the manual?
Questions and answers