Makita DFS451 Instruction Manual
Hide thumbs
Also See for DFS451:
- Instruction manual (25 pages) ,
- Technical information (14 pages) ,
- Instruction manual (14 pages)
Table of Contents
Advertisement
Available languages
Available languages
Quick Links
Advertisement
Table of Contents

Related Manuals for Makita DFS451


Summary of Contents for Makita DFS451
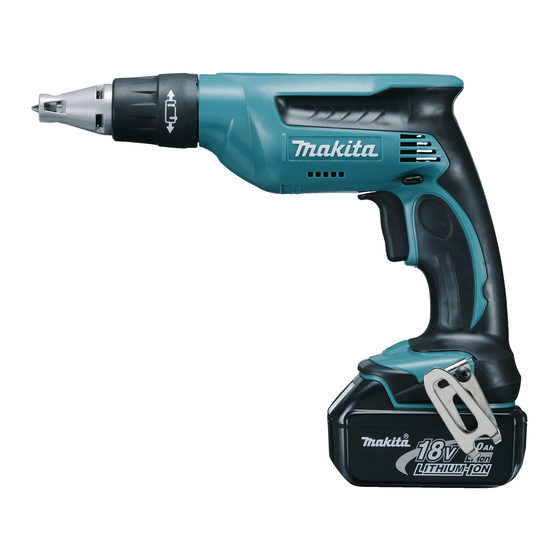
- Page 1 INSTRUCTION MANUAL MANUEL D'INSTRUCTION MANUAL DE INSTRUCCIONES Cordless Screwdriver Visseuse sans Fil Atornillador Inalámbrico DFS451 IMPORTANT: Read Before Using. IMPORTANT : Lire avant usage. IMPORTANTE: Lea antes de usar.
-
Page 2: Specifications
ENGLISH (Original instructions) SPECIFICATIONS Model DFS451 Capacities Drywall screw 4 mm (5/32") No load speed (RPM) 0 - 4,000 /min Overall length With short locator 281 mm (11-1/8") With long locator 296 mm (11-5/8") Net weight 1.5 - 1.8 kg (3.2 - 4.0 lbs) Rated voltage D.C. - Page 3 Use personal protective equipment. Always Keep cutting tools sharp and clean. Properly wear eye protection. Protective equipment such maintained cutting tools with sharp cutting edges as dust mask, non-skid safety shoes, hard hat, or are less likely to bind and are easier to control. hearing protection used for appropriate conditions Use the power tool, accessories and tool bits will reduce personal injuries.
-
Page 4: Cordless Screwdriver Safety Warnings
Makita warranty for the Makita tool and Do not expose battery cartridge to water charger. or rain. -
Page 5: Functional Description
Tips for maintaining maximum CAUTION: battery life • Always switch off the tool before installing or removing of the battery cartridge. Charge the battery cartridge before completely Hold the tool and the battery cartridge firmly discharged. Always stop tool operation and • when installing or removing battery car- charge the battery cartridge when you notice less tool power. -
Page 6: Electric Brake
25% to 50% This tool is equipped with an electric brake. If the tool 0% to 25% consistently fails to quickly stop after switch trigger release, have tool serviced at a Makita service center. Charge the battery. Lighting up the front lamp... -
Page 7: Depth Adjustment
NOTE: 3 mm (1/8") • Use a dry cloth to wipe the dirt off the lens of lamp. Be careful not to scratch the lens of lamp, or it may lower the illumination. Reversing switch action ► 1 . Locator Adjust the locator so that the distance between the tip of the locator and the screw head is approximately 3 mm (1/8") as shown in the figures. Drive a trial screw into your material or a piece of duplicate material. -
Page 8: Operation
To maintain product SAFETY and RELIABILITY, repairs, carbon brush inspection and replacement, any other maintenance or adjustment should be performed by Makita Authorized or Factory Service Centers, always using Makita replacement parts. ► 1 . Groove 2. Hook 3. Screw The hook is convenient for temporarily hanging the tool. -
Page 9: Optional Accessories
The use of any other accessories or attachments might present a risk of injury to persons. Only use accessory or attachment for its stated purpose. If you need any assistance for more details regard- ing these accessories, ask your local Makita Service Center. • Phillips Insert bits •... -
Page 10: Spécifications
FRANÇAIS (Mode d’emploi original) SPÉCIFICATIONS Modèle DFS451 Capacités Vis de plaque de plâtre 4 mm (5/32") Vitesse à vide (RPM) 0 - 4 000 /min Longueur totale Avec positionneur court 281 mm (11-1/8") Avec positionneur long 296 mm (11-5/8") Poids net... - Page 11 Les outils électriques peuvent produire des Utilisation et entretien des outils électriques champs électromagnétiques (CEM) qui ne sont Ne forcez pas l’outil électrique. Utilisez l’outil pas préjudiciables à l’utilisateur. Les utilisa- électrique adéquat suivant le type de travail à teurs de stimulateur cardiaque ou autres appareils effectuer.
- Page 12 N’utilisez un outil électrique qu’avec le bloc-piles Tenez l’outil fermement. conçu spécifiquement pour cet outil. Il y a risque de Gardez les mains éloignées des pièces en blessure ou d’incendie si un autre bloc-piles est utilisé. rotation. Lorsque vous n’utilisez pas le bloc-piles, ran- Ne touchez ni l’embout, ni la pièce à...
-
Page 13: Description Du Fonctionnement
INSTRUCTIONS. ATTENTION : Utilisez exclusivement les bat- teries fabriquées par Makita. Les batteries autres que celles fabriquées par Makita ou les batteries modifiées peuvent exploser et causer un incendie, une blessure ou des dommages. Cela annule aussi la garantie Makita de l’outil et du chargeur Makita. -
Page 14: Protection Contre La Surcharge
Affichage de la charge restante de la ATTENTION : batterie • Mettez toujours l'appareil hors tension avant d'installer ou de retirer la batterie. Uniquement pour les batteries avec voyant • Tenez fermement l'outil et la batterie lors de l'installation ou du retrait de cette dernière. Sinon, l'outil et la batterie pourraient vous glis- ser des mains, ce qui risque d'endommager l'outil et la batterie, ou encore de provoquer des... - Page 15 ATTENTION : Lorsque vous n'utilisez pas l'outil, relâchement de la gâchette, faites-le réparer dans un placez toujours le levier inverseur en position neutre. centre de service après-vente Makita. Réglage de la profondeur Allumage de la lampe avant ► 1 . Positionneur ► 1 . Lampe Vous pouvez régler la profondeur en tournant le positionneur.
- Page 16 3 mm (1/8") ► 1 . Positionneur ► 1 . Positionneur 2. Embout 3. Porte-embout magnétique Réglez le positionneur de sorte que la distance entre le bout du positionneur et la tête de la vis soit d'environ Pour installer l'embout, poussez-le fermement dans le 3 mm (1/8"), tel qu'illustré.
-
Page 17: Accessoires En Option
Pour maintenir la SÉCURITÉ et la FIABILITÉ du pro- duit, les réparations, l'inspection et le remplacement des charbons, et tout autre travail d'entretien ou de réglage doivent être effectués dans une usine ou un centre de service après-vente Makita agréé, exclusive- ment avec des pièces de rechange Makita. 17 FRANÇAIS... -
Page 18: Especificaciones
ESPAÑOL (Instrucciones originales) ESPECIFICACIONES Modelo DFS451 Capacidades Tornillo para pared "sheetrock" 4 mm (5/32") Velocidad sin carga (RPM) 0 - 4 000 r/min Longitud total Con localizador corto 281 mm (11-1/8") Con localizador largo 296 mm (11-5/8") Peso neto 1,5 kg - 1,8 kg (3,2 lbs - 4,0 lbs) Tensión nominal... - Page 19 Si no es posible evitar usar una herramienta Utilice siempre gafas protectoras para prote- eléctrica en condiciones húmedas, utilice un ger sus ojos de lesiones al usar herramientas alimentador protegido con interruptor de cir- eléctricas. Las gafas deben cumplir con la cuito de falla a tierra (ICFT).
- Page 20 Uso y cuidado de la herramienta a batería Asegúrese siempre de pisar sobre suelo firme. Asegúrese de que no haya nadie debajo cuando Recargue sólo con el cargador especificado utilice la herramienta en lugares elevados. por el fabricante. Un cargador que es adecuado para un solo tipo de batería puede generar riesgo Sostenga la herramienta con firmeza.
- Page 21 Siga las regulaciones locales seis meses). relacionadas al desecho de las baterías. 12. Utilice las baterías únicamente con los pro- Símbolos ductos especificados por Makita. Instalar las baterías en productos que no cumplan con los A continuación se muestran los símbolos utilizados requisitos podría ocasionar un incendio, un calen- para la herramienta. tamiento excesivo, una explosión o una fuga de electrolito.
-
Page 22: Descripción Del Funcionamiento
Sistema de protección para la DESCRIPCIÓN DEL herramienta/batería FUNCIONAMIENTO La herramienta está equipada con un sistema de pro- tección para la herramienta/batería. Este sistema corta PRECAUCIÓN: automáticamente la alimentación para prolongar la vida • Asegúrese siempre de que la herramienta esté de la herramienta y la batería. La herramienta se deten- apagada y el cartucho de batería extraído antes drá automáticamente durante la operación si la herra- de realizar cualquier ajuste o comprobación en mienta o la batería se someten a una de las siguientes la herramienta. condiciones: Protección contra sobrecarga Instalación o desmontaje del cartucho de batería Esta protección funciona cuando la herramienta se está utilizando de una manera que causa que consuma una cantidad de corriente inusualmente alta. - Page 23 Apagadas Parpadeando la herramienta dejase de parar enseguida repetidamente después de soltar el gatillo interruptor, pida a un centro 75% a 100% de servicio Makita que le hagan el mantenimiento. Iluminación de la lámpara delantera 50% a 75% 25% a 50% 0% a 25% Cargar la batería.
-
Page 24: Ajuste De La Profundidad
ENSAMBLE PRECAUCIÓN: Confirme siempre la dirección de giro antes de la operación. PRECAUCIÓN: Utilice el conmutador de inver- PRECAUCIÓN: sión solamente después de que la herramienta haya • Asegúrese siempre de que la herramienta esté parado completamente. Si cambia la dirección de apagada y el cartucho de batería extraído antes giro antes de que la herramienta haya parado podrá... -
Page 25: Mantenimiento
El gancho resulta útil para colgar temporalmente la Makita, empleando siempre piezas de repuesto de Makita. herramienta. Se puede instalar en cualquiera de los lados de la herramienta. Para instalar el gancho, insér- telo en una ranura de la carcasa de la herramienta de ACCESORIOS OPCIONALES cualquiera de los lados y después sujételo con un torni-... - Page 28 Para reducir la exposición a estos productos químicos: trabaje en un área bien ventilada y póngase el equipo de seguridad indicado, tal como las máscaras contra polvo que están especialmente diseñadas para filtrar partículas microscópicas. Makita Corporation 3-11-8, Sumiyoshi-cho, 885267F934 Anjo, Aichi 446-8502 Japan...
Need help?
Do you have a question about the DFS451 and is the answer not in the manual?
Questions and answers