
Related Manuals for OTTO MOTORS Lifter V1

Summary of Contents for OTTO MOTORS Lifter V1
- Page 1 English OTTO Lifter V1 - OMM-000111 Operation and maintenance manual OMM-000111 Publication date Jan-23...
- Page 2 Copyright © 2023 CLEARPATH and OTTO Motors are trademarks of Clearpath Robotics Inc. All other product and company names listed are trademarks or trade names of their respective companies. The information provided herein is for general guidance only and is subject to change. For support, please...
-
Page 3: Table Of Contents
OTTO Lifter V1 - OMM-000111 TABLE OF CONTENTS 1. IMPORTANT SAFETY INFORMATION ..................6 1.1. Hazards ........................6 General hazards ......................7 Robot hazards ......................8 Charger hazards ......................9 1.2. Hazard labels ......................10 1.3. Safety awareness ......................12 Facility conditions ...................... - Page 4 8.5. Replacing the OTTO Lifter battery ................45 8.6. Manually charging the OTTO Lifter ................49 8.7. Moving the OTTO Lifter V1 ..................50 8.8. Storing the OTTO Lifter ....................53 8.9. Connecting to a robot using an Ethernet cable .............. 53 8.10.
- Page 5 OTTO Lifter V1 - OMM-000111 Inspecting string pots ....................68 9.4. 3-month preventative maintenance ................68 Lubricating the OTTO Lifter periodically ............... 68 9.5. 6-month preventative maintenance ................68 Brake inspection ......................69 9.6. Annual preventative maintenance ................. 69 Inspecting and refilling hydraulic fluid ................69 10.
-
Page 6: Important Safety Information
OTTO Lifter V1 - OMM-000111 1. IMPORTANT SAFETY INFORMATION The top priority of OTTO Motors is the safety of its users. OTTO Motors produces high power and fast-moving pieces of machinery that could cause serious injury, including death, if improperly used or maintained. -
Page 7: General Hazards
CAUTION • Never operate the product after faulty parts are identified. • Never expose OTTO Motors products to rain, condensation, or standing water. Store products in a clean and dry location. • Use appropriately rated lift equipment and follow safe lifting procedures as defined by the facility when lifting the product. -
Page 8: Robot Hazards
• IMPACT HAZARD! Never bypass the drive wheels of the robot while on a sloped surface. • Never use OTTO Motors products to transport people or live animals. • CRUSH or IMPACT HAZARD! Robots must be prevented from traveling in areas that do not follow Facility Conditions specifications, such as ramps and stairwells. -
Page 9: Charger Hazards
OTTO Lifter V1 - OMM-000111 CAUTION • IMPACT HAZARD! Always maintain a safe distance from a robot in operation. A robot being operated in manual mode should only be operated by personnel who have been trained and authorized according to the standards of the facility in which the robot is in use. -
Page 10: Hazard Labels
1.2. Hazard labels Review the following to learn more about the labels that may be used on OTTO Motors products. Hazards can also apply to attachments and accessories used in conjunction with an OTTO Motors product. - Page 11 OTTO Lifter V1 - OMM-000111 Label Title Description Label Title Description Grounding Improper grounding Pinching risk Keep hands and other electrical of OTTO Motors objects clear of pinch hazard chargers can result in points at all times. a potential shock risk.
-
Page 12: Safety Awareness
Component Overview section of the robot operation and maintenance manual. Personnel present in a facility with OTTO Motors products need to be made aware or be accompanied by personnel who are familiar with the specific risks and hazards associated with automated mobile robots. -
Page 13: Facility Conditions
OTTO Lifter V1 - OMM-000111 • Personnel should be aware that OTTO Motors LiDAR safety scanners are laser products rated class 1/1M. Personnel must not look directly at the laser beam source. • Personnel should keep all loose clothing and body parts away from robots, accessories, attachments, and payloads, while they are in autonomous operation. -
Page 14: Payload Maximums And Stability
For additional information on the operating environment conditions, refer to the System Specifications in the product operation and maintenance manual. • OTTO Motors robots use LiDAR with a wavelength of 905 nanometers, and are designed to operate indoors free of direct sunlight. Infrared light sources (including sunlight, light curtains, welding) may interfere with the operation of robots when shone directly into the robot's optical sensors. -
Page 15: Battery Handling
Refer to the robot Safety Configuration document for the footprint dimensions. OTTO Motors autonomous mobile robots (AMR) use LiDAR to detect potential obstacles and obstacles located above a robot's LiDAR detection plane may not be perceived by a robot. Existing equipment in the facility could be rendered invisible to a robot due to an "overhang", for example a robot with wheels offset... -
Page 16: Safety System Functionality
OTTO Lifter V1 - OMM-000111 Robots capable of 3D perception, either integrated or through use of an equipped 3D Perception Attachment, are better able to detect overhanging obstacles without the presence of perception-assist flaps. • Ideally, installed flaps should touch the floor; however, in instances where the flap can't be installed that close to the floor, the distance between the flap's bottom edge and the floor should not exceed 75 mm. -
Page 17: Emergency Stop System
See the applicable safety configuration for the robot and the MicroScan3 LIDAR Operating Instructions document for more details. Credentialed OTTO Motors platform users can learn more on the OTTO Motors Support Center (login required). -
Page 18: Footprint Safety
OTTO Lifter V1 - OMM-000111 are also disabled while in manual mode. There is a collision risk with objects while driving the OTTO Lifter in manual mode. While controlling the autonomous mobile robot (AMR) using its pendant, there are no speed restrictions and the safety field sets monitored by the LiDAR are disabled. -
Page 19: Disclaimer
OTTO Motors assumes no responsibility for any errors or omissions that may appear in this document. In no event shall OTTO Motors be liable for any costs or damages arising from the use of this document or the hardware and software described within. The reference documents listed in this manual shall be applicable at the latest revision in effect. -
Page 20: Included Items
OTTO Lifter V1 - OMM-000111 IMPORTANT Information in this document related to software functionality is up-to-date as of OTTO Motors software version 2.26. Hardware functionality outlined in this document pertains both to the base platform and the functionality of any of its versions. -
Page 21: Applicable Documents
OTTO Lifter V1 - OMM-000111 4. Applicable documents For additional information, refer to the OTTO Motors Support Center at help.ottomotors.com. © Clearpath Robotics Inc. 2023. All rights reserved. CLEARPATH and OTTO are trademarks of Clearpath Robotics Inc. All other product and company names listed are trademarks or trade names of their respective companies. -
Page 22: In Case Of A Collision
Take photos or make a drawing. If the robot is connected to OTTO Fleet Manager, create a manual snapshot to capture diagnostic information and robot sensor data to assist OTTO Motors in diagnosing the incident cause. Inspect the robot Shut down the robot. -
Page 23: Otto Lifter Specifications
6.1. Size and weight Component Specification Dimensions (L x W x H) OTTO Lifter V1: 2841 x 1201 x 2155 mm (111.9 x 47.3 x 84.8 in) Height (fully-raised forks) 2900 mm (114.2 in) Fork length OTTO Lifter V1: 1234 mm (48.6 in) Fork height OTTO Lifter V1: 58.5 mm (2.3 in) -
Page 24: Speed And Performance
Maximum autonomous mode OTTO Lifter V1: Reference ICD-000112 - Raised pallet pick-up/drop-off raised pick-up/drop-off height interface control document Credentialed OTTO Motors platform users can learn more on the OTTO Motors Support Center (login required). If access is required, contact OTTO Motors Support and they will be happy to answer any questions or provide access. -
Page 25: Battery And Power System
Raised drop-offs with dock target X, Y + / - 10 mm (0.4 in) IMPORTANT Docking accuracy is subject to the deployment. Please speak to an OTTO Motors representative for more information. Pallet positioning tolerance X, Y + / - 200 mm (7.87 in) (pick-up) Yaw + / - 15.0 °... -
Page 26: Operating Environment
IP classification IP20 Operating temperature range 0 °C to 40 °C (32 °F to 104 °F) Please contact OTTO Motors if lower operating temperatures are needed. Non-operating temperature -25 °C to 70 °C (-13 °F to 158 °F) range Operating relative humidity... -
Page 27: Safety System
OTTO Lifter V1 - OMM-000111 Component Specification Sound pressure emissions 83.7 dB (audible indications) level 102.4 dB (horn) 6.7. Safety system Component Specification Intelligent braking Redundant monitoring with safety-system interlock Adaptive field sets Intelligent PL-d rated switching fieldsets (patent-pending) Standards compliance FCC (RF, for example: WiFi, 5G) ;... -
Page 28: Emergency Stop Buttons
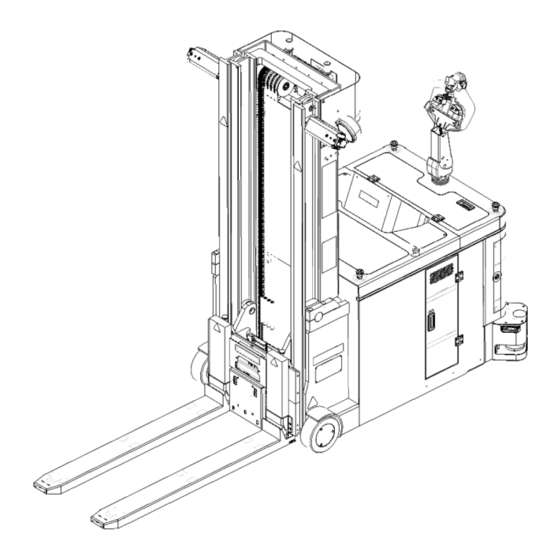
OTTO Lifter V1 - OMM-000111 Robot battery state indicator Safety Reset button Digital interface Auto button Lift points Dome light Direction lights Emergency Stop buttons Light pipe Right side door 3D perception cameras Safety LiDAR Left side door Forks Top door... -
Page 29: Safety Reset Button
OTTO Lifter V1 - OMM-000111 Pressing any of the Emergency Stop buttons will remove power from any motions controls to prevent further movement. Pressing the Safety Reset button when all Emergency Stop buttons are no longer pressed will reset the system and return power to the motion controls. -
Page 30: Digital Interface
Electrical—inspect wiring/connections/terminals/contactors for damage—confirm screw terminals are secure Tiller handle—secure, free of debris, returns to neutral position after use LiDAR safety scanners—clean with an OTTO Motors-approved product 3D perception cameras—clean with an OTTO Motors-supported product Dock assist sensors—clean with an OTTO Motors-supported product Buttons—secure—check visually... -
Page 31: Tiller
OTTO Lifter V1 - OMM-000111 Requires maintenance Nameplate—attached and information matches model, serial number, and attachments 7.7. Tiller The tiller is used by an operator to control the OTTO Lifter autonomous mobile robot (AMR) when it is in manual mode. Operation of the robot acts much like a traditional electric pallet stacker, allowing operators to control forward and reverse travel, raise and lower the forks, and steer the robot. -
Page 32: Forks
OTTO Lifter V1 - OMM-000111 CAUTION PINCH HAZARD! Keep objects and body parts away from pinch points. 7.8. Forks © Clearpath Robotics Inc. 2023. All rights reserved. CLEARPATH and OTTO are trademarks of Clearpath Robotics Inc. All other product and company names listed are trademarks or trade names of their respective companies. -
Page 33: Robot Battery State Indicator
OTTO Motors robots rely on audiovisual indications to warn nearby personnel of their presence, intent, and mode of motion. Ensure that the robot audio volume is at least loud enough that nearby personnel can detect the presence of the robot. - Page 34 OTTO Lifter V1 - OMM-000111 Name Description Visual indication About to The robot is move about to start traveling after White pulses chasing from center to corners an emergency/ safety stop or after not moving for at least 10 seconds.
- Page 35 OTTO Lifter V1 - OMM-000111 Name Description Visual indication Hazard The robot is entering what it considers a Front solid dull white narrow pathway. Rear solid red Safety fields Blinking yellow stripes are reduced in size. WARNING CRUSH HAZARD! Pedestrians should be aware of hazard mode or docking mode audio-visual indications.
-
Page 36: Safety Reset Button States
OTTO Lifter V1 - OMM-000111 Name Description Visual indication Emergency The robot has stop entered an emergency Full flashing red stop state. Failed target The robot has find failed find its target—for Front solid dull white example, a dock or cart. -
Page 37: Direction Lights
Description Dome light state Starting up The robot is on but has not completed the boot cycle. OTTO Lifter V1: Full solid dull white, changing to pink, then purple, then red, indicating a safety stop Normal travel The robot is traveling normally. -
Page 38: Lift Points
OTTO Lifter V1 - OMM-000111 7.15. Lift points The lift points are used to hoist the robot for transport. 7.16. Top door The top door enables access to the inner components of the robot. CAUTION PINCH HAZARD! Keep objects and body parts away from pinch points. -
Page 39: Left Side Door
7.19. Right side door The right side door enables access to the OTTO Lifter V1 autonomous mobile robot (AMR) computer. 7.20. Rear door The rear door enables access to the OTTO Lifter autonomous mobile robot (AMR) drive motor, steering motor, motor controllers, and fans/filters. -
Page 40: Safety Lidar
OTTO Lifter V1 - OMM-000111 At least two of the counterweights (each weighing 11 kg) will need to be removed from above the rear safety scanners before the rear door can be accessed. Remove the 2 x M8 x 100 bolts to detach the counterweights. -
Page 41: Perception Cameras
OTTO Lifter V1 - OMM-000111 connected directly to the drive system to help avoid collisions, preventing the robot from moving if there is an obstacle in the LiDAR field. 7.22. 3D perception cameras The OTTO Lifter autonomous mobile robot (AMR) is equipped with 5 3D perception cameras (located at each LiDAR scanner location) that are used during autonomous navigation to avoid overhanging obstacles. -
Page 42: Thermal Detectors
This section describes the operation of the product. Prior to using the robot, the surrounding area must be approved for autonomous navigation by an OTTO Motors representative. Never use the robot in an area without prior consultation by an OTTO Motors representative. -
Page 43: First Time Otto Lifter Digital Interface Setup
OTTO Lifter V1 - OMM-000111 Lock-out the robot side of the battery connection by covering the battery connection with the lock-out/ tag-out cover bag provided. Lock the bag closed with the provided lock and use the tag provided according to facility standards. -
Page 44: Starting Up The Otto Lifter
OTTO Lifter V1 - OMM-000111 Remove the digital interface from the OTTO Lifter. Removing the OTTO Lifter digital interface Shut down the robot. Remove the 4 x M3 screws from the digital interface cover plate using 2 mm Hex bit. -
Page 45: Shutting Down The Otto Lifter
Electrical—inspect wiring/connections/terminals/contactors for damage—confirm screw terminals are secure Tiller handle—secure, free of debris, returns to neutral position after use LiDAR safety scanners—clean with an OTTO Motors-approved product 3D perception cameras—clean with an OTTO Motors-supported product Dock assist sensors—clean with an OTTO Motors-supported product Buttons—secure—check visually... - Page 46 OTTO Lifter V1 - OMM-000111 CAUTION • Proper PPE must be worn, including safety footwear (ie. steel toe) around OTTO Motors products. • FIRE HAZARD! Chargers and batteries must only be used in a well-ventilated area and must be easily accessible.
- Page 47 OTTO Lifter V1 - OMM-000111 Pull the robot side of the battery connection up and out of the way of the battery compartment. © Clearpath Robotics Inc. 2023. All rights reserved. CLEARPATH and OTTO are trademarks of Clearpath Robotics Inc.
- Page 48 OTTO Lifter V1 - OMM-000111 Using the handle on the battery, pull the battery out of the battery compartment and onto the battery transfer cart. CAUTION PINCH HAZARD! Keep objects and body parts away from pinch points. WARNING CRUSH HAZARD! OTTO Lifter batteries are extremely heavy and can tip easily.
-
Page 49: Manually Charging The Otto Lifter
OTTO Lifter V1 - OMM-000111 11. Return the robot to operation. 8.6. Manually charging the OTTO Lifter The OTTO Lifter autonomous mobile robot (AMR) relies on a manual charger to charge the battery. Always attempt to charge the OTTO Lifter before the robot automatically shuts down at 25% charge level. A low battery exception will be displayed at 30% charge level. -
Page 50: Moving The Otto Lifter V1
Prevent the wheels at the front of the OTTO Lifter V1 from moving, preferably using wheel chocks. With the 4 x 4 in block (at least 48 in length) nearby, raise the back of the OTTO Lifter V1, centered on the tiller, until there is enough space to position the 4 x 4 in block behind the robot drive wheel. - Page 51 Use a long tool to move the 4 x 4 in block to avoid being close to the raised robot. Lower the back of the OTTO Lifter V1 until it is resting on the 4 x 4 in block. Using a forklift, approach the OTTO Lifter V1 from the right side. One of the forklift forks should be positioned directly beside the 4 x 4 in block.
- Page 52 Use a long tool to move the 4 x 4 in block to avoid being close to the raised robot. 10. Lower the OTTO Lifter V1 until it is just above the 4 x 4 in block. Place wheel chocks so the wheels at the front of the robot are prevented from moving when the robot is lowered to the floor.
-
Page 53: Storing The Otto Lifter
OTTO Lifter V1 - OMM-000111 12. Raise the back of the OTTO Lifter V1, centered on the tiller, until there is enough space to remove the 4 x 4 in block. Use a long tool to move the 4 x 4 in block to avoid being close to the raised robot. -
Page 54: Connecting A Robot To A Network
8.11. Adding a robot to a fleet To add a robot to the fleet, a computer must be connected to the OTTO Motors autonomous mobile robot (AMR) and the robot must be connected to the network. It is also assumed that OTTO Fleet Manager has been fully deployed. -
Page 55: Autonomous Operation
OTTO Lifter V1 - OMM-000111 Verify the robot is now connected to OTTO Fleet Manager: In a new browser tab, open OTTO Fleet Manager. Navigate to Monitor > Robots and in the list of fleet robots that is displayed, verify the new robot has been added. -
Page 56: Dispatching Jobs
OTTO Lifter V1 - OMM-000111 CAUTION • CRUSH or IMPACT HAZARD! Keep low profile objects that the LiDAR cannot detect, such as forklift tines and pallets, outside of the robot's path. For sensor layouts, refer to the Component Overview section of the robot operation and maintenance manual. -
Page 57: Manual Mode Operation
OTTO Lifter V1 - OMM-000111 Confirm the robot is clear of obstacles on all sides by at least 1 m, if so, remove them. Confirm there are no obstacles located above or below the forks, if so, remove them. If all the above steps fail to remove the robot from a blocked state, use manual mode to move the robot to a space clear of obstacles, lower the forks to the ground, then restart the job in OTTO Fleet Manager. -
Page 58: Raising And Lowering Forks
OTTO Lifter V1 - OMM-000111 Turn the robot key switch to the Manual position. Perform any manual work required using the tiller with the robot in manual mode. Raising and lowering forks Move the tiller to the middle position. Tiller positions The tiller must be moved to the middle position (A) to operate the robot in manual mode using its tiller. -
Page 59: Using The Horn
OTTO Lifter V1 - OMM-000111 Tiller positions The tiller must be moved to the middle position (A) to operate the robot in manual mode using its tiller. The robot can't operate in autonomous mode when the tiller is in the middle position (A). Autonomous mode requires the tiller to be in a neutral position (B). -
Page 60: Accessing Robot Dashboards
OTTO Lifter V1 - OMM-000111 Robot dashboards can be accessed from any computer or tablet that is connected to the same network as the fleet. Current robot status Current job details, including current and next task Container status Current alerts... -
Page 61: Monitoring Robot Sensors In Robot Dashboard
OTTO Lifter V1 - OMM-000111 Skip Skips the current task; this option is only available when a job has failed and the current task is not the final task in the job Retry Tries running the current task again; this option is only available when a job has failed •... -
Page 62: Exceptions
OTTO Lifter V1 - OMM-000111 • Select Alerts. • Select Sensors. The robot sensors window displays the status of each robot sensor, indicating when operator intervention is required, and potential troubleshooting steps. 8.15. Exceptions The Exceptions menu displays relevant robot alerts, OTTO App, and OTTO Fleet Manager. Nuisance messages—or messages unhelpful to diagnosing exceptions and troubleshooting—are automatically... -
Page 63: Accessing Exceptions In Otto App
If desired, select Show Attributes to display additional detail. Typically the detail shown through clicking Show Attributes will only be useful to advanced users or OTTO Motors Support staff. © Clearpath Robotics Inc. 2023. All rights reserved. CLEARPATH and OTTO are trademarks of Clearpath Robotics Inc. -
Page 64: Filtering Exceptions
OTTO Lifter V1 - OMM-000111 Filtering exceptions Exceptions can be filtered by their severity (error or warning), state (active or resolved), or source using the filter field. Select To filter by Warning- or Error-level exceptions, select Severity. To filter by Active or Resolvedexceptions, select State. -
Page 65: Circle Check
OTTO Lifter V1 - OMM-000111 Component Daily Monthly 3 months 6 months Annually Confirm fork impact sensor functionality Detailed fork inspection Electrical Check the frame leakage (insulation test) Check the electrical system of the drive motor Confirm string pots are tight, free of debris, and in... -
Page 66: Robot On Checks
Electrical—inspect wiring/connections/terminals/contactors for damage—confirm screw terminals are secure Tiller handle—secure, free of debris, returns to neutral position after use LiDAR safety scanners—clean with an OTTO Motors-approved product 3D perception cameras—clean with an OTTO Motors-supported product Dock assist sensors—clean with an OTTO Motors-supported product Buttons—secure—check visually... -
Page 67: Checking The Battery Water Level
• Always use level rigging when lifting or lowering the product. • BURN HAZARD! Do not overfill the battery. CAUTION Proper PPE must be worn, including safety footwear (ie. steel toe) around OTTO Motors products. Open the left side door. -
Page 68: Inspecting And Replacing Otto Lifter Guarding
OTTO Lifter V1 - OMM-000111 Inspecting and replacing OTTO Lifter guarding CAUTION • Never operate the product after faulty parts are identified. Inspect the guarding for damage. If the guarding needs to be removed: Shut down the robot. Remove the fixing screws and remove the guarding carefully. The screws will remain with the guarding. -
Page 69: Brake Inspection
OTTO Lifter V1 - OMM-000111 Brake inspection Visually inspect the brake pad by lifting up the dust protection ring (021966), observing for a build up of foreign material. Check the brake performance and, if necessary, replace the brake disc, or adjust the air gap. - Page 70 Robot travels very slowly Battery is discharged Check the battery status at the robot battery state indicator. Electromagnetic brake is Check the electromagnetic brake and contact OTTO Motors engaged Support. Robot is in docking or hazard Verify map layout is correct and robot hasn't entered docking or mode or it has entered a hazard mode, a Narrow Corridor zone, or a Speed Limit zone.
- Page 71 Remove any dust or debris using OTTO Motors-supported cleaning products. Start up the robot [44]. If all of the above checks fail, contact OTTO Motors Support. Red blinking lights and Robot in emergency stop Confirm that all Emergency Stop buttons are released.
-
Page 72: Robot Forklift Pre-Op Checklist - Omm-000105
Electrical—inspect wiring/connections/terminals/contactors for damage—confirm screw terminals are secure Tiller handle—secure, free of debris, returns to neutral position after use LiDAR safety scanners—clean with an OTTO Motors-approved product 3D perception cameras—clean with an OTTO Motors-supported product Dock assist sensors—clean with an OTTO Motors-supported product Buttons—secure—check visually... -
Page 73: Robot On Checks
OTTO Lifter V1 - OMM-000111 Robot on checks CAUTION Confirm that the robot has sufficient space to test full range of motion when performing the operational inspection as the forks will be raised to their maximum height and the robot will be moving.
Need help?
Do you have a question about the Lifter V1 and is the answer not in the manual?
Questions and answers