
Related Manuals for bintec elmeg D140


Summary of Contents for bintec elmeg D140
- Page 1 Userguide Userguide elmeg D140 Copyright© Version 1.0, 2013 bintec elmeg GmbH elmeg D140...
- Page 2 This manual has been put together with the greatest possible care. However, the information con- tained in this manual is not a guarantee of the properties of your product. bintec elmeg GmbH is only liable within the terms of its conditions of sale and supply and accepts no liability for technical inaccuracies and/or omissions.
-
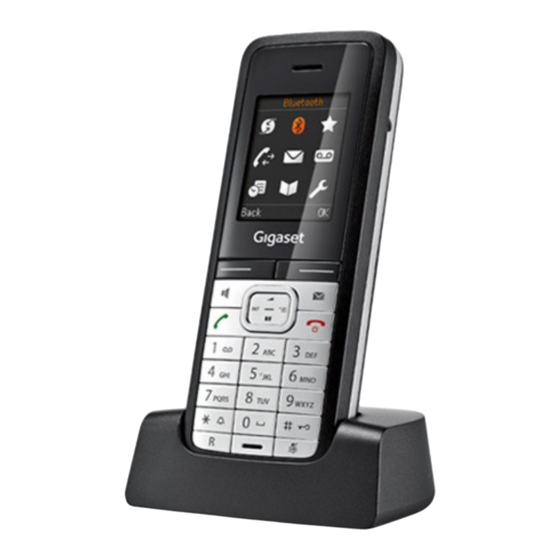
Page 3: Elmeg D140 - Your High-Quality Accessory
¢ saver slide show ( page 32) or change the colour scheme of the display ( page 32). Choose from a selection of ringtones specially composed for your elmeg D140 or load your ¢ own ( page 34). If you don't (always) want it to ring ¢... -
Page 4: Brief Overview
Green: Eco Mode ( page 26) activated Please note ¢ To change the display language, proceed as follows ( page 32): ¢ Press keys slowly one after the other. Select the correct language and press the right display key. elmeg D140... -
Page 5: Display Symbols
Connection established interrupted ¢ ¢ Ø « Ú Ø å Ú External call ( page 19) Internal call ( page 20) ¢ ¢ ¢ ØìÚ ØðÚ ØáÚ Alarm ( page 27) Anniversary ( page 27) Appointment ( page 27) elmeg D140... -
Page 6: Display Keys
Delete key: delete character by Directory Ï character/word by word from Settings right to left. Go back one menu level or can- Back Information on using the menus ¢ cel operation. page 16) ¢ Save entry. Save Menu overview ( page 17) elmeg D140... -
Page 7: Table Of Contents
D140 - your high-quality accessory ........ - Page 8 Contents Setting the alarm clock ............27 Using a handset as a room monitor (Babyphone) .
-
Page 9: Safety Precautions
They will be able to advise you regarding the susceptibility of the device to external sources of high frequency energy. Please refer to the "Appendix" chapter for the specifications of this bintec elmeg product. Do not hold the rear of the handset to your ear when it is ringing or when handsfree mode is activated. -
Page 10: First Steps
Connecting the charger ¤ Connect the flat plug from the power adapter 1. ¤ Plug the power adapter into the plug socket 2. To disconnect the plug from the charger, press the release button and disconnect the plug 4. elmeg D140... -
Page 11: Setting Up The Handset For Use
Inserting the battery and closing the battery cover Please note Use only rechargeable batteries recommended by bintec elmeg GmbH, as this could result in significant health risks and personal injury. For example, the outer casing of the battery could be destroyed or the battery could explode. The phone could also malfunction or be damaged as a result of using batteries that are not of the recommended type. -
Page 12: Registering The Handset
(1) and the base (2). Once the registration process has been completed successfully, the handset returns to idle sta- tus. The handset's internal number is shown in the display, e.g., INT 1. If not, repeat the proce- dure. elmeg D140... - Page 13 – xy xy x{ x{ white: battery charging INT 1 Internal name of the handset ¢ page 26) is activated, the ¼ icon is displayed in the top left corner of the dis- If Eco Mode+ ( play. Your phone is now ready for use! elmeg D140...
-
Page 14: Connecting The Headset
Depending on the operating situation, the key has different functions. In idle status the key opens the main menu. In submenus, selection and input fields, the key takes on the function of the display keys §OK§ §Yes§ §Save§ §Select§ §Change§ elmeg D140... -
Page 15: Using The Menus
If keypad lock is activated, you will see a message when you press a key. Keypad lock deactivates automatically when you receive a call. It is reactivated when the call is finished. Please note When keypad lock is active, you cannot even call emergency numbers. elmeg D140... -
Page 16: Menu Overview
Call Lists (Menu dependent on base) Ë (Menu dependent on base) Ì Voice Mail (Menu dependent on base) á Organizer ¢ Calendar page 26 ¢ Alarm Clock page 27 ¢ Missed Alarms page 27 Â ¢ Directory page 20 elmeg D140... - Page 17 (further submenus dependent on base) • ¢ System Handset Reset page 36 (further submenus dependent on base) ¢ Menu View Simplified page 17 ¢ Complete page 17 Eco Mode Eco Mode (dependent on base) Eco Mode+ (dependent on base) elmeg D140...
-
Page 18: Making Calls
By pressing any key the saved number is dialled. Press the end call key a, to cancel If you wish to place the handset in the charger during a call: the dialling operation or to end the call. elmeg D140... -
Page 19: Switching To Mute
Caller Melody (VIP): All handsets are called. Mark a directory entry as a VIP (Very Important Person) by assigning a specific Ending a call ringtone to it. Prerequisite: Calling Line Press the end call key. Identification Presentation (CLIP). elmeg D140... - Page 20 Bluetooth: Send the complete Delete Entry list in vCard format via Bluetooth. Delete selected entry. Available Memory Display the number of entries that are still ¢ available in the directory ( page 20). elmeg D140...
- Page 21 You can copy numbers displayed in a list, e.g., the call list or the redial list, or in an SMS, to the directory. If you have CNIP, the first 16 characters of the transmitted name are copied to the Sur- name line. elmeg D140...
-
Page 22: Redial List
(dependent on base): š §View§ ing the display key Outgoing calls ( › Accepted calls ( ™ Missed calls ( When in idle status, open the call lists by §Calls§ selecting the display key or via the Ê menu: ¢ elmeg D140... -
Page 23: Message Key Function (Dependent On Base)
Copy to Directory Delete Entry Delete All When you quit the call lists, all entries are set to the status "old", i.e., the next time you call up the list, they will no longer be shown in bold. elmeg D140... -
Page 24: Missed Alarms List
Back Select a list with q. To open, press §OK§ Missed alarms list Missed (unacknowledged) appointments ¢ from the calendar ( page 26) and anniver- ¢ saries ( page 22) are saved in the Missed Alarms list. elmeg D140... -
Page 25: Eco Dect
22) entered in the directory are Signal: automatically recorded in the calendar. Select the reminder type. §Save§ Press the display key. Saving an appointment Prerequisite: the date and time have already been set. Í ¢ ¢ Calendar September 2011 elmeg D140... -
Page 26: Displaying Missed Appointments, Anniversaries
Deleting all appointments for one day ¢ ¢ Melody: §Options§ §OK§ Delete all Appts. Select melody. §Yes§ Confirm the security prompt with §Save§ Press the display key. ¼ All appointments are deleted. In idle status, the icon and wake-up time are displayed. elmeg D140... -
Page 27: Using A Handset As A Room Monitor (Babyphone)
(Two Way Sensitivity: Talk = On or Off). If Two Way Talk is switched Select noise level sensitivity (Low or on, you can answer the room monitor call. High). ¤ §Save§ Press to save the settings. elmeg D140... -
Page 28: Using Bluetooth Devices
If you would like to use a headset with your handset that is already regis- tered to another device (e.g., to a mobile phone), please deactivate this connection before you start the regis- tration process. elmeg D140... - Page 29 ò §Yes§ display key instead of §No§ – Use temporarily: press display key Viewing entries ¢ s (select entry) Open list §View§ Press the display key. Device name and address are displayed. §OK§ Go back with elmeg D140...
-
Page 30: Changing The Bluetooth Name Of The Handset
Press and hold the digit key §OK§ Select an entry and press Press the digit key briefly and press the §QuickDial§ display key The directory opens. ¤ §OK§ Select an entry and press The entry is saved to the corresponding digit key. elmeg D140... -
Page 31: Changing The Display Language
Select screensaver and press ¤ §OK§ Modify the entry: §Save§ Brightness: Press the display key. Briefly press the end call key a to return Select 1 (darkest) to 5 (brightest). §Save§ Press the display key. to the idle display. elmeg D140... -
Page 32: Activating/Deactivating Auto Answer
If t is assigned to another function: Handsfree Profiles §OK§ Select and press §Options§ Open menu. Select handsfree profile (1 to 4). §OK§ Volume Select and press §Select§ Press the display key to save the Configure setting (see above). setting. elmeg D140... -
Page 33: Changing Ringtones
Press and hold the star key. the directory (VIP). The ó icon appears in the display. Reactivating the ringtone Press and hold the star key. Deactivating the ringtone/silent alert for the current call §Silence§ Press the display key. elmeg D140... -
Page 34: Using The Resource Directory
You can set the volume during playback. Select On or Off. §Options§ Open menu. Confirmation: §OK§ Volume Select and press Select On or Off. Set volume. Battery: §Save§ Press the display key. Select On or Off. §Save§ Press the display key. elmeg D140... -
Page 35: Setting Your Own Area Code
You can enter data in the following fields: ¢ ¢ ¢ System Handset Reset Select/change input field. §Yes§ Press the display key. Navigate in the input field. Ñ If necessary, delete number: press the display key. Enter number. §Save§ Press the display key. elmeg D140... -
Page 36: Service (Customer Care)
3. The base is not switched on. ¥ Check the base power adapter. "Please register handset" flashes on the dis- play. Handset has not been registered with the base or has been deregistered. ¥ ¢ Register the handset ( page 13). elmeg D140... -
Page 37: Authorisation
Country-specific requirements have been pal waste stream via designated collection taken into consideration. facilities appointed by the government or We, bintec elmeg GmbH, declare that this the local authorities. device meets the essential requirements This crossed-out wheeled and other relevant regulations laid down in bin symbol on the product Directive 1999/5/EC. -
Page 38: Appendix
75% relative humidity Due to the constant progression in battery development, the list of recommended bat- Bluetooth teries in the FAQ section of the bintec elmeg Radio frequency range 2402–2480 MHz Customer Care pages is regularly updated: Transmission power 4 mW pulse power bintec-elmeg.com... -
Page 39: Writing And Editing Text
Repeatedly press the hash key # to 2) Line break change the text input mode. Writing digits Upper case * Lower case * First letter in capitals, all others in lower case The active mode is indicated at the bottom right of the screen. elmeg D140... -
Page 40: Accessing Additional Functions Via The Pc Interface
PC. ignored. ¤ Remove the USB data cable from the tel- ephone. ¤ ¢ Remove the battery ( page 12). ¤ Replace the battery. ¤ Complete the firmware update as described. elmeg D140... - Page 41 Complete the firmware update as ¤ Remove the USB data cable from the tel- described. ephone. ¤ ¢ Remove the battery ( page 12). ¤ Press and hold keys 4 and L with the index and middle finger. elmeg D140...
-
Page 42: Index
....using quick dial Birthday, see Anniversary ....using the directory elmeg D140... - Page 43 ..... . . deregistering ..... . . end call key elmeg D140...
- Page 44 ... directory entry to handset Missed calls ......elmeg D140...
- Page 45 ..........Writing and editing text elmeg D140...
Need help?
Do you have a question about the D140 and is the answer not in the manual?
Questions and answers