Advertisement
Quick Links
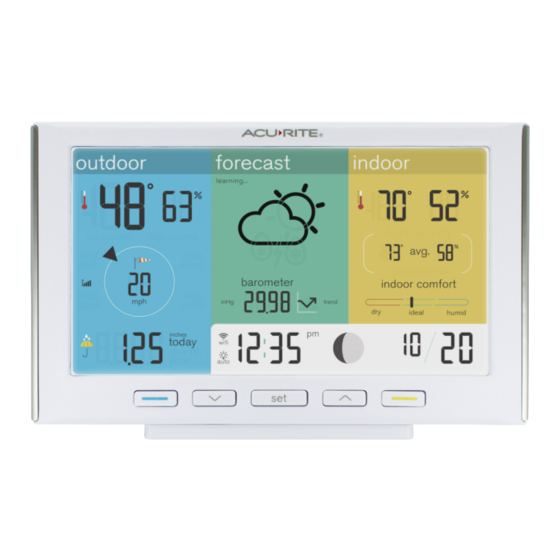
Blue Button
Up Button
Down Button
1
INSTALL SENSOR BATTERIES
In the outdoor sensor battery compartment, install
four AA alkaline or lithium* batteries. If you have the
optional Lightning Detection Sensor, also install four
AA batteries into its battery compartment.
*Lithium batteries recommended for temperatures
below -4°F (-20°C).
NOTE: In the battery compartment of the sensor, there is
a small A-B-C switch that must match the selection on the
display. By default, both the sensor and display are set to
"A" and should not need adjustment.
A B C
A-B-C Switch
Set to match
display
Rain Gauge Stabilizer
Install Batteries
Remove and discard
4 AA Batteries
Set up your AcuRite Iris
Direct-To-Wi-Fi Display 06101M
SETUP REQUIRES:
• Display
• Power Adapter (3 AAA backup batteries recommended)
• AcuRite Iris (5-in-1) Sensor*
*May be sold separately and requires 4 AA batteries
Yellow Button
set Button
PLUG IN DISPLAY AND CONFIGURE
2
•
SETTINGS
Plug in the power adapter. You'll find the port within
the battery compartment in the back of the display.
It is recommend to also install the three AAA backup
batteries at this time.
Once the display is powered on, configuration will
behind automatically. Use the Up
and Down
buttons to select between options, and press the set
button to confirm your selections.
• Clock Hour/Minute
• Month/Day/Year
• Units of Measurements (U.S. Standard/Metric)
You can configure these settings at any time by
pressing the
set
button. Wi-Fi configuration is optional,
but recommended.
3
MOUNT SENSOR
Find a suitable place outdoors to mount the AcuRite
Iris Sensor:
• At least 5 ft. (1.5 m) off the ground
• With the front solar cell facing south
• Away from heat and humidity sources
• Level for accurate rain reporting using
For additional information on the best way to mount your
AcuRite Iris, please refer to the AcuRite Iris instruction
manual or visit: support.acurite.com and navigate to the
AcuRite Iris (5-in-1) Weather Station category.
(5-in-1)
®
If you are interested in accessing your weather data anytime, anywhere online, follow the below steps to push
your weather data to the internet. If you are only interested in viewing your weather data inside your home on
the display, then disregard this section.
Connect to My AcuRite
SETUP REQUIRES:
• Display
• AcuRite Iris Sensor
CONNECT TO DISPLAY'S TEMPORARY
1
NETWORK
Once the display is on:
• Open the Wi-Fi settings of your Wi-Fi-compatible
device and select and connect to the Wi-Fi network
with "AcuRite" in its name.
› If you see any "unsecure network" warnings,
know that it's safe to continue.
› You will not be able to access the internet while
connected to this "AcuRite" network.
2
ACCESS WI-FI SETUP PAGE
Once connected to the Wi-Fi network with "AcuRite"
in its name:
• Open a web browser on the device you used to
connect to the display.
• To access the AcuRite Wi-Fi display setup page,
type the following into the address bar and then
press go/enter/return: 192.168.4.1
• Troubleshooting if the setup page does not load:
› Make sure you are still connected to the AcuRite
Wi-Fi network you connected to in step 1.
› Unplug the display, plug it back in, and try
setup again.
› Contact Support at acurite.com/support
ADDITIONAL NOTES
The Wi-Fi signal on your display is broadcasted for 30 minutes after the display is powered on. Press the set button to
reactivate the Wi-Fi signal broadcast at any time. Please note, however, that the display will not indicate that its Wi-Fi
signal is broadcasting. Check your settings on your setup device for the display's Wi-Fi signal.
To retain Wi-Fi configuration details, backup batteries are strongly recommended for the display. The display can be power
cycled at any time to clear Wi-Fi credentials, records, and other settings. Simply remove the batteries, unplug the display,
replace the batteries, and plug the display back in to power cycle the unit.
Visit acurite.com/support for additional help on Wi-Fi Setup.
with Wi-Fi
®
• Wi-Fi Wireless Network (2.4 GHz networks only, not operable with 5 GHz)
• Phone, Tablet, or Computer with Wi-Fi Access
3
ADD YOUR WI-FI CREDENTIALS
Once the setup page loads:
• Select your personal Wi-Fi network name, enter
your network password, and press Save.
• If Wi-Fi credentials are successfully entered, the
Wi-Fi indicator on the display should appear as:
• Troubleshooting if the setup page does not load:
› If the Wi-Fi icon flashes with a flashing X
— Wi-Fi still needs to be configured on the
display. Repeat Wi-Fi steps 1-3.
› If a flashing X appears above the Wi-Fi icon
— Wi-Fi credentials may be incorrect and should
be reentered. Repeat Wi-Fi steps 1-3.
4
SET UP YOUR MY ACURITE ACCOUNT
Once you see "Successfully connected to your Wi-Fi"
on your device and the Wi-Fi icon on the display fills
in solid black:
• Reconnect your device to your normal, personal
Wi-Fi network.
• Download the My AcuRite app or visit
myacurite.com to complete setup.
› Note: The Device ID needed to set up your product
online is located on the back of the display.
Advertisement

Related Manuals for AcuRite Iris 06101M


Summary of Contents for AcuRite Iris 06101M
- Page 1 • Troubleshooting if the setup page does not load: • Month/Day/Year Wi-Fi network. › Make sure you are still connected to the AcuRite • Units of Measurements (U.S. Standard/Metric) • Download the My AcuRite app or visit Wi-Fi network you connected to in step 1.
- Page 2 WE’RE HERE TO HELP! buttons and set button. For support, visit acurite.com/support. Product manuals, warranty information, and FCC statement available on acurite.com. MY ACURITE Register your product for a one-year limited warranty at: • My AcuRite is compatible with Amazon Alexa and acurite.com/product-registration...
Need help?
Do you have a question about the Iris 06101M and is the answer not in the manual?
Questions and answers