
Related Manuals for ACS ADC Series


Summary of Contents for ACS ADC Series
- Page 1 ADC, ADP, ADW SERIES DRYER HMI OPERATION AND INSTRUCTION MANUAL ADC, ADP, ADW Part Number: 882.04327.00 Revision Date: 07.17.2023 Revision: A ADC, ADP, ADW CONTROLS 882.04327.00 • 07.17.2023...
- Page 2 Write Down Your Serial Numbers Here for Future Reference: _________________________ _________________________ _________________________ _________________________ _________________________ _________________________ We are committed to product improvement. Specifications, appearance, and dimensions described in this manual are subject to change without notice. DCN No. ____________ © Copyright 2023 All rights reserved. ADC, ADP, ADW CONTROLS 882.04327.00 •...
- Page 3 According to the contract terms and conditions of the Carrier, the freight claims are filed by the terms below. If the order is prepaid, ACS Group is responsible for the freight payment. ACS will file the claim with the truck line. We need pictures of the damaged freight and a copy of the delivery receipt marked Damaged Freight.
- Page 4 Please call 262-641-8600. Have the order number and item number available. Hold the items until you receive shipping instructions. Do not return any goods before receiving your RMA (Return Material Authorization) number from ACS. Returns Do not return any goods before receiving your RMA (Return Material Authorization) number and shipping instructions from ACS.
-
Page 5: Table Of Contents
Table of Contents CHAPTER 1: OPERATOR INTERFACE ........1 Main Screen ..........................1 User Management ........................3 POWER USER Parameter Settings ..................... 5 MAINTAINER Parameter Settings ....................5 ACTUAL DATA ....................... 6 SMART MODE ....................... 7 MPM........................8 FEEDING KIT......................9 SETTINGS ......................10 CLOCK AND ON/OFF TIMER MANAGEMENT .............11 WEEKEND TIMER MANAGEMENT ................11... -
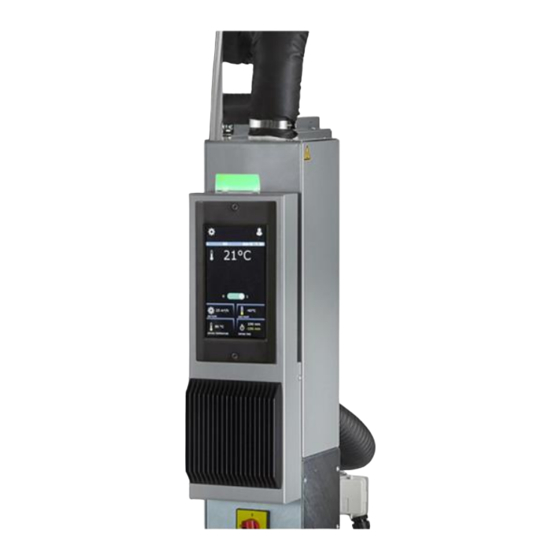
Page 6: Chapter 1: Operator Interface
Chapter 1: Operator Interface Main Screen After turning on, once the starting animation is finished, the following standby screen appears with the main operating parameters. Move the O/I power button (A) to the right to start the dehumidification process and 4 vital parameters to dehumidify the material: AIR FLOW - air flow of the production process (1). - Page 7 If the variables for “SMART MODE” are true, the machine enters “protection” mode and light (7) turns on blue to indicate that the machine is operating in “SMART MODE” protection mode. ADC, ADP, ADW CONTROLS 882.04327.00 • 07.17.2023...
-
Page 8: User Management
User Management Keep the User icon (1) pressed for 3 seconds to access User screen. Guest (Does not require a password) Operator Maintainer If the passwords are deactivated in area (2), the message OPERATOR PASSWORD becomes PASSWORD DISABLED. After entering the correct password: USER: OPERATOR appears if the Operator password is entered USER: MAINTAINER appears if the Maintainer password is entered INVALID PASSWORD appears if the wrong password is entered... - Page 9 USER levels GUEST: Can only access functions that do not require a password (Screen A) POWER USER: Can access advanced functions (Screen B) MAINTAINER: Can access machine maintenance menu (Screen C) All other passwords are set by the customer and define the various other levels. ADC, ADP, ADW CONTROLS 882.04327.00 •...
-
Page 10: Power User Parameter Settings
POWER USER Parameter Settings Press the gear icon (1) Press to activate the SMART MODE function Press to activate the MPM function Press to activate the SLS function WARNING: If SMART MODE is activated and MPM is set to “RETURN AIR TEMPERATURE”, MPM is deactivated and forced to change to “BY DRYING HOPPER LOADER”... -
Page 11: Actual Data
ACTUAL DATA Press ACTUAL DATA (1) to access the Actual Data screen This screen shows the data read by the various temperature probes and meters in the machine. Scroll to view all data. ADC, ADP, ADW CONTROLS 882.04327.00 • 07.17.2023... -
Page 12: Smart Mode
SMART MODE SET Press SMART MODE SET (1) to access Smart Mode settings screen Setting for the return temperature delta compared to the process temperature ADC, ADP, ADW CONTROLS 882.04327.00 • 07.17.2023... -
Page 13: Mpm
Press MPM SET (1) to access MPM overview screen Setting/Display of the type of MPM selected by means of MPM options (B) If the MPM option is OFF, screen (B) is displayed If the MPM option is ON, screen (A) remains locked to “BY DRYING HOPPER LOADER” and the MPM active warning appears Setting for the inactivity time of the loader before decreasing the temperature Setting of the process temperature delta to be lowered... -
Page 14: Feeding Kit
FEEDING KIT Press FEEDING KIT (1) to access Feeding Kit overview screen This screen shows the components of the built-in feeding system. Scroll to view all data. Select the element to be set between the two loaders and a vacuum unit ADC, ADP, ADW CONTROLS 882.04327.00 •... -
Page 15: Settings
SETTINGS Press SETTINGS (1) to access Settings overview screen Select operator interface language Select unit of measure (METRIC or IMPERIAL system) Select between MANUAL and ADVANCED Select type of signals displayed (OFF/ONLY ALARM/ALARMS and WARNINGS) Press background to adjust brightness of the display Value 0 is not available;... -
Page 16: Clock And On/Off Timer Management
CLOCK AND ON/OFF TIMER MANAGEMENT In Settings overview, press Calendar/Clock icon (1) to access Clock and Timer screen Set day/month/year and time Activate/deactivate the weekly timer to schedule start/stop of dryer Activate/deactivate set activities WEEKEND TIMER MANAGEMENT Set dryer date and time (2). Turn Activities on and off (3) Continued operation over multiple days can be set (Ex: turning on the machine Monday morning at 6:30am and turning it off Wednesday evening at 7:30pm) Select to activate/deactivate the weekly repeat (4) -
Page 17: Material Database Management
MATERIAL DATABASE MANAGEMENT Press MATERIAL DATA (1) to access Material Management Database Press to display the list of materials of the standard material database Press to display the list of customized materials Press to display the list of standard and customized materials Press to add a new customized material Press to delete a previously created customized material Indicates materials contained in the standard database... -
Page 18: Password Management
PASSWORD MANAGEMENT Press gears icon (1) to access POWER USER PASSWORD Press gears icon (2) to access MAINTAINER PASSWORD Enter 6-digit code and confirm to modify password The POWER USER password is changed be entering a code (6-digit max) and pressing Enter. Confirm If AUTOLOGIN (3) is off, the POWER USER is always logged in. -
Page 19: Software Updates
SOFTWARE UPDATES 1. Unscrew the touch panel (1) 2. Remove the panel (2) 3. Power off the dryer 4. Insert the USB key in the slot provided and switch on the dryer (3). On the screen, select the filename to be installed. Screen will indicate when old software version is uninstalled, and software update is complete. -
Page 20: Chapter 2: Warranty
Chapter 2: Warranty Customer Satisfaction Warranty Program The terms and conditions of the warranty set forth are for one (1) year from the original date of purchase by the original purchaser. The manufacturer warrants to the original purchaser the product and/or goods to which this disclaimer is attached, and manufactured by us, to be free from defects in material and workmanship under normal use and service. - Page 21 Refer to this manual for assistance in installing and maintaining a highly efficient machine. Questions regarding areas that are not covered in the manual should be referred to the customer service manager at the factory at 262-641-8600. ADC, ADP, ADW CONTROLS 882.04327.00 •...
- Page 22 PARTS SUPPORT ACS welcomes inquiries on all your parts needs and is dedicated to providing excellent customer service. The ACS Customer Service Group will provide your company with genuine OEM quality parts manufactured to engineering design specifications, which will maximize your equipment’s performance and efficiency.
Need help?
Do you have a question about the ADC Series and is the answer not in the manual?
Questions and answers