SunDING SD-558A - Bicycle Accessory Manual
- Manual (1 page) ,
- Installation (2 pages)
Advertisement
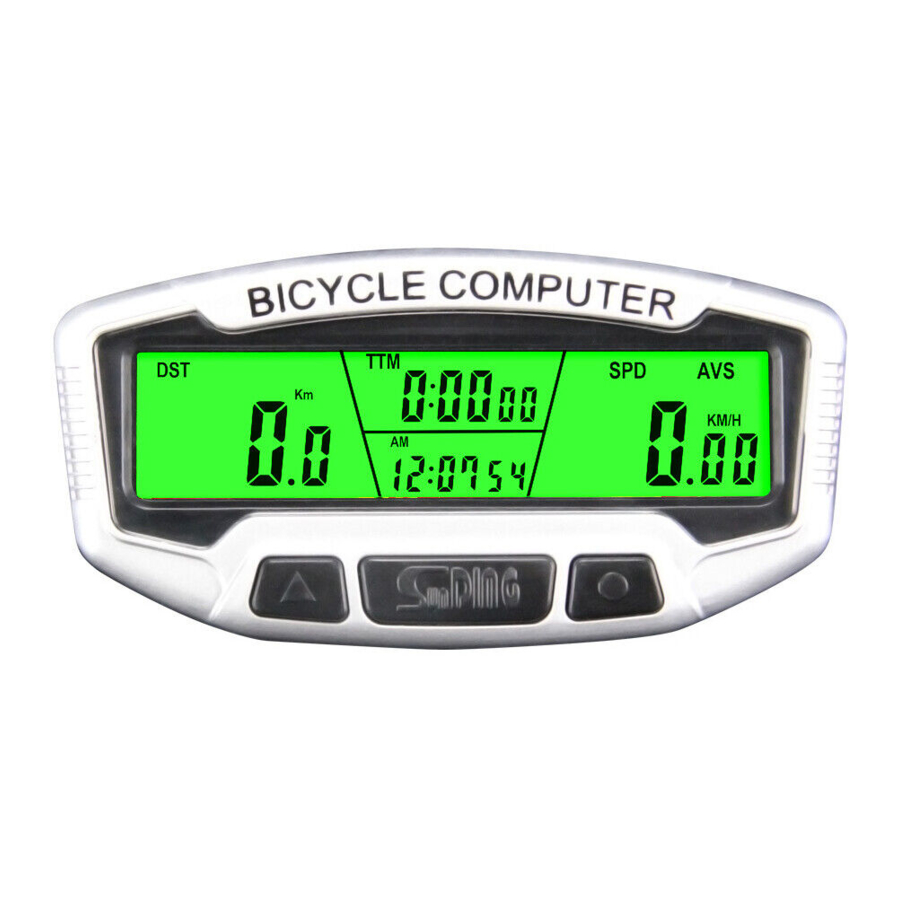
FUNCTIONS ILLUSTRATIONS
- SPD CURRENT SPEED
- ODO ODOMETER ( 0.00 9999 km/m)
- DST TRIP DISTANCE
- MXS MAXIMUM SPEED
- AVS AVERAGE SPEED
- TTM TOTAL TRIP TIME
- TM TRIP TIME
- RAT RIDING ALL TIME
- CLK CLOCK 12H/24H.
- SW STOPWATCH
- TEMPERATURE ( -20 ~7 0 )
- TM UP TRIP TIME UP
- TM DN TRIP TIME DOWN
- TRIP UP TRIP DISTANCE UP
- TRIP DN TRIP DISTANCE DOWN
- COMPARATOR
- Km Mile SELECTION /
- MAINTENANCE ALERT
- CARE REMINDER
- OVER SPEED REMINDER
- SETTING TYRE CIRCUMFERENCE
- SETTING THE LAST VALUE OF ODOMETER / ODO
- SETTING THE LAST VALUE OF TOTAL TIME
- FREEZE FRAME MEMORY
- LCD BACKLIGHT
- LOW BATTERY INDICATOR
- AUTO ON/OFF
HEAD UNIT ILLUSTRATION

 | MAINTENANCE ALERT |
 | CARE REMINDER |
 | COMPAPATOR |
 | LOW BATTERY INDICATOR |
 | UP BUTTON |
 | SET BUTTON |
 | MODE BUTTON |
COMPONENT ILLUSTRATIONS

BATTERY INSTALLATION
Remove the battery cover from the bottom of the computer by using a flat blade screwdriver, install a CR2032battery with the positive (+) pole facing the battery cover and replace the cover. Should the LCD show irregular figures, take out the battery and reinstall it.

INSTATION PROCEDURES
MOUNT BRACKET & HEAD UNIT
Attach the computer to the mounting shoe by sliding the unit until it snaps firmly into its postion. To remove it, press the button on it in the opposite direction. To check for proper speed function and sensor alignment.

WIRELESS TRANSMITTER MAGNET
Attach the sensor transmitter to the left fork blade, the closer the better. Using the shims to adjust the diameter, and using the cable ties(show below) to tie it with the fork. Position the sensor transmitter and magnet as shows, make sure that the arc of the magnet intersects the alignment marked on the sensor transmitter with 1. 5 mm clearance. Alignment, spin. the front wheel with computer in speed mode. Adjust the position of sensor and magnet when there is no or weak reaction.

MAIN UNIT SETUP

MODE INSTRUCTION
When set up the battery, it into the DISPLAY (DST) mode Still press MODE. button, will go into UP or DOWN MODE, The DST MODE is the default one.
ENTER THE DATA SETTING MODE
In the DST and ODO MODE, press SET button for 3 seconds into DATA SETTING MODE.
SET TEMPERATURE (C / F)
When into the DATA SETTING MODE, press UP button to choose C and F. Press SET button to confirm and enter into the CLOCK SET MODE.
")
SET 12/24 CLOCK
Press UP button to set 12 24hour / exchange Press the SET button to. confirm and enter to Hour setting, when the figure indicating HOUR start to flash, press the UP button to adjust it. Continue to press the SET button to enter Minute Second setting mode, press the UP button to adjust it, Upon completion press SET button to set the wheel size

SET WHEEL SIZE
Default wheel circumference setting is 2080mm Choose correct wheel circumference figure from Reference. Chart Press. UP Button to advance as needed and SET button to confirm and advance. (Range 0 9999mm)

| TIRE SIZE | CIRC | TIRE SIZE | CIRC TIRE SIZE | CIRC | |
| 700CX38mm | 2180 | 650CX23mm | 1990 | 26 "x1.75" | 2035 |
| 700CX35mm | 2168 | 650CX20mm | 1945 | 26 "X1.5" | 1985 |
| 700Cx32mm | 2155 | 27 "x1-1/4" | 2161 | 26 "X1.25" | 1953 |
| 700Cx30mm | 2145 | 27 "x1-1/8 " | 2155 | 26 "X1.0" | 1913 |
| 700Cx28mm | 2136 | 26 "x2.3" | 2135 | 24 "x1.9 " | 1916 |
| 700Cx25mm | 2124 | 26 "x2.25" | 2115 | 20 "x1-1/4" | 1618 |
| 700Cx23mm | 2105 | 26 "x2.1" | 2095 | 1 6 "X2.0" | 1253 |
| 700Cx20mm | 2074 | 26 "x2.0" | 2074 | 1 6 "X1.95" | 1257 |
| 700CxTubular | 2130 | 26 "X1.9" | 2055 | 1 6 "X1.5" | 1206 |
If the wheel size is not on the chart or if you want a more precise, calibration wheel circumference maybe calculated as following Mark the, : tire and a spot on the floor Roll the wheel forward acomplete revolution. until the tire mark touches the floor against and mark the spot Measure. the distance betwen the marks on floor in millimeters and enter the result into the computer. (1 inch = 2.54mm)
SET (KM/H) / (M/H)
After circumference setting it enters, to ( km/h or m/h setting mode. Press the UP button to select the km h or m h Press the SET button / /. to confirm and enter ODO SET mode
 / (M/H)")
SET ODOMETER
Press UP button to adjust the flashing. ODO rercord. Press SET button to advance. The default number is 0000 (range 0 9999kms/ miles). when the ODO setting is finished press SET button to, RAT mode.

SET RAT
When in RAT mode, press UP button to adjust press SET button to advance. the default number is 00: 00: 00 (range 0'9999Hrs). when the RAT setting finished press SET button to DISPLAY mode.

SET TM UP AND TRIP UP
When in DISPLAY mode, press MODE button enter to TM UP AND TRIP UP mode press SET button for 3 seconds to enter into TM UP AND TRIP UP SET mode. Press UP button to adjust, press SET button to advance. The TM UP default number is 00:00:00 (range: 0-99. 99. 99Hrs). the TRIP UP default number is 000. 0 (range: 000. 0-999. 9kms/miles). Press "SET" back to TM UP AND TRIP UP mode.

SET TM DOWN AND TRIP DOWN
When TM UP AND TRIP UP mode, press SET button to enter into TM DN AND TRIP DN mode. Press SET button for 3 seconds to enter into TM DN AND TRIP DN SET. Press UP button to adjust, press SET button to advance. The TM DN default number is 00:00:00 (range: 0°99:99:99Hrs). the TRIP DN defaultis 000. 0(range: 0-999. 9kms/miles). Press SET back to TM DN AND TRIP DN MODE.

RETURN TO FACTORY SETTING
In any mode press SET and UP button for 5 seconds clear all the data except CLOCK Put off battery will clear all the datas and return to factory setting
FUNCTION
SPD
Speed is shown all the time on the screen, its maximum reading is 99.9 km/h(m/h), and it's accurate to +/- 0.1km(m/n).
SPD CONTAST
During riding, "![]() "' and '
"' and '![]() ' indicates the current speed is higher or lower than average speed(AVS).
' indicates the current speed is higher or lower than average speed(AVS).
ODO
In ODO mode, the total distance is indicated on the screen, its mileage range is 0.00 9999km(m). The display will be back to 0 when value exceeds its maximum limit.
DST
In DST mode, the distance for one trip is indicated on the bottom line. DST ranges from 0 9999km(m),when the value exceed the range limit, it restarts from 0 automatically Both the time and the distance records will be cleared when the time of one trip exceed the range limit.
MAX SPD
In MXS mode, maximum speed is indicated on the bottom line.
AVS
In AVS mode, average speed is indicated on the bottom line.
TM
In TM mode, trip time is indicated on the top line. TM ranges 0:00:00-99:59:59. It will be back to 0 when value exceed the limits.
TTM
All riding time TTM ranges 0:00:00-9999hr.
RAT
Total elapsed time RAT. ranges 0:00:00-9999hr.
STOPWATCH
In DST or ODO mode Press SET button, STOPWATCH appears. Start stopwatch with UP button, press UP button again and the watch stops, with another UP button it starts again. Press SET button again, the watch goes to zero.
SLEEP MODE
If no signal has been inputted for 300 seconds, computer will enter into Sleep Mode automaticly but, CLK remains. It will turn back to the former mode with all the data collected when any signal is inputted or any button is pressed.
BACK LIGHT
The backlight function is switched on when you press any buttons during PM: 17:00 - AM:08: 00, and switch off automaticly in seconds. It will not work at any other time.
TEMPERATURE
The range for the temperature is as follows: - 20C - 70C or - 4F - 158F
OVER SPEED REMINDER
When the SPD > 20KM/H, the SPD will be shining when the speed < 20KMH it will stop.
MAINTENANCE ALERT
When the ODO 500 > KM, the  will be shining, press both UP and MODE at same time it, will clear .
CARE REMINDER
When the ODO 300 > KM, the  will be shining, press both SET and MODE at same time will clear .
FREEZE FRAME MEMORY
Press the UP button in any MODE (Except STOPWATCH mode will enter into freeze frame memory mode). Flashing TM data will appear on the screen.the display will show the records of DST TTM or TM SPD Go on press the UP button will exit this mode.
MALFUNCTIONS AND PROBLEMS
KMH NO DISPLAY
- Improper magnet/sensor alignment.
Inaccurate value is indicated
- Improperly input, such as wheel circumference.
Slow display response
- Temperature exceeds operating limits (0ºc-55ºC).
Black display
- Temperature too high, or display exposed to direct. sunlight for too long.
Display readout fades
- Poor battery contact or dead battery.
Display shows irregular figures
- Take out battery and re-install it after 10 seconds..
Abnormal sound when shaking computer
- Rolling Ball switch voice/ shaking the computer in sleep mode, computer auto wake-up.

Documents / ResourcesDownload manual
Here you can download full pdf version of manual, it may contain additional safety instructions, warranty information, FCC rules, etc.
Advertisement


Need help?
Do you have a question about the SD-558A and is the answer not in the manual?
Questions and answers