Sage the Smoking Gun BSM600 / SSM600 - Hand Cooking Smoker Manual
- Manual (64 pages) ,
- Quick manual (40 pages) ,
- Instruction book (12 pages)
Advertisement
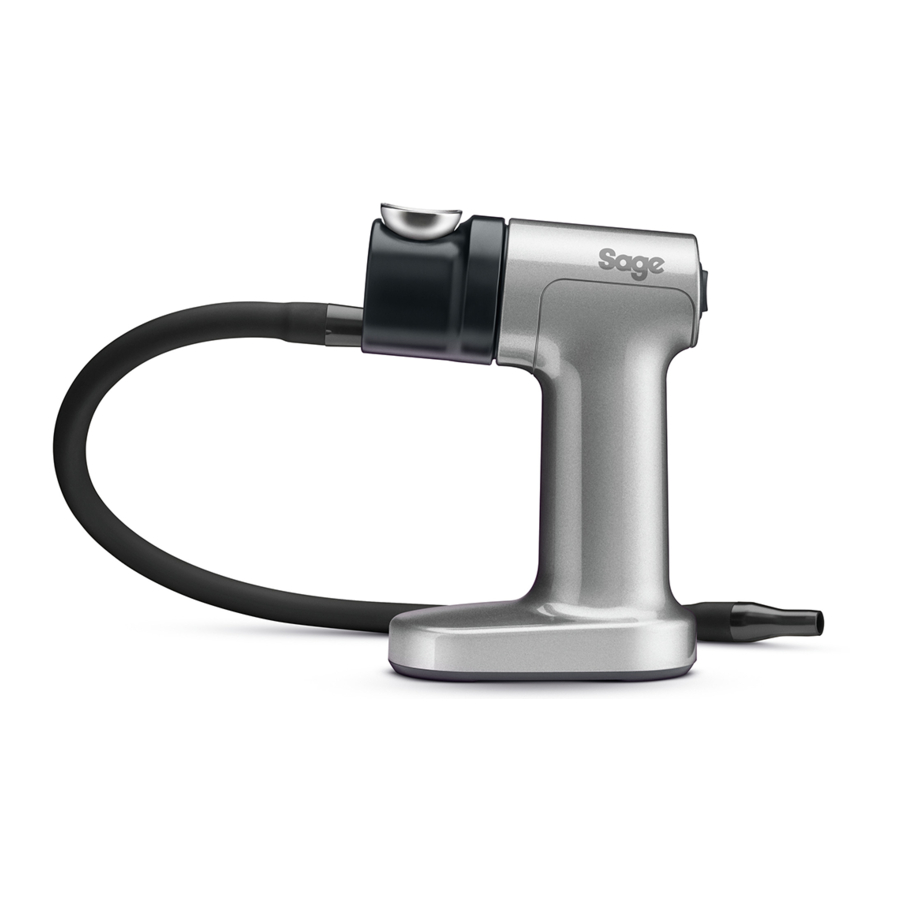
Components

- On / off switch
- Removable burn chamber
- Removable mesh filter
- Die-cast barrel
- Silicone hose
- Robust housing
- Battery operated
Rating Information
6V  (4x1.5V AA Batteries)
Assembly
- Place the mesh filter in the top of the burn chamber and press down with a finger to seat it into the bottom of the burn chamber.
- Place the burn chamber into the barrel. Push down until the spring around the burn chamber provides a small click sensation.
![]()
- Press the larger plastic end on the silicone hose firmly into the round hole on the front of the barrel.

BATTERIES
Use 4 x AA (1.5V alkaline) batteries only.
(No rechargeable batteries)
- Remove battery cover from underside of unit by sliding clip towards rear and rotating outwards.
- Insert batteries into cavity with orientation to match the outer face of the battery cover.
- Replace battery cover and press to snap into place.
Functions
BEFORE FIRST USE
Wipe the burn chamber and mesh filter with a damp cloth.
OPERATION
- Place a small amount of wood chips (or desired smoking materials) into the burn chamber.
NOTE
Do not overfill the burn chamber. The wood chips should just cover the mesh filter area with a thin layer. - Press down the power switch located on the rear of the main unit, to activate the fan at high speed. This position is designated by 2 lines = on the switch.
| - Low Speed | O Off | = High Speed |
| To smoulder the wood chips and generate smoke. | For greater airflow to assist in initially igniting wood chips. |
- Use a handheld lighter or match to apply a flame to the top surface of the wood chips. Move the flame around to ignite the entire exposed surface. For best results make sure the burning area is evenly distributed or centred.

Maintain the presence of the lighter for a period of time sufficient to start ignition only. Excessive heat may cause damage to the unit.
- Once the smoke is seen exiting the end of the hose, depress the top of the switch to maintain the fan on low speed (designated by 1 line –). Allow the wood chips to smoulder and direct the smoke to where required.
- When sufficient smoke has been generated or wood chips are extinguished, return the switch the central position to turn the fan off (designated by a circle O).
- Allow the unit to cool completely after burning has completed.
- When cooled completely the burn chamber can be removed by pulling it free of the barrel.
 NOTE
NOTE
Invert the burn chamber and tap on a solid surface to remove any remaining wood chips or ash.
It is recommended to clean the burn chamber prior to re-assembly.
Tips
- Only 3 minutes under smoke is all that is needed to provide smoke flavour and aroma for meats, fish, fruits, or vegetables after cooking. Simply place the food in a covered casserole, stockpot, Dutch oven, or other covered dish / pan and inject smoke under the lid.
- Don't place hose directly in the food. Place it just slightly above.
- Continuous smoking with the Smoking Gun is NOT required.
- Ensure the unit has had sufficient time to cool before reloading and operating additional burn cycles if required.
- Use wood chips that have been specifically prepared for the purpose of smoking – these timbers will have been dried to the correct level and will produce less resinous materials in the smoke output from the unit.
Care & Cleaning
- Before cleaning, make sure the unit is completely cooled down and power switch is positioned to off position.
- Remove the burn chamber from the barrel. Invert the burn chamber and tap on a solid surface to remove any remaining wood chips or ash. The burn chamber may be cleaned by hand with warm soapy water or by placing in a dishwasher.
- Wipe the barrel clean if residue is visible.
- Mesh filter can be cleaned with warm soapy water and small brush as required.
- Clean hose and tube ends in warm soapy water as required.
- Use damp cloth to clean the main unit.
Do not immerse in water.
NOTE
- Do not use unit without the burn chamber present.
- Do not use unit if there is no mesh filter in the burn chamber.
- Cannot be used to bubble through liquid.
- Remove the batteries if the device is not to be used for a long period of time.
- Allow the unit to cool completely between consecutive burns.
NOTE
Replace mesh filter if it becomes clogged.
Filter specification: No.20 US Sieve Size
[Ø19.0mm (¾ inch), stainless steel 304].
Resin may stain hands, handle parts with caution.
Visit www.sageappliances.com to order more wood chips.
Troubleshooting
| POSSIBLE PROBLEM | EASY SOLUTION |
Fan not starting |
|
No smoke generated |
|
Not enough smoke |
|

Documents / Resources
References
Download manual
Here you can download full pdf version of manual, it may contain additional safety instructions, warranty information, FCC rules, etc.
Download Sage the Smoking Gun BSM600 / SSM600 - Hand Cooking Smoker Manual
Advertisement


Need help?
Do you have a question about the the Smoking Gun BSM600 and is the answer not in the manual?
Questions and answers